When you use a Letter type of Print Template to print details dispatched to a Contact, Talisma provides an option to create an Interaction for each Contact to whom the merged Print Template will be dispatched. This enables Talisma to track Print Template communication that occurs between a Talisma User and a Contact.
For each Contact, the merged document is included in the Conversation pane of the Interaction as an attachment.
To Create an Interaction from a Print Template
1. From your Workspace's Contact table view, select the required Contacts and then select Print From Template from the File menu.
- OR -
Right-click the selected Contacts and select Print From Template from the shortcut menu.
- OR -
Open the required Contact and select Print From Template from the File menu.
The Select Print Template dialog box is displayed. Print Templates created with the Contact Object as the base Object are listed.
2. Select the relevant Print Template and click OK.
The Print and Interaction Options dialog box is displayed.
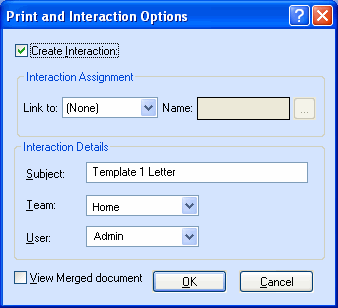
The Print and Interaction Options Dialog Box
3. Click Create Interaction. The fields in the Print and Interaction Options dialog box are enabled.
4. From the Link to list, select the Object with which you want to link the Interaction. The following Objects are available for selection: Lead, Enrollment, Campaign, Opportunity, and Order.
|
Note If Talisma Higher Education Foundation is not installed, the Link to list displays only the Campaign, Opportunity, and Order Objects. |
5. In the Name field, click  .
.
The Set Object dialog box is displayed.
|
Note The Link to and Name fields are disabled when you select multiple Contacts and select the Print From Template option. |
6. In the Set <Object> dialog box, search for the Object item you want to set. Select the Object item in the Results pane and click Set.
The selected Object item is displayed as a link in the Name field. You can click the link to view the Object item in the Object window.
7. In the Subject field, the text <Name of the selected Print Template> Letter is displayed by default. You can modify this text.
Text specified in this field will be set in the Subject field of the created Interactions.
8. In the Team list, a list of all Teams in the Talisma system is displayed. Select the Team to which the Interactions must belong.
9. Values in the User list are displayed based on the following scenarios:
◦ When you have access to the Team selected in step In the Team list, a list of all Teams in the Talisma system is displayed. Select the Team to which the Interactions must belong.:
◦ If the Assign/Transfer Interaction Permission is enabled for the logged in User - By default, the logged in User is selected in the User list. You can select a different User to whom you want to assign the Interaction(s) that are created as a result of the merge operation.
◦ User Object Properties in the Print Template are merged based on the selected User.
◦ If the Assign/Transfer Interaction Permission is not enabled for the logged in User - By default, the value None is selected. Further, the name of the logged in User is not listed in the User list. Select a User for whom the Assign/Transfer Interaction Permission is enabled. Interactions created as a result of the merge operation will be assigned to the selected User.
User Object Properties in the Print Template are merged based on the selected User.
If the value None is not changed, User Object Properties are not merged in the MS Word document that is attached to the new Interaction(s).
◦ When you do not have access to the Team selected in step In the Team list, a list of all Teams in the Talisma system is displayed. Select the Team to which the Interactions must belong., content will be displayed identical to the scenario where the User’s access is enabled in the selected Team, and the Assign/Transfer Interaction Permission is not enabled.
|
Note If the Assign/Transfer Interaction Permission is enabled and you select None in the User list, User Object Properties in the Print Template will not be merged in the MS Word document that is attached to the new Interaction. |
10. Click OK.
A message is displayed that prompts you to click Set Lead, Set Enrollment, or Continue. The message is displayed if all the following conditions are satisfied:
◦ Talisma Higher Education Foundation is installed.
◦ The Prompt User(s) to associate an Interaction with Lead or Enrollment option in the Global Options page in Talisma Business Administrator is set to Yes.
◦ While logging a Message, you do not specify values in the Link to and Name fields.
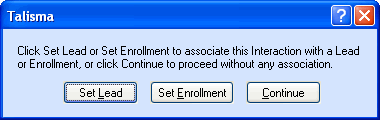
The Prompt to Link Interaction With a Lead or Enrollment
a. Click Set Lead.
The Set Lead dialog box is displayed. Search for a Lead and select the Lead in the Results pane.
b. Click Set or double-click a Lead.
The Print and Interaction Options dialog box is displayed and the selected Lead is linked to the Interaction.
- OR -
a. Click Set Enrollment.
The Set Enrollment window is displayed. Search for an Enrollment and select the Enrollment in the Results pane.
b. Click Set or double-click an Enrollment.
The Print and Interaction Options dialog box is displayed and the selected Enrollment is linked to the Interaction.
- OR -
Click Continue to log the Interaction without linking it to any Object item.
The Print and Interaction Options dialog box is displayed.
11. Click OK.
Interactions are created in the Talisma system.
|
Note The Interaction created through Media Property of Interaction(s) created using a Print Template is set to Letter. |
When the create Interaction operation is complete, the Contact Table View is displayed if you selected multiple Contacts in the Contact Table View. The Contact window is displayed if you performed the operation from the Contact window.
You can navigate to the Interaction Table View and work with the created Interactions.
|
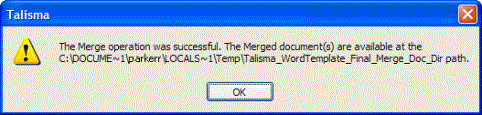
Note • If you select View Merged document, in addition to performing the create Interaction operation, an MS Word document is displayed with merged details of all selected Contact(s). If View Merged document is not selected, while the create Interaction operation is performed, the following message is displayed with details of the location of the merged MS Word document(s):
By default, the folder specified in the message is hidden. To view the MS Word document(s), enable the display of the folder and navigate to the folder path. Open the required document to view merged details. Based on the count of selected Contacts, the same number of merged MS Word document(s) is created in the specified path. If the View Merged document option is selected, an additional document is created with merged details of all selected Contact(s). |
|
Note • In the Print and Interaction Options dialog box, if you click OK without selecting the Create Interaction option, while Interaction(s) are not created for the selected Contacts, values of the Contact Properties are merged and displayed in MS Word. • While Print Templates of type Label are also available in the Select Print Template dialog box, the functionality of creating Interactions from Label type of Print Templates is not supported. • Printing content with a custom color configured as the background color of the print template page is not supported. |