Document Synchronization Status
A Document Sync record (under Reference Data > Global) is created for each document / attachment that is pushed from Anthology Reach to the Document Imaging System.
The Document Sync record stores the integration details of the document integrated with the Document Imaging System, which are as follows:
-
Document type
-
Document ID
-
Document URL
-
Drawer
-
Document Sync Status
The Document Sync Status field in the Document Sync record indicates the integration status of the document and the entity attributes synchronized with the Document Imaging System. It can have one of the following values:
-
Ready
-
Processing
-
Uploaded
-
Retrieve
-
Failure
-
Delete
Scenario to Change the Status of Document Sync Record to Ready
In a scenario where the Document Sync Status is Processing for more than one day (i.e. the document was not successfully synced with the Document Imaging System or is stuck in the Processing status), institutions can create a scheduled custom flow to automatically change the status of a Document Sync record to Ready.
Steps to Create a Scheduled Custom Flow to Update the Document Sync Status to Ready
-
Login to make.powerapps.com.
-
Select an environment, click Solutions, select an unmanaged solution.
-
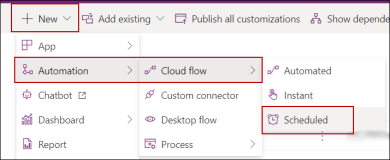
In the unmanaged solution page, click New > Automation > Cloud flow > Scheduled.
-
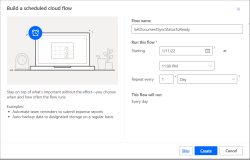
In the Build a scheduled cloud flow page, specify the name, and the recurrence details such that the flow is triggered in the non-peak hours, and click Create.
-
In the Flow page, click New Step.
-
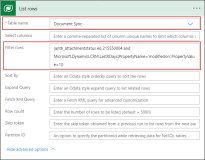
In the Choose an operation dialog, click Microsoft Dataverse > List rows.
-
In the Table name field select Document Sync from the drop-down list and click the Show advanced options link.
-
In the Filter rows field, paste the following text:
(anth_attachmentstatus eq 215550004 and Microsoft.Dynamics.CRM.LastXDays(PropertyName='modifiedon',PropertyValue=1))
-
Click New Step.
-
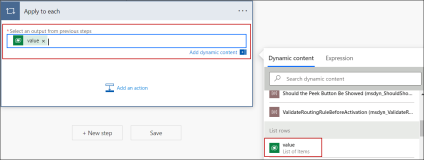
In the Choose an operation dialog, click Control, and in the Actions tab, click Apply to each.
-
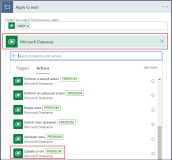
In the Apply to each step, select value from the dynamic content and click Add an action.
-
In the Choose an operation, click Microsoft Dataverse > select Update a row.
-
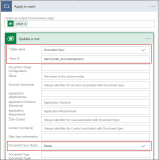
In the Update a row action:
-
In the Table name field, select Document Sync.
-
In the Row ID field, specify item()['anth_documentsyncid'].
-
In the Document Sync Status field, select Ready.
-
-
Click Save.
