About Success Network Assignment
It is important for the Higher Ed institution to have their students feel connected. At the same time the student also needs to know who their important networks are. For example, who is the student’s admissions representative or their advisor in the institution. Further, the various areas of campus such as Career Services, Student Life, Residential Hall Leaders, financial aid advisors, etc. are also possible connections that could help a student.
Using Success Network, these relationships can be made and shown to the student on the portal or for a Reach user in CRM to understand who else is related to a student and how.
The Success Network Assignment feature provides an ability to create or deactivate Success Network records in bulk based on a defined criteria. The criteria can include the staff member(s) to be assigned to a specific segment of Students, and also define how the student and staff member will be related. For example, a new Advisor is required to be assigned to all the new students who have recently got enrolled.
Reach administrators can create the following two types of Success Network Assignment records:
An Assign Type of Success Network Assignment
An Assign type of Success Network Assignment record is used to perform bulk assignment of Success Network records to student records as follows:
-
Student Group Based Assignment
When the Enrollment Driven Success Network field is set to No, the system does not reference individual enrollment records for assignments. Instead, the process is driven by Student Groups (Marketing Lists) - students grouped together based on shared attributes or segmentation criteria, such as program, intake term, geographic region, or stage in the admissions cycle. These groups serve as the foundation for bulk assignments, allowing Success Networks to be allocated efficiently to a broad set of students without evaluating each enrollment separately.
For example, if an advisor needs to be assigned to all first-year Engineering students, the system can use a Student Group that includes all these students. Once the process runs, each student in that group will automatically receive a Success Network record with the appropriate staff member and role assigned, streamlining the workflow and saving significant administrative effort.
-
Enrollment Based Assignment
When the Enrollment Driven Success Network field is Yes in the Success Network Assignment record:
In this scenario, the assignment logic is based on a query condition based on the Enrollment entity instead of the Student Groups. Administrator can define filters and criteria directly on Enrollment attributes to accurately target specific enrollments.
Based on the matching Enrollment records, the system identifies the associated Contact and assigns Success Network members with the Staff member and Role combination selected in the Staff Member / Group field.
-
In Anthology Reach, navigate to Process Config > Success Network > Success Network Assignment.
-
Click New.
The New Success Network Assignment page is displayed.
-
In the Type field select Assign.
-
In the Enrollment-Driven Assignment field, select one of the following values:
-
Yes - Indicates the Success Network Assignment is enrollment-driven.
-
No - Indicates the Success Network Assignment is not enrollment-driven.
-
-
In the Staff Member/Group, select a Staff Member Group Name.
or
 Create a New Staff Member Group
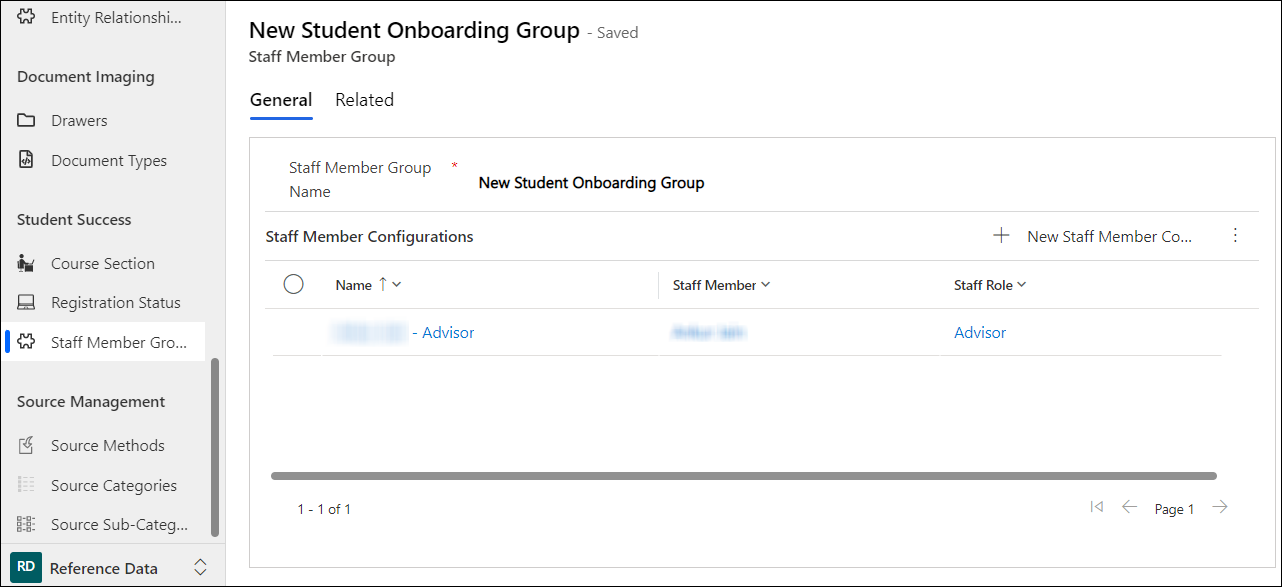
Note: A Staff Member Group comprises of a combination of a Staff member and a Role, required for creating Success Network records. A Staff Member Group can include more than one Staff Member.
-
Navigate to the New Staff Member Group page.
-
Specify a name in the Staff Member Group Name field and click Save.
-
In the Staff Member Configurations section, click New Staff Member Configuration.
-
In the New Staff Member Configuration page, select a value in the Staff Member and Role fields.
-
Click Save.
The new Staff Member Configuration is added to the Staff Member Configurations section in the Staff Member Group.
-
Repeat steps iii through v to add more staff member configurations.
Use Case for Creating a Success Network With a Group of Staff Members
-
A team of staff members called Student Onboarding Team is assigned to each new Student.
-
The Onboarding team has different staff members who play different roles: Academic Advisor, Coach, Advisor etc.
-
New students are distributed into various segments based on their attributes.
-
Each Student group /segment is assigned to an Onboarding Team.
-
The Onboarding group is assigned only for 3 months.

-
-
-
In the Publish Status field, select one of the following values:
-
Draft - Indicates the Success Network Assignment is not ready for processing.
-
Live - Indicates the Success Network Assignment is ready to be picked up by the Success Network flow until the End Date field
-
Processed - Indicates the Success Network Assignment will be picked up by the Success Network flow until the End Date.
-
Deactivated - Indicates the Success Network Assignment has been deactivated and will no longer be picked up by the Success Network flow.
-
-
In the Status field, select one of the following values:
-
Active - Indicates the Success Network Assignment is active.
-
Inactive - Indicates the Success Network Assignment is inactive.
-
-
(Optional) In the End Date section, select a date in the End Date field.
The Success Network flow will run recurrently until the date configured in the End Date field. Additionally, the End Date selected in the Success Network Assignment record is used to update the end date of the child Success Network records that are created from the Success Network Assignment record.
-
Click Save.
-
When the Enrollment-Driven Assignment field is No, in the Student Groups section, add a Marketing List for which the Success Network record needs to be created.
-
When the Enrollment-Driven Assignment field is Yes, select the Query Condition tab and use one of the following options to create a query.
Option 1 - Create a Query Condition Based on Enrollment records
The following steps enable you to define the query logic which will be used for shortlisting the records.
Prerequisite-
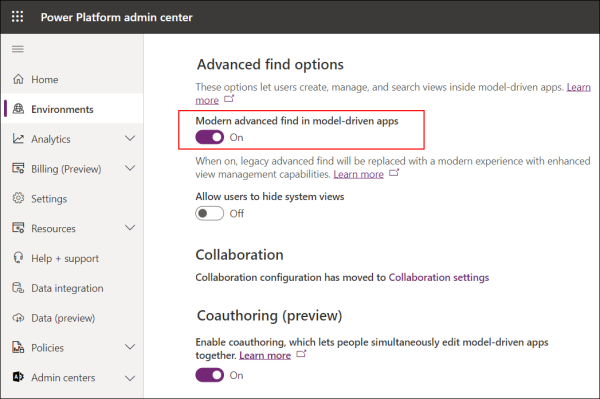
The Modern advanced find in model-driven apps setting is On (under the Power Platform admin center page > Environments > Anthology Reach environment > Settings >Feature).
-
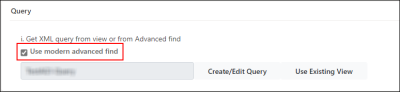
The Use modern advanced find check box must be selected.
-
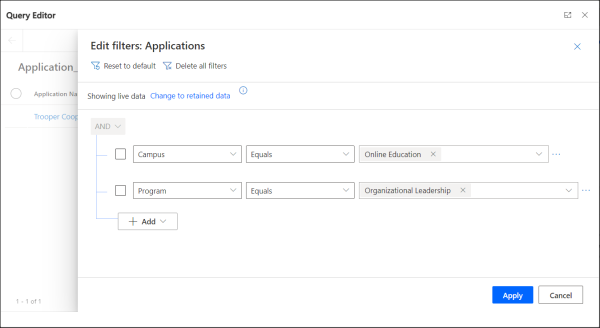
Click Create/Edit Query to view the Query Editor page.
Note: Do not change the default view, Temp_<view name>, that is populated by default in the Query Editor page. -
Click the Edit Filters button.
-
Configure the filter conditions that align with the logic to shortlist the records.
-
Click the Apply button.
The Query Editor page is displayed.
-
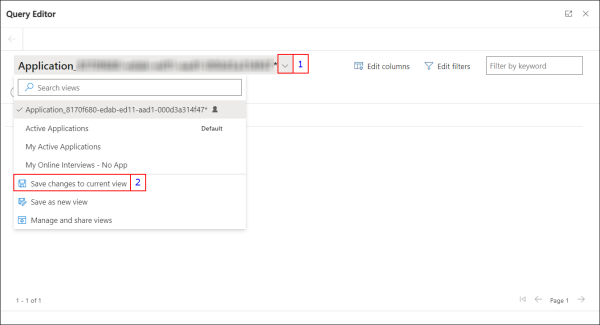
Click the drop-down next to the view name and select Save changes to current view.
-
Close the dialog.
XML details of the query will be listed in the Query XML area.
-
If required, modify the displayed XML conditions and then click Save. Ensure that manual modifications to the XML conditions are error-free.
Option 2 - Create a Query Based on an Existing View of the Enrollment Entity
The following steps enable you to use an existing view that contains applicable logic.
-
Click Use Existing View.
-
From the list, select the view and then click Use Query.
Note:
-
The drop-down list displays the default system views and personal views created by the logged in user.
-
The Nearby Contact query filters saved by the logged-in user, will not be available for selection in this drop-down list.
Conditions defined in the view will be displayed in the Query XML area.
-
- If required, modify the displayed XML conditions and then click Save. Ensure that manual modifications to the XML conditions are error-free.
-
-
Click Save.
After an Assign type of Success Network Assignment record is Live, i.e. the Publish Status is set to Live, the Success Network flow picks up the Success Network Assignment record and creates the Success Network records for the selected students.
The Success Network flow runs recurrently based on the recurrence configured in the flow until the date configured in the End Date field of the Success Network Assignment record. For more information, see Success Network Flows.
The fields in the Success Network record created by an Assign type of Success Network Assignment display the following values:
-
The Originating Success Network Assignment field is populated with the Success Network Assignment name from which the Success Network record was created. This helps in determining which Success Network record was created by which Success Network Assignment record.
-
The Student field displays the Contact record. When created with an Enrollment driven Success Network Assignment, the Student field displays the Contact associated with the Enrollment.
-
The assigned Staff Member and Staff Role, as defined in the Staff Member Group in the Success Network Assignment.
-
The Enrollment field displays the corresponding Enrollment record configured in the Query Condition in the Success Network Assignment record.
An Un-Assign Type of Success Network Assignment
An Un-Assign type of Success Network Assignment record is used for bulk deactivation of the Success Network records as follows:
-
When the Enrollment Driven Success Network field is Yes in the Success Network Assignment record:
Based on the matching enrollment records, the system identifies all Success Network records created for the selected enrollments, along with the Staff Member and Role combination selected in the Staff Member/Group field, and then unassigns or deactivates them.
-
When the Enrollment Driven Success Network field is No in the Success Network Assignment record:
The Un-Assign type of Success Network Assignment record deactivates the Success Network records that match the Staff Member and Role present in the Staff Member/Group field in the Success Network Assignment record.
If Student Group(s) are added to the Un-Assign type of Success Network Assignment record the Success Network flow will remove the Success Network records from the students in the Student Group(s) that match the criteria of the Staff Member and Role.
Note: To unassign all Success Network records solely based on the Staff Member and Role combination (regardless of Enrollment), create the Un-Assign Success Network Assignment record with the following field values:
-
Select the appropriate Staff Member Group.
-
Set the Enrollment Driven Success Network field as No.
-
Do not configure the Student Group.
If Student Group(s) are not added to the Un-Assign type of Success Network Assignment record the Success Network flow will check all the existing Success Network records that have the same Staff Member And Role that are selected in the Staff Member Group and will deactivate them.
For information about Success Network flows, see Success Network Flows.
-
In Anthology Reach, navigate to Process Config > Success Network > Success Network Assignment.
-
Click New.
The New Success Network Assignment page is displayed.
-
In the Type field select Un-Assign.
-
In the Enrollment-Driven Assignment field, select one of the following values:
-
Yes - Indicates the Success Network Assignment is enrollment-driven.
-
No - Indicates the Success Network Assignment is not enrollment-driven.
-
-
In the Staff Member/Group, select a Staff Member Group Name.
or
Create a New Staff Member Group
Note: A Staff Member Group consists of a combination of a Staff member and a Role, required for creating Success Network records. A Staff Member Group can include more than one Staff Member.
-
Navigate to the New Staff Member Group page.
-
Specify a name in the Staff Member Group Name field and click Save.
-
In the Staff Member Configurations section, click New Staff Member Configuration.
-
In the New Staff Member Configuration page, select a value in the Staff Member and Role fields.
-
Click Save.
The new Staff Member Configuration is added to the Staff Member Configurations section.
-
Repeat steps iii through v to add more staff member configurations.
Use Case for Creating a Success Network With a Group of Staff Members
-
A team of staff members called Student Onboarding Team is assigned to each new Student.
-
The Onboarding team has different staff members who play different roles: Academic Advisor, Coach, Advisor etc.
-
New students are distributed into various segments based on their attributes.
-
Each Student group /segment is assigned to an Onboarding Team.
-
The Onboarding group is assigned only for 3 months.
-
-
-
In the Publish Status field, select one of the following values:
-
Draft - Indicates the Success Network Assignment is not ready for processing.
-
Live - Indicates the Success Network Assignment is ready to be picked up by the Success Network - Deactivate Success Network based on Un-assign criteria flow.
-
Processed - Indicates the Success Network Assignment has been picked up by the Success Network - Deactivate Success Network based on Un-assign criteria flow.
-
Deactivated - Indicates the Success Network Assignment has been deactivated and will no longer be picked up by the Success Network - Deactivate Success Network based on Un-assign criteria flow.
-
-
In the Status field, select one of the following values:
-
Active - Indicates the Success Network Assignment is active.
-
Inactive - Indicates the Success Network Assignment is inactive.
-
-
Click Save.
-
When the Enrollment-Driven Assignment field is No, in the Student Groups section, add a Marketing List for which the Success Network record needs to be unassigned.
-
When the Enrollment-Driven Assignment field is Yes, select the Query Condition tab and use one of the following options to create a query.
Option 1 - Create a Query Condition Based on Enrollment records
The following steps enable you to define the query logic which will be used for shortlisting the records.
Prerequisite-
The Modern advanced find in model-driven apps setting is On (under the Power Platform admin center page > Environments > Anthology Reach environment > Settings >Feature).
-
The Use modern advanced find check box must be selected.
-
Click Create/Edit Query to view the Query Editor page.
Note: Do not change the default view, Temp_<view name>, that is populated by default in the Query Editor page. -
Click the Edit Filters button.
-
Configure the filter conditions that align with the logic to shortlist the records.
-
Click the Apply button.
The Query Editor page is displayed.
-
Click the drop-down next to the view name and select Save changes to current view.
-
Close the dialog.
XML details of the query will be listed in the Query XML area.
-
If required, modify the displayed XML conditions and then click Save. Ensure that manual modifications to the XML conditions are error-free.
Option 2 - Create a Query Based on an Existing View of the Enrollment Entity
The following steps enable you to use an existing view that contains applicable logic.
-
Click Use Existing View.
-
From the list, select the view and then click Use Query.
Note:
-
The drop-down list displays the default system views and personal views created by the logged in user.
-
The Nearby Contact query filters saved by the logged-in user, will not be available for selection in this drop-down list.
Conditions defined in the view will be displayed in the Query XML area.
-
- If required, modify the displayed XML conditions and then click Save. Ensure that manual modifications to the XML conditions are error-free.
-
-
Click Save.
After an Un-Assign type of Success Network Assignment record is created, the Success Network flow is triggered when the Publish Status is set to Live for the Success Network Assignment record.
Best Practices
-
The End Date for the Success Network Record
-
It is recommended to populate the End Date of a Success Network record. This will ensure automatic deactivation of expired success network records, which will help in improving system performance.
-
-
Success Network Assignment & Duplicate Check
-
When success networks are created from a Success Network Assignment record, duplicate check of success network records is limited to the records which were previously created by the same Success Network Assignment record. Anthology Reach allows the creation of same Success Network records by another Success Network Assignment.
Therefore, it is recommended to create Success Network Assignment with a unique purpose or the Marketing List criteria should be mutually exclusive to avoid creation of duplicates.
-
Duplicate check is performed when a user manually creates a Success Network record.
-
-
Marketing Lists
-
The recommended maximum size for a Marketing List is 10k students, to manage the performance load better.
-
-
The OOTB Success Network Flows
-
It is recommended to not make changes to the OOTB Success Network Flows. For information about Success Network flows, see Success Network Flows.
-