Export/Import
The Export/Import tile on the Forms Builder home page links to a workspace that allows you to export and import sequences and associated workflows from one environment to another. For example, you may have created and tested sequences in a staging environment. You then export the sequences from the staging environment to a network location and later import them into the production environment.
If sequences have been translated in the staging environment, the .po files for the localized sequences need to be transferred to the production environment using the Import Translation tab in the Internationalization workspace of Form Designer. For more details see Internationalization.
Note
Custom Bootstrap and Kendo themes applied on sequences imported into Forms Builder in a previous version will be overwritten with the following default settings in version 4.1:
-
Theme-Bootstrap – Lumena
-
Theme-Kendo - Silver
In addition, if custom themes were used, after uploading the custom theme’s .css and images to the database, update the affected sequences by selecting the same .css file in the Theme-Custom Content property of Sequence Designer. For more information, see Remove Local Custom Content (version 3.8).
Prerequisites
The application databases in the source and target systems must be identically configured regarding School Defined Fields (SDFs) in Anthology Student and Custom properties/objects in CampusNexus CRM. If import sequences with SDFs or Custom fields are defined only in the export environment, an error will be seen when the sequence is rendered in the new environment and a user attempts to enter a value for an undefined SDF or Custom field.
The Forms Builder environment must be identically configured regarding the integration of CampusNexus CRM and/or Anthology Student. The export/import process does not check for mismatched environment entities. For example, the export/import process will not detect if a sequence from a CampusNexus CRM environment is imported into an Anthology Student environment. The sequence will fail when rendered.
Export Sequences
-
On the Forms Builder home page, click the Export/Import tile.
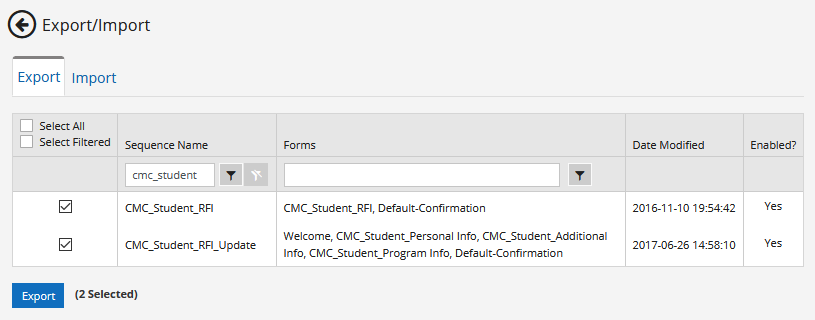
The Export tab is displayed by default. It contains a grid listing sequence names, forms contained with the sequences, the date modified, and the workflow status.

-
Use one of the following options to select sequences. The number of selected sequences will be displayed next to the Export button.
-
Click Select All.
-
Use the column filters to narrow your search and click Select Filtered.
-
Clear "Select All" and "Select Filtered" and select individual sequences.
Check the Enabled column to determine if the workflow for a sequence is enabled. Only sequences that have enabled workflows can be exported.
-
-
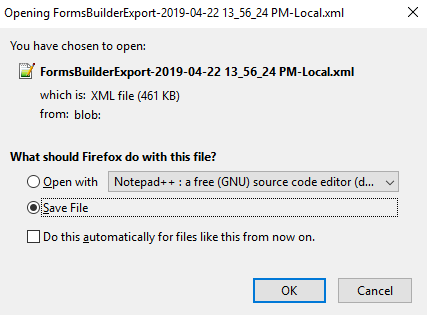
Click Export. When export is complete, your browser displays a message with the name of the export file.

-
Select Save File and click OK to save the export file to the \Downloads folder on your local machine. You can copy the file to a new name or location if desired; just note that it must remain an .xml type file.
Forms Builder creates an export file in XML format and makes the file available as a stream on the server. The export file is saved with the specified name in the specified location. The export file contains the Forms Builder version and the export date.
For every sequence that is exported, data from the following tables is saved:
- Formsbuilder.Sequence
- Formsbuilder.Form
- WorkflowDefinition
- WorkflowDefinitionVersion
The data from the above tables include Name, Title, Description, JSON, XAML and so on. The Ids, DateCreated/Modified are not in the export file and will be generated on import. The exported sequences carry with them any saved Forms Builder elements and configurations required by the sequence (e.g., fields, components, properties, and workflow definitions). End state form data for each sequence is included in the export file.
Import Sequences
- On the Forms Builder home page, click the Export/Import tile.
-
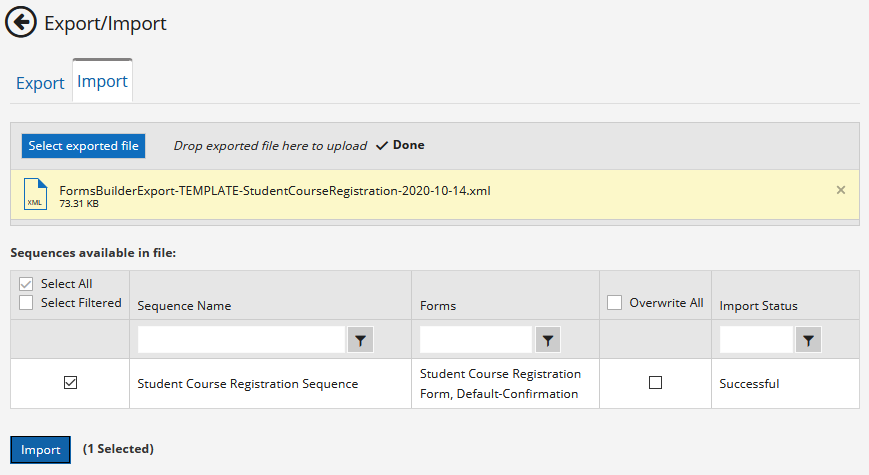
Select the Import tab, click Select exported file, and navigate to the location where the export file was saved.
After selecting the export file, the sequences that are available for import are listed in the grid.
-
Use one of the following options to select sequences. The number of selected sequences will be displayed next to the Import button.
-
Click Select All.
-
Use the column filters to narrow your search and click Select Filtered.
-
Clear "Select All" and "Select Filtered" and select individual sequences.
-
-
If you want to force an overwrite of sequences and workflows with the same name, select the check box in the header of the Overwrite All column OR select this option for individual sequences.
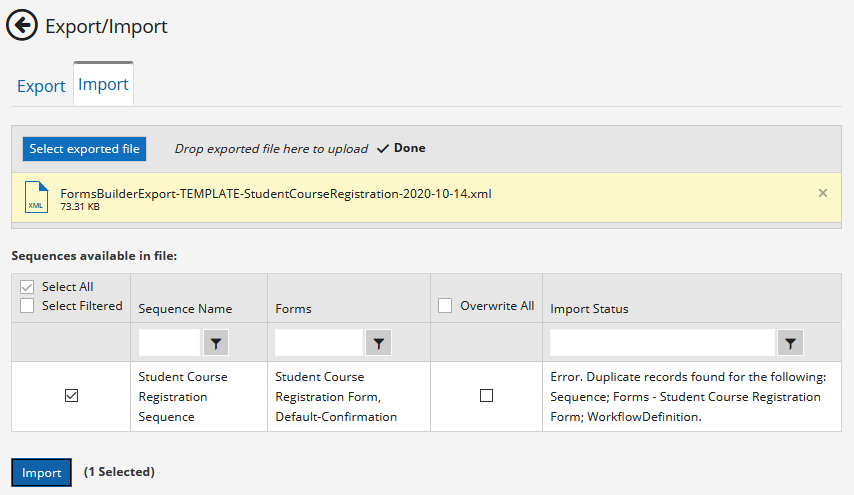
If the check box is not selected, sequences with no name conflicts will still be imported but those with duplicate or conflicting data will not be.
Note: The Default-Confirmation, Default-Frame, and Default-DocuSignWait forms are handled as special cases during the import. These forms will remain unchanged in the new environment and will not be flagged as duplicates. This allows for form reuse in multiple sequences and import of sequences with default forms without forcing an overwrite. If, however, the Overwrite option is selected, the forms will be updated.
-
Click Import. The import process deserializes the XML of the export file into the appropriate entities. If there are any issues with the export data causing errors with deserialization, an error is displayed and logged.
Note: If a theme is missing in the new environment, the imported sequence is rendered using the default styles.
The Import Status column displays the import result, for example: Successful

— OR —
The Import Status column indicates if errors occurred during the import or duplicate records were found.

When you have completed the import process, check the imported sequences in Renderer to make sure that they are imported correctly.
The Export/Import tile on the Forms Builder home page links to a workspace that allows you to export and import sequences and associated workflows from one environment to another. For example, you may have created and tested sequences in a staging environment. You then export the sequences from the staging environment to a network location and later import them into the production environment.
If sequences have been translated in the staging environment, the .po files for the localized sequences need to be transferred to the production environment using the Import Translation tab in the Internationalization workspace of Form Designer. For more details see Internationalization.
Prerequisites
The application databases in the source and target systems must be identically configured regarding School Defined Fields (SDFs) in Anthology Student and Custom properties/objects in CampusNexus CRM. If import sequences with SDFs or Custom fields are defined only in the export environment, an error will be seen when the sequence is rendered in the new environment and a user attempts to enter a value for an undefined SDF or Custom field.
The Forms Builder environment must be identically configured regarding the integration of CampusNexus CRM and/or Anthology Student. The export/import process does not check for mismatched environment entities. For example, the export/import process will not detect if a sequence from a CampusNexus CRM environment is imported into an Anthology Student environment. The sequence will fail when rendered.
Export Sequences
-
On the Forms Builder home page, click the Export/Import tile.
The Export tab is displayed by default. It contains a grid listing sequence names, forms contained with the sequences, the date modified, and the workflow status.

-
Use one of the following options to select sequences. The number of selected sequences will be displayed next to the Export button.
-
Click Select All.
-
Use the column filters to narrow your search and click Select Filtered.
-
Clear "Select All" and "Select Filtered" and select individual sequences.
Check the Is Workflow Enabled column to determine if the workflow for a sequence is enabled. Only sequences that have enabled workflows can be exported.
Note: In Forms Builder 3.5 and later, the option to "Include workflow version history for exported sequences" is removed because this option provided unnecessary data and caused export files to grow too large. The maximum size of an export file is 2000 megabytes. If this size is exceeded, an error will occur during the import.
-
-
Click Export. When export is complete, your browser displays a message with the name of the export file.

-
Select Save File and click OK to save the export file to the \Downloads folder on your local machine. You can copy the file to a new name or location if desired; just note that it must remain an .xml type file.
Forms Builder creates an export file in XML format and makes the file available as a stream on the server. The export file is saved with the specified name in the specified location. The export file contains the Forms Builder version and the export date.
For every sequence that is exported, data from the following tables is saved:
- Formsbuilder.Sequence
- Formsbuilder.Form
- WorkflowDefinition
- WorkflowDefinitionVersion
The data from the above tables include Name, Title, Description, JSON, XAML and so on. The Ids, DateCreated/Modified are not in the export file and will be generated on import. The exported sequences carry with them any saved Forms Builder elements and configurations required by the sequence (e.g., fields, components, properties, and workflow definitions). End state form data for each sequence is included in the export file.
- On the Forms Builder home page, click the Export/Import tile.
-
Select the Import tab, click Select exported file, and navigate to the location where the export file was saved.
After selecting the export file, the sequences that are available for import are listed in the grid.
-
Use one of the following options to select sequences. The number of selected sequences will be displayed next to the Import button.
-
Click Select All.
-
Use the column filters to narrow your search and click Select Filtered.
-
Clear "Select All" and "Select Filtered" and select individual sequences.
-
-
If you want to force an overwrite of sequences and workflows with the same name, select the check box in the header of the Overwrite All column OR select this option for individual sequences.
If the check box is not selected, sequences with no name conflicts will still be imported but those with duplicate or conflicting data will not be.
Note: The Default-Confirmation, Default-Frame, and Default-DocuSignWait forms are handled as special cases during the import. These forms will remain unchanged in the new environment and will not be flagged as duplicates. This allows for form reuse in multiple sequences and import of sequences with default forms without forcing an overwrite. If, however, the Overwrite option is selected, the forms will be updated.
-
Click Import. The import process deserializes the XML of the export file into the appropriate entities. If there are any issues with the export data causing errors with deserialization, an error is displayed and logged.
Note: If a theme is missing in the new environment, the imported sequence is rendered using the default styles.
The Import Status column displays the import result, for example: Successful

— OR —
The Import Status column indicates if errors occurred during the import or duplicate records were found.

When you have completed the import process, check the imported sequences in Renderer to make sure that they are imported correctly.


