The Application Server component handles all application operations between client computers and databases. It increases the scalability of the product by maintaining the client connections and their state, thereby relieving the Database server of a huge load.
Application Server uses connection Objects to create a temporary connection between various clients and databases and executes client requests. Once a request is executed, the connection is closed and the Object is returned to the connection pool.
Preinstallation Tasks
Identify and install the prerequisite software. See Software Requirements by Component — Application Server.
-
If you are installing Application Server on a Windows NLBS cluster and connections to Application Server are made through HTTP (with load balancing), follow these steps:
-
Ensure that:
-
Application Server is installed on all NLBS host machines.
-
Virtual root names of Application Server are identical on all servers.
-
-
Execute sproc_AddMachinestoNLBS with the following parameters:
-
Parameter1: @tNLBS: This parameter represents the virtual IP address of the NLBS Cluster.
-
Parameter2: @tMachines: This parameter contains the list of computer names that are part of the NLBS Cluster.
The computer names must be separated by the comma delimiter. For example, Exec sproc_AddMachinestoNLBS N'172.17.32.100', N'HostMac1, HostMac2'
-
-
Ensure the following are configured in the Windows Firewall Settings dialog box:
-
In the Exceptions tab, select the COM+ Network Access, Distributed Transaction Coordinator, and COM Surrogate check boxes.
-
Select the Notify me when Windows Firewall blocks a new program check box.
-
-
-
When connecting to Application Server using HTTP, we recommend that you modify the settings in the Web.config file as indicated below:
<httpRuntime
executionTimeout="900"
maxRequestLength="5248"
useFullyQualifiedRedirectUrl="false"
minFreeThreads="8"
minLocalRequestFreeThreads="4"
appRequestQueueLimit="2000"
enableVersionHeader="true"
/>
These settings are explained below:
-
executionTimeout="[seconds]": This attribute represents the time (in seconds) before a request automatically times out. -
maxRequestLength="[KBytes]": This attribute indicates (in kilo bytes), the maximum size for a request that can be accepted. -
useFullyQualifiedRedirectUrl="[true|false]": This attribute indicates whether the URL for Client redirects must be fully qualified. -
minFreeThreads="[count]": This attribute specifies the minimum number of free threads to enable the execution of new requests. -
minLocalRequestFreeThreads=" [count] ": This attribute specifies the minimum number of free threads to enable execution of new local requests. -
appRequestQueueLimit="[count]": This attribute specifies the maximum number of requests that can be queued for the application. -
enableKernelOutputCache="[true|false]": This attribute indicates whether the http.sys cache must be enabled on IIS 7.5 and higher versions. By default, this value is True. -
enableVersionHeader="[true|false]": This attribute indicates whether the X-AspNet-Version header must be output with each request.
The Web.config file is located in the folder in which Application Server is installed.
-
Set Up Application Servers
-
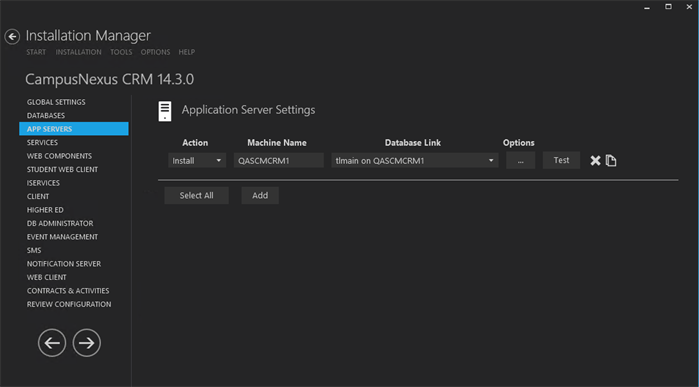
In the Installation menu, click App Servers. The Application Server Settings screen is displayed.

-
Click Add to add a line to the Settings screen.
-
Select an appropriate Action. The following Action values are available:
-
None – Performs no action.
-
Install – Performs a fresh installation or upgrade of a component. You can install or upgrade multiple components at the same time.
-
Uninstall – Removes all subcomponents on that machine and uninstalls the component from Programs and Features.
-
Reinstall – Retries to install a subcomponent.
-
Add – Installs an additional component on the computer where one or more components already exist. You can add only one component at a time.
-
Remove – Uninstalls a single component. You can remove only one component at a time.
Optional: Click Select All to set the Action field to Install for all components listed on this screen. Click Unselect All to set the Action field to None.
-
-
Enter the Machine Name for the component to be installed.
-
Select a Database Link for Application Server.
-
Click
 to view and edit the Options form.
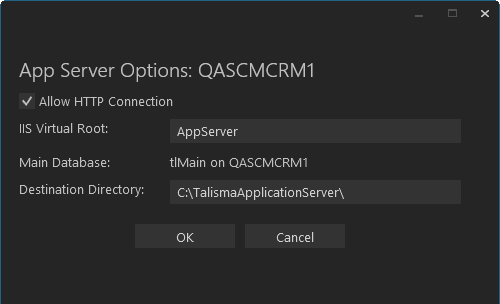
-
Click OK to save changes on the Options form. The form is closed.
-
Click
 to copy a line. Edit the copied line as needed.
 -
Click
 to delete a selected line.
 -
Click Test to ensure the setup for the corresponding line is correct. If a test on a particular line fails, check all associated fields and click Test again.
-
If all tests pass, click
 .
.
Note: Trace logs for Application Server must be enabled only from Talisma Trace Client available in the Application Server installation folder. While trace logs for other components can also be enabled from this location, Application Server traces cannot be enabled from Talisma Trace Client available in other locations.
Perform Other Operations
-
From the Start menu, select Programs, Administrative Tools, Component Services. The Component Services screen is displayed.
-
Browse to the following path:
Console Root/Component Services/Computers/My Computer/COM+ Applications -
Right-click ApplicationServer, and select Shut down from the shortcut menu.
-
Right-click ApplicationServer, and select Start from the shortcut menu.
Notes:
Ensure that Application Server is restarted in the following scenarios:
-
When a CampusNexus CRM license is updated.
-
When a database is configured after the installation of Application Server.
-
When the date or time has been modified on Application Server.
-
When one or more of the following values are modified in the TalismaObjectAssembly.Config file, which is located in the Talisma Shared folder:
- Compression size
- Poll Interval
- Pool Size
- Internal Account Password
-
From the Start menu, select Run. The Run dialog box is displayed.
-
Type iisreset in the Open field.
-
Click OK. The IIS Service is stopped and restarted.
By default, Application Server is configured to run using an interactive account, which is for the User who is currently logged on. It is recommended that you configure Application Server to run under an Account that has been granted administrative privileges. To do so:
-
From the Start menu of the Application Server computer, select Settings, Control Panel. The Control Panel is displayed.
-
Double-click the Administrative Tools icon. The Administrative Tools screen is displayed.
-
Double-click the shortcut for Component Services. The Component Services screen is displayed.
-
Expand the following nodes: Component Services, Computers, My Computer, COM+ Applications. All COM+ applications are listed.
-
Right-click Application Server, and select Properties from the shortcut menu. The COM+ Application Server Properties dialog box is displayed.
-
Select the Identity tab.
-
In the Account area, select the This user option, and click Browse to locate a User who has administrative privileges on the Application Server computer.
-
Specify a password for the User in the Password field.
-
Type the password again in the Confirm Password field.
-
Click OK. Application Server is now configured to run using a local administrator account.
If you have installed iServices, carry out the following steps for each iService:
-
Select an iService component node.
-
Right-click on the node, and select Properties from the shortcut menu. The relevant Properties dialog box is displayed.
-
Click the Identity tab.
-
Select the This User option.
-
In the User field, click Browse to select the domain User name.
-
In the Password field, type the password of the domain User account.
-
In the Confirm password field, type the password you have specified in the Password field.
-
Click OK. The Properties screen is closed.
-
Start the Service of the iService component node. To do so, right-click on the iService component node you have selected in step 1, and select Start from the shortcut menu.
-
Close the Component Services screen.
You can create a local user account so that it is accessible even without logging on to the computer. To do so, follow these steps:
-
From the Start menu, select Programs, Administrative Tools, Computer Management. The Computer Management screen is displayed.
-
Browse to the following path:
Computer Management/System Tools/ Local Users and Groups/Users. -
Right-click in the right pane and select New User from the shortcut menu. The New User dialog box is displayed.
-
Type the required details.
-
Clear the selection for the User must change password at next logon option.
-
Select the User cannot change password and Password never expires options.
-
Click Create.
The local user account is created on the computer on which Application Server is installed.
On the computer where Application Server is installed, the value of the cacherefreshtime tag in the application.config file is set to 180, which indicates that the Application Server cache is refreshed every 3 minutes. The file will be available in the Installation folder.
It is recommended to set the value of cacherefreshtime Key to 14400 to ensure that the Application Server cache is not refreshed frequently.
<add key="CacheRefreshTime" value="14400" />
When the value of the cacherefreshtime tag is set to 14400, the Application Server cache is refreshed at the interval specified in this tag. Operations performed in Business Administrator such as creation of Users, Teams, Rules, and enabling Permissions to Users and so on will be reflected in Web Client only when the Application Server cache is refreshed.
For the operations performed in Business Administrator to be reflected immediately, perform the following steps on the computer where Application Server is installed:
-
Reset IIS.
-
Shut down and start the Application Server COM + Component. To do so:
-
From the Control Panel, open Administrative Tools, and double-click Component Services.
-
Navigate to the Component Services, Computers, My Computer, COM+ Applications node.
-
Select the ApplicationServer node.
-
Right-click the ApplicationServer node and select Shut down from the shortcut menu.
-
Right-click the ApplicationServer node and select Start from shortcut menu.
-
You can configure additional connections to the database.
-
From the Start menu, select Settings, Control Panel.
-
Double-click Add/Remove Programs.
-
From the list of programs, select Application Server <version number>.
-
Click Change/Remove. The Add/Remove/Reinstall dialog box is displayed.
-
Click Configure Databases. The Configure Database Servers page is displayed. Configure additional HTTP or DCOM connections to Application Server.
The file size for compression can be configured for Application Server and Client. By default, compression is disabled when connections to Application Server are made over a Local Area Network (LAN). To enable compression:
-
On the computer where Client is installed, run Regedit from the command prompt. The Registry Editor is displayed.
-
Browse to the following key: HKEY_LOCAL_MACHINE\SOFTWARE\Talisma\Common\ConnectionParameters\LAN
-
Right-click the DWORD values Request and Response, and select Modify from the shortcut menu. The Edit DWORD Value dialog box is displayed.
-
Specify the required data size in the Value data field, after selecting Decimal in the Base area. Compression is enabled for DCOM connections. Requests and responses that are greater than or equal to the specified size are compressed.
Notes:
-
By default, the value for the Request and Response DWORDs for the LAN key is 0, indicating that compression is disabled. Setting a value greater than 0 enables compression.
-
Values specified in the Value data field must be in bytes, indicating the file size for which compression must be enabled.
By default, data greater than or equal to 1024 bytes will be compressed when connections to Application Server are made over HTTP. You can modify this value. To do so:
-
Browse to the following key: HKEY_LOCAL_MACHINE\SOFTWARE\Talisma\Common\ConnectionParameters\Internet
-
Modify the DWORD values Request and Response, and specify the required data size in the Value data field, after selecting Decimal in the Base area.
Postinstallation Tasks
On the Application Server and Database Server computers, perform the following steps:
-
Right-click the My computer icon, and select Manage from the shortcut menu. The Server Manager screen is displayed.
-
In the left pane, navigate to the Configuration, Local Users and Groups, Groups node.
-
In the right pane, right-click the Distributed COM Users group, and select Add to Group from the shortcut menu. The Distributed COM Users Properties dialog box is displayed.
-
Click Add. The Select Users, Computers, or Groups dialog box is displayed.
-
In the Enter the object names to select area, specify the names of the users you want to add to the Distributed COM Users group. Use a semicolon (;) to separate the names of multiple users.
-
Click Check Names.
-
Click OK. The users are added to the group.
-
Click OK.
On the computer on which Application Service is installed, perform the following steps:
-
Click Start, Run, type gpedit.msc, and click OK. The Local Group Policy Editor is displayed.
-
Navigate to Computer Configuration, Administrative Templates, System, User Profiles.
-
Double-click Do not forcefully unload the users registry at user logoff.
-
Select Enabled.
-
Click OK.
-
Close the Local Group Policy Editor.
-
Restart the Application Server computer.