The Client component ("thick client") provides an interface from which a CampusNexus CRM user can log and track interactions with contacts, respond to queries from contacts, and work with items of other objects.
Prerequisites
Identify and install the prerequisite software. See Software Requirements by Component — Client.
If the Data Management Utility (DMU) is installed on the Client computer, the previous DMU version must be uninstalled before installing the new DMU version.
Install the Client in Silent Mode
You can perform a fresh installation, reinstallation, or upgrade of the Client in silent mode. Depending on the type of installation you want to perform, you must rename the FreshInstall.iss, Reinstall.iss, or Upgrade.iss files to Setup.iss. To do so:
-
Copy all files in the ClientSetup folder from the host computer to the folder on the computer where you want to install the Client.
-
Identify the type of installation that must be performed on the computer. Depending on the type of installation, perform one of the following steps:
-
To upgrade the Client version, rename Upgrade.iss to Setup.iss.
-
To reinstall an existing Client, rename Reinstall.iss to Setup.iss.
-
-
If you are doing a fresh installation, perform the following steps:
-
Open the Setup.iss file in an editor.
-
Provide the installation path for 32-bit and 64-bit computer in the following code:
32bitmachinePath= C:\Program Files\Talisma Client64bitmachinePath= C:\Program Files (x86)\Talisma Client -
Save and close the file.
-
-
Open the Windows command prompt.
-
Navigate to the folder where the setup.exe file is located, and type:
setup.exe /s -
Press ENTER.
The Client is installed on the computer and a log file is created in the following drive:
-
On a 32-bit computer:
<Drive name>:\Program Files\Common Files\Talisma Shared\SetupLogpath -
On a 64-bit computer:
<Drive name>:\Program Files (x86)\Common Files\Talisma Shared\SetupLogpath
View the log file to check for any errors occurred during installation. Events are added to the Application Log of the Windows Event Viewer on the computer.
-
Notes:
-
In a scenario where you have removed the Client using silent mode, rename FreshInstall.iss to Setup.iss to perform a fresh installation using silent mode.
-
If the computer where the Client is being installed in silent mode has other CampusNexus CRM components such as Data Management Utility (DMU), these components will not be installed or upgraded through silent mode. You must install or upgrade these components manually.
-
When the Client is installed manually, the success and failure messages are not logged in the Windows Event Viewer. These messages are added to a log file available in the following paths on the computer where the Client is installed:
-
On a 32-bit computer:
<Drive name>:\Program Files\Common Files\Talisma Shared\SetupLog -
On a 64-bit computer:
<Drive name>:\Program Files (x86)\Common Files\Talisma Shared\SetupLogon
-
-
The Client can be installed in silent mode using a systems management tool such as System Center Configuration Manager (SCCM) by Microsoft. When a systems management tool is used for installing in silent mode:
-
A single package that is created in the systems management tool can be used for any of the Windows operating systems (32-bit and 64-bit) that are supported by the Client.
-
If you are upgrading or re-installing the Client in silent mode using SCCM, before creating a package for these operations, you must rename the Upgrade.iss and Reinstall.iss file to Setup.iss based on the scenario.
-
Similarly, before creating a package for removing the Client installation in silent mode, you must rename the Remove.iss to Setup.iss.
-
The failure or success of the Client installation will be reported in the systems management tool.
-
When the Client is installed or removed in silent mode, by default, the computer does not restart automatically. You can enable automatic restart of the computer once the Client is installed in silent mode. To do so:
-
Navigate to the folder where the Client setup files are located.
-
Depending on the type of installation that must be performed, open the FreshInstall.iss, Upgrade.iss or Reinstall.iss, Remove.iss in an editor, and locate the following code:
BootOption=0 -
Change the value of BootOption from 0 to 3.
-
Save and close the .iss file.
-
Repeat steps 2 to 6 of Install the Client in Silent Mode.
-
The computer will automatically restart when the Client is installed or removed.
-
Navigate to the folder where the Client setup files are located.
-
Rename Remove.iss to Setup.iss.
-
Open the Windows command prompt.
-
Navigate to the folder where the setup.exe file is located, and type:
setup.exe /s -
Press ENTER.
The Client will be removed from the computer and a log file is created in the <Drive name>:\Program Files\Common Files\Talisma Shared\SetupLogpath. View the log file to check for any errors occurred while removing the Client. Additionally, events are added to the Application Log of the Windows Event Viewer on the computer.
Following are the various success and failure scenarios for which events are logged in the Windows Event Viewer:
Success scenarios for which events are logged:
- When the Client is installed successfully through a fresh installation.
- When the Client is reinstalled successfully.
- When an upgrade of the Client is installed successfully.
- When the Client installation is removed successfully.
Failure scenarios for which events are logged:
- When the user who is running the Client setup is not a local administrator.
- When the installation path provided in the setup.iss file exceeds the 116 characters limit.
- When the drive name provided for the 32-bit and 64-bit paths in the setup.iss file does not exist on the computer where the Client is being installed.
- When the Visual C++ Redistributable for Visual Studio 2015 (Update 1) prerequisite is not installed.
- When the tlc3setup.dll file failed to be copied.
Install the Client in a Citrix Environment
The Client can also be installed centrally on a Microsoft Windows Terminal Server with Citrix Server installed. The Citrix Client program can then be installed on computers that need to use the Client on the Microsoft Windows Terminal Server.
You have only one installation of the Client and avoid installing it on all client computers individually. You have to install the Citrix Client program, and use the Client on the Terminal Server. Upgrades too, are made very easy, where you have to just upgrade the Client on the central computer, and not on every client computer.
Notes:
-
On a fresh Client, the Manage Filters Permission is enabled by default for users with System Administration, or Business Administration Permissions.
-
On a fresh Client, audit is disabled for all the Properties and events except:
- Message Objects
- Health Check Objects
- URL property in Link Object
Configuration for Message and Health Check Objects cannot be changed.
Set Up Clients
-
In the Installation menu, click Client. The Client Settings screen is displayed.

Client Settings identify client machines in a client-server relationship so that manipulations of multiple client machines can be handled in one location.
Note: Ensure that the database settings are appropriate. Installation Manager allows multiple machine names listed in the Machine Name column.
-
Click Add to add a line to the Settings screen.
-
Select an appropriate Action. The following Action values are available:
-
None – Performs no action.
-
Install – Performs a fresh installation or upgrade of a component. You can install or upgrade multiple components at the same time.
-
Uninstall – Removes all subcomponents on that machine and uninstalls the component from Programs and Features.
-
Reinstall – Retries to install a subcomponent.
Optional: Click Select All to set the Action field to Install for all components listed on this screen. Click Unselect All to set the Action field to None.
-
-
Enter the Machine Name for the component to be installed.
-
Click
 to copy a line. Edit the copied line as needed.
 -
Click
 to view and edit the Options form for each Client. The options include the following:
The default Destination Directory is
C:\Program Files (x86)\Talisma Client\.
Enter a different Destination Directory for a 32-bit machine, e.g.,C:\Program Files)\Talisma Client\.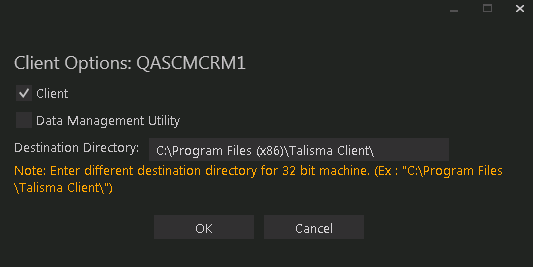
-
Click OK to save changes on the Options form. The form is closed.
-
Accept the default Destination Directory or select a directory where the information for this component is stored. Changing this directory will apply across all machines in the Machine Name column.
-
Click
 to delete a selected line.
 -
Click Test to ensure the setup for the corresponding line is correct.
If a test on a particular line fails, check all associated fields and click Test again.
-
If all tests pass, click
 .
.

Postinstallation Tasks
-
To work with Analytics, on the Client computer, ensure that the logged on user has the Modify permission for the Talisma Client folder. The folder is available in the <Drive name>:\Program Files path.
-
On the Web Server computer on which trackable URLs and Forms that will be inserted into Mailers are configured, install the AspEmail component obtained from Persits Software Inc. Alternatively, you can install any component with a Send Mail feature.
Log on to the Client
You can log on to the Client using Application, Trusted, or Custom Security. This section covers the procedures for these options.
-
Double-click the Client icon on your desktop.
— OR —
From the Start menu, point to Programs, click Talisma Client <version>, and select Talisma.
-
Type your user name in the Login name field.
-
Type your password in the Password field.
-
Select a profile from the Profiles list. The Talisma Profile is selected by default.
Note: When you log on to the Client for the first time, you must either create a profile, or edit the default profile, by specifying the Server and Database details.
-
To create a user profile:
-
Click Profiles. The Profiles dialog box is displayed.
-
Click Add. The New Profile dialog box is displayed.
-
Type a name for the profile in the Profile Name field.
-
To log on using Application Security, select Application Security from the Login Security field.
— OR —
To use your Microsoft Windows login name and password for logging on to the Client, select Trusted Security from the Login Security field.
— OR —
To use a custom login name and password for logging on to the Client, select Custom Security. This login name and password can reside in any database. For example, it could be a Microsoft Access database or any other database from where these details are retrieved for logging on to the Client.
-
In the Application Server field, type the name of the Application Server to which you want to connect when logging on to the Client.
-
From the Database Server list, select the SQL Server on which the Main database is installed.
-
In the Database Name field, type the name of the database to which you want to connect.
-
If you select Internet from the Connection Type list, the Internet Security option is enabled. Select the required level of security that needs to be implemented when connecting over the Internet.
-
Click OK.
Note: You can also edit, delete, or copy a profile in the Profiles Dialog box. For more information about Profiles, see the Client Help system.
-
-
In the Profiles dialog box, the Talisma profile is selected by default in the When starting Talisma, use this Profile list. You can select the newly created profile to set it as the default profile for logging on to the Client.
-
Click OK.
Note: When license information is updated, ensure that you log off from the Client, and log on again.
Perform Other Operations
This section describes Client-side settings for tracking Interaction actions, the procedure for handling E-mail messages without Character Sets, and configurations for various workspaces and the Campaign Dashboard in the Client.
The actions performed on an Interaction are tracked as they occur, and are recorded periodically in the Main database. While actions are tracked in real time, they are updated in the Main database every 300 seconds, or when a user logs out of CampusNexus CRM. An updated record of these actions is displayed in the Actions tab of the Message screen only after the predefined time interval lapses. If you want to set this time to a different number, you must create an appropriate registry key on the computer where the Client is installed.
To Set the Time for Updating Frequency in the Registry:
-
From the Command prompt, run Regedit.
-
Browse to HKLM\Software\Talisma\Talisma Client\CurrentVersion.
-
Create a key of type DWORD called SaveTrackInfoDuration under CurrentVersion.
-
In the Base section of the Edit DWORD Value dialog box, select Decimal.
-
Specify the required value for the "SaveTrackInfoDuration" key in the Value data field. The value you specify is in seconds.
-
Click OK.
Notes:
-
If the registry key is not created, the actions are updated in the Main database every 300 seconds.
-
You must set the value of the "SaveTrackInfoDuration" registry key to 0 if you want the actions to be written in the Main database in real time.
CampusNexus CRM provides two methods to handle incoming e-mail messages received with blank Character Sets:
Method 1
If the value of the AutoResolveCharset row in the tblGlobalInfo table is 1, CampusNexus CRM uses the default Character Set "iso-8859-1" for the Message. By default, the value of the AutoResolveCharset row is 1.
Disadvantages of deploying Method 1
-
If an e-mail message with a blank Character Set is received, CampusNexus CRM uses the default Character Set "iso-8859-1" for it. As a result, the message content may be distorted. Subject Line-based threading may fail and a new Interaction may be created.
-
Language detection may fail, and an improper Canned Response may be sent to the Contact.
Note: If Method 1 is deployed, messages will not be sent to the Inbox Workspace.
Method 2
If the value of the AutoResolveCharSet row in the tblGlobalInfo table is set to 0, e-mail messages without Character Sets are received in the Inbox Workspace, if they satisfy any of the following conditions:
-
The Contact's Default E-mail Character Set Property is blank, and the value of the AutoDetectUSASCII row in the tblGlobalInfo table is 0.
-
The Contact's Default E-mail Character Set Property is blank, and the value of the AutoDetectUSASCII row in the tblGlobalInfo table is 1, but the message content does not conform to the US ASCII Character Set.
Note: The default value of the AutoDetectUSASCII row in the tblGlobalInfo table is 1. It is recommended that you do not modify this value.
Benefits of deploying Method 2
-
Client users can set the character set for e-mail messages in the Inbox Workspace. The Contact's Default E-mail Character Set property is automatically set using this value, and is used for subsequent messages coming into CampusNexus CRM from the Contact.
-
Language detection will not fail.
-
Threading will not fail.
Disadvantage of deploying Method 2
There is no option available to send an e-mail message or any notification to Client users when e-mail messages are received in the Inbox Workspace.
Users' Access to the Inbox Workspace
When Method 2 is deployed, Client users will be able to open the Inbox Workspace if any one of the following conditions is satisfied:
-
The value of the InboxSecAccessBased row in the table tlbGlobalInfo is 0 and the user has been granted the System Administration Permission.
-
The value of the InboxSecAccessBased row in the table tlbGlobalInfo is 1.
Notes:
-
Although CampusNexus CRM supports Character Sets in several languages, when selecting a Character Set for a Message, a Client user can only choose a language supported by the operating system on the user's computer.
-
To enable language detection in the Inbox Workspace, Microsoft Word must be installed on the Client computer.
You can customize the Message ID for the Interaction and Campaign Objects with custom envelope tokens. To do so, specify custom envelop tokens in the tblEnvelopeIdTokens table for the Interaction and Campaign Objects. The tblEnvelopeIdTokens table consists of four columns.
| Column Name | Description |
|---|---|
| aIndex | Auto generated ID. |
| nEvpMarker | The envelope token for the Interaction Object. For example, #MyCompanyInteraction. |
| CampEvpMarker | The envelope token for the Campaign Object. For example, %MyCompanyCampaign. |
| nEvpSeparator | The character used as separator. Notes:
|
Notes:
-
You cannot update the values specified in the tblEnvelopeIdTokens table. To modify the values of an existing row, you must delete the row and add new values.
-
The value in the nEvpMarker and CampEvpMarker columns cannot be same.
-
You must specify values in all columns of the tblEnvelopeIdTokens table.
-
The first row of the tblEnvelopeIdTokens table stores the default envelope tokens for the Interaction and Campaign Objects, @TLZ and TLC respectively.
-
If a single character is specified in the nEvpMarker or CampEvpMarker column, the threading of Interaction fails when the Threading Model, Interaction in Reply-To or Interaction in Reply-To with Subject Match is selected in Business Administrator.
-
The Message ID parameter can store a maximum of 999 characters.
-
After adding custom envelope tokens for the Interaction and Campaign Objects in tblEnvelopeIdTokens table, you must restart JSF and Campaign Dispatcher Services.
-
If there are issues with threading of undelivered messages with an Interaction and update of undelivered messages for a Campaign in the Campaign Dashboard, you can create custom tokens to resolve this issue.
You can use the Campaign Dashboard to monitor and control the dispatch of Mailers, and view the status of Campaign Dispatchers configured in CampusNexus CRM. The Campaign Dashboard is automatically updated with the most current information at intervals of 5 minutes. You can modify this value. To do so:
-
From the Start menu, select Run. The Run dialog box is displayed.
-
In the Open field, type Regedit. The Registry Editor is displayed.
-
Browse to the following key, and specify the required value:
HKEY_CURRENT_USER\Talisma\TalismaClient\RefreshRate.
The value you specify is in minutes.