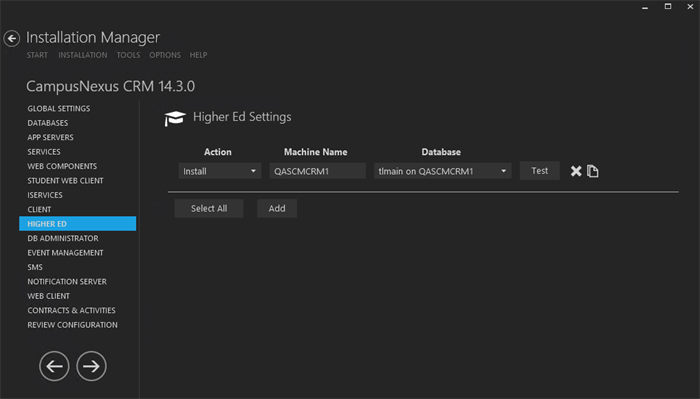
The Higher Education Foundation (Higher Ed) setup enables the Client user to work with the Lead Object in the Higher Education environment.
The Client user also works with other operational Objects. While the Client user can work with instances of reference Objects by including, or associating them in operational Objects, the Client user typically does not create reference Objects in CampusNexus CRM; however, a Client user with Business Administration permission or higher can create reference Object items in the Client component.
Preinstallation Tasks
-
Stop the SQL Server Agent on the computers where the Main and Subscriber databases are installed.
-
Set the value of Linked Servers, Data Access option to True. To do so:
-
Navigate to Microsoft SQL Management Studio, open Server Objects, and select Linked Servers.
-
Select Properties from the shortcut menu. The Linked Server Properties screen is displayed.
-
Click Server Options in the left pane.
-
In the right pane, ensure that the value of the Data Access option is set to True.
-
Perform steps (a) through (d) for all Linked Servers.
-
Set Up Higher Ed
-
In the Installation menu, click Higher Ed. The Higher Ed Settings screen is displayed.

This screen enables users to install or delete machine/database combinations used in the Higher Education Foundation module. The settings on this screen may be affected by information added in other steps of the setup process.
Note: Ensure that the default SQL Server settings are appropriate. Installation Manager allows multiple machine names listed in the Machine Name column.
-
Click Add to add a line to the Settings screen.
-
Select an appropriate Action. The following Action values are available:
-
None – Performs no action.
-
Install – Performs a fresh installation or upgrade of a component. You can install or upgrade multiple components at the same time.
Optional: Click Select All to set the Action field to Install for all components listed on this screen. Click Unselect All to set the Action field to None.
-
-
Enter the Machine Name for the component to be installed.
-
Select a Database from the Database list.
-
Click
 to copy a line. Edit the copied line as needed.
 -
Click
 to delete a selected line.
 -
Click Test to ensure the setup for the corresponding line is correct. If a test on a particular line fails, check all associated fields and click Test again.
-
If all tests pass, click
 .
.
Postinstallation Tasks
-
If you are migrating from a non-Higher Ed environment to a Higher Ed environment with this installation, run the sproc_UpgradeCountryAndStateForSis script manually by executing the following commands:
Declare @nUserID int = 2,@tTraceString  nvarchar(max) = N'',@retval int = 0
EXEC @retval =   sproc_UpgradeCountryAndStateForSis @nUserID = @nUserID , @tTraceString = @tTraceString  output
SELECT @retval ,@tTraceString
Note: The time taken to execute this script completely may vary depending on the number contact, account, and order object instances that exist in the system.
Start the SQL Server Agent service on computers where the Main and Subscriber databases are installed.
-
Run the following script:
CREATE NONCLUSTERED INDEX [IX_tblObjectType20005_bDeleted_nMergedWithID_aID_nTeamID_tName]
ON [dbo].[tblObjectType20005] ([bDeleted],[nMergedWithID],[aID],[nTeamID])
INCLUDE ([tName])
GO
