The iServices are web services through which an external application interacts with CampusNexus CRM. The Web Service Definition Language (WSDL) interface acts as an interface between the external application and iServices.
Prerequisites
Identify and install the prerequisite software. See Software Requirements by Component — iServices.
The prerequisites for installing iServices are:
-
The Database component must be installed.
-
Microsoft Microsoft Web Service Enhancement 3.0 (WSE 3.0) and iServices must be installed on the same computer.
To install WSE 3.0, navigate to the Prerequisites\WSE 3.0 folder and run MicrosoftWSE3.0.msi.
-
You must obtain the following licenses:
-
iService - Service: for installing and using Contact, Account, Interaction, Utils, Reports, and Portal iServices.
-
iService - COF: for installing and using COF iService.
For information about iServices licenses, contact Anthology Inc. Professional Services.
-
Set Up iServices
-
In the Installation menu, click iServices. The iServices Settings screen is displayed.

Note: The iServices are not licensed individually. They are bundled together and are installed all at once. The Options form enables you to change the virtual directory names for the iServices separately.
-
Click Add to add a line to the Settings screen.
-
Select an appropriate Action. The following Action values are available:
-
None – Performs no action.
-
Install – Performs a fresh installation or upgrade of a component. You can install or upgrade multiple components at the same time.
-
Uninstall – Removes all subcomponents on that machine and uninstalls the component from Programs and Features.
Optional: Click Select All to set the Action field to Install for all components listed on this screen. Click Unselect All to set the Action field to None.
-
-
Enter the Machine Name for the component to be installed.
-
Click
 to copy a line. Edit the copied line as needed.
Copy as many lines as needed to create the iService components required for the installation.
-
Click
 to view or edit the Options form.
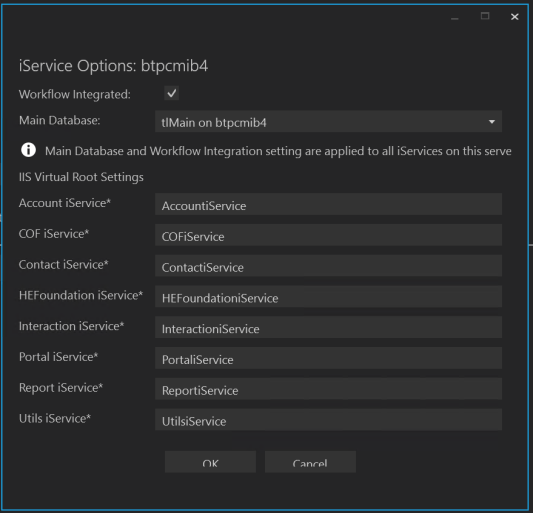
A new flag is available on IM for iServices to integrate workflow with CRM. The default setting for this flag is enabled, meaning that the workflow is integrated with CRM through iServices.
-
Verify or edit the Application Server, Main Database, and IIS Virtual Root Settings in the Options form.
-
Click OK to save changes on the Options form. The form is closed.
-
Accept the default Destination Directory or select a directory where the information for this component is stored. Changing this directory will apply across all machines in the Machine Name column.
-
Click
 to delete a selected line.
 -
Click Test to ensure the setup for the corresponding line is correct. If a test on a particular line fails, check all associated fields and click Test again.
-
If all tests pass, click
 .
.
Postinstallation Tasks
Following are the postinstallation steps for iServices:
-
Configure the following settings for the DefaultAppPool Application Pool. To do so:
-
Open the Internet Information Services (IIS) Manager in one of the following ways:
Go to Start, Run. Type inetmgr.
— OR —
Type inetmgr in the Search box of the Start menu.
-
Click ENTER.
-
Navigate to the <Server Name>, Application Pool node. The Application Pools screen is displayed.
-
In the Application Pools screen, right-click the DefaultAppPool Application Pool, and select Basic Settings. The Edit Application Pool dialog box is displayed.
-
Set the value of the fields in the Edit Application Pool dialog box as follows:
-
Set the value of the .Net Framework Version field to .Net Framework v4.0.30319.
-
Set the value of the Managed Pipeline Mode field to Integrated.
-
-
In the Application Pools screen, right-click the DefaultAppPool Application Pool, and select Advanced Settings. The Advanced Settings dialog box is displayed.
-
-
In the Process Model section, set the value of the Identity field as Local System.
Note: The iServices API documentation is available in the Service Catalog (login required).