Add Students to a Group
In this example, an institution wants to manage its military students by groups. Whenever a student’s veteran status is set to "Yes", the student is added to a group called "Military Students". If a student's veteran status changes to "No", the workflow removes the student from that group.
-
In the standard interface of Anthology Student, create a student group as follows:
-
Select the Groups tile. The list of existing Student Groups is displayed.
-
Click New.
-
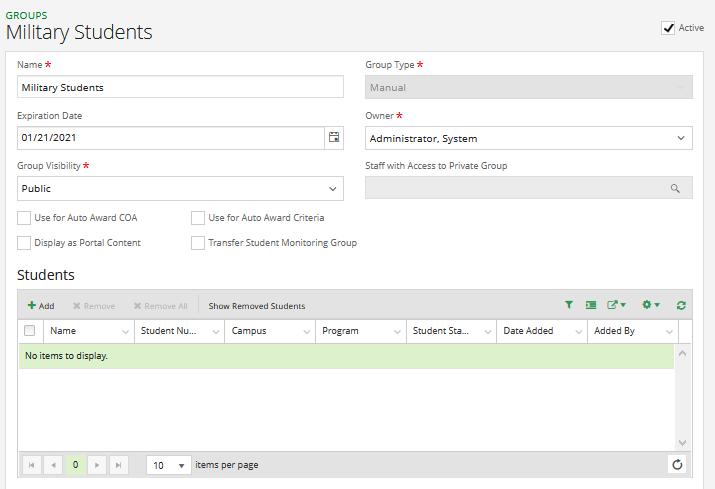
In the Group Name text box, specify a name, e.g., Military Students.
-
Select an appropriate Expiration Date. Keep in mind that this will be a long running workflow.
-
Select values for additional group properties or accept the defaults.
-
Click Save & Close.
In the legacy interface of Anthology Student, create a student group as follows:
-
Navigate to View > Student Groups. The Student Groups form is displayed.
-
Click Add.
-
In the Group Name text box, specify a name, e.g., Military Students.
-
Select an appropriate Expiration Date. Keep in mind that this will be a long running workflow.
-
Select values for additional group properties or accept the defaults.
-
Click Save and Close.

-
-
Start the Workflow application from your desktop.
-
Click New Event Workflow.
-
In the Entities area:
-
Click
 next to Cmc.Nexus.Contracts.
 -
Click
next to Cmc.Nexus. -
Click Person (Person).
-
-
In the Events area, click Saved (SavedEvent).
-
Specify a Name for the workflow and click OK.
-
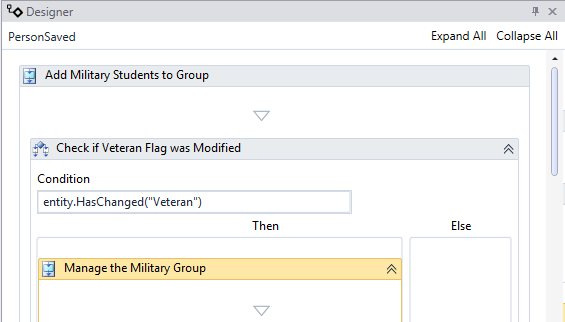
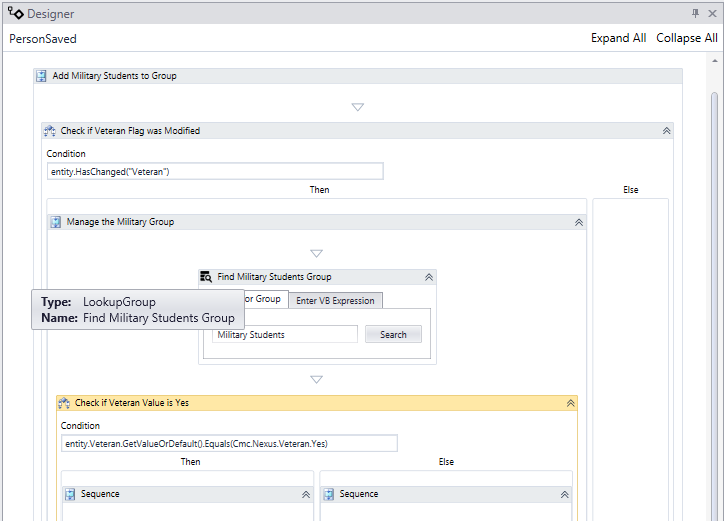
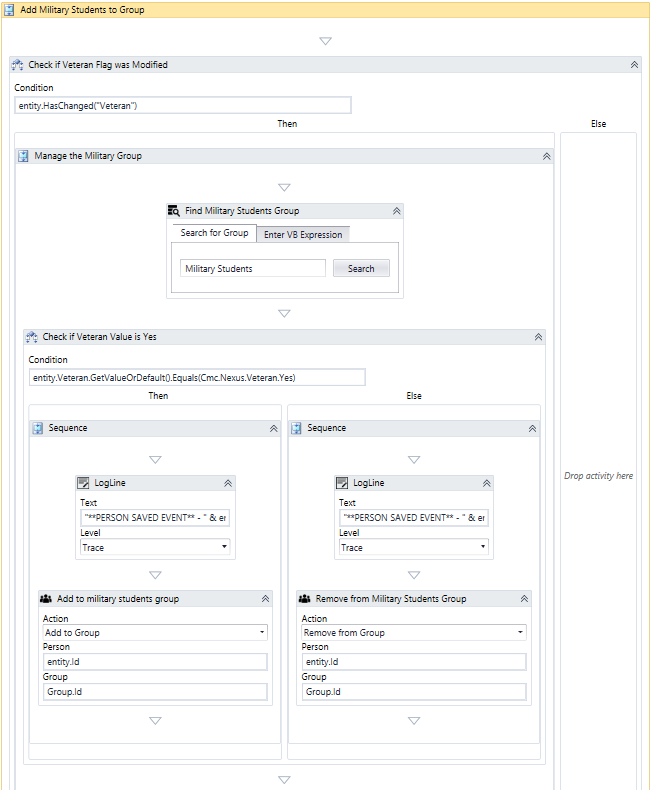
In the Properties pane of the Designer, specify Add Military Students to Group as the DisplayName of the sequence.
Note: It is a good practice to assign a meaningful DisplayName to each activity as soon as it is dragged into the workflow. The DisplayName makes it easier to track the workflow in log files and reports.

-
In the Toolbox, under Control Flow, select the If activity and drag it into the sequence.
-
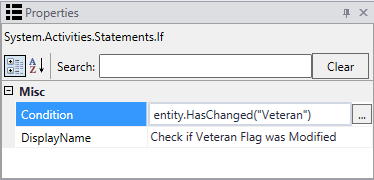
In Properties pane, specify Check if the Veteran Flag was Modified as the DisplayName of the If condition.
-
In the Condition field, specify the following VB expression: entity.HasChanged("Veteran")
Refer to Helpful Hints to learn more about the purpose of this condition.
-
In Properties pane, specify Manage the Military Group as the DisplayName of the Then sequence in the If condition.
-
In the Toolbox, under Cmc.Nexus.Workflow, select the LookupGroup activity and drag it into the Then sequence of the If condition.
-
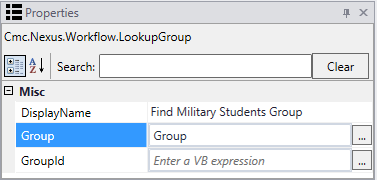
In Properties pane, specify Find Military Students Group as the DisplayName of the LookupGroup activity.
-
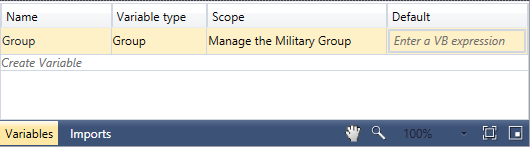
Create a variable to pass the GroupId to the activity that will add or remove students from the group.
-
Click the Variables tab in the Designer pane.
-
Add the variable name Group.
-
Choose the Variable type. For groups, it is found under Cmc.Nexus.Group.
-
In the Properties pane of the LookupGroup activity, specify Group as the Name of the variable in the Group field.
-
-
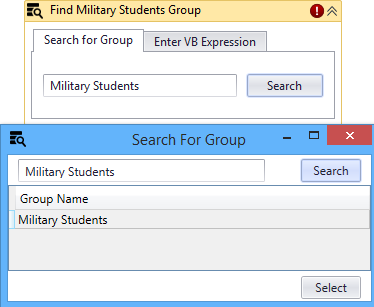
Use the LookupGroup activity to search your Anthology Student system for groups and select the group created in step 1.
-
Specify Military Students in the Search for Group tab of the LookupGroup activity.
-
Click Search.
-
In the Search for Group window, select the Military Students group from the returned list of groups.
-
In the Search for Group window, click Select.
-
-
In the Toolbox, under Control Flow, select another If activity and drag it into the Then sequence of the first If condition.
-
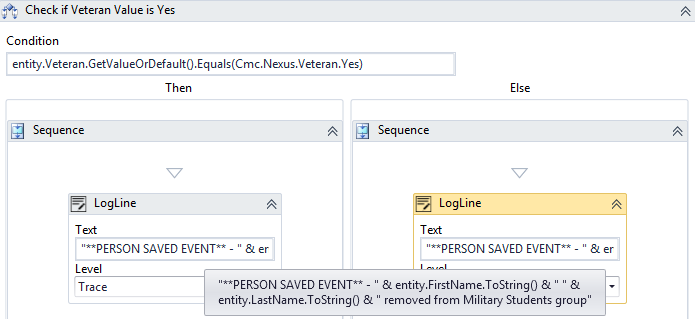
In Properties pane, specify Check if the Veteran Value is Yes as the DisplayName of the second If condition.
-
In the Condition field, specify the following VB expression:
entity.Veteran.GetValueOrDefault().Equals(Cmc.Nexus.Veteran.Yes)
The entity.Veteran.GetValueOrDefault() part of this expression gets the veteran status that was passed when the Veteran value was saved on the Person.
The Equals(Cmc.Nexus.Veteran.Yes) part of the expression calls the enumerated list of Veteran values in the Cmc.Nexus contract.
-
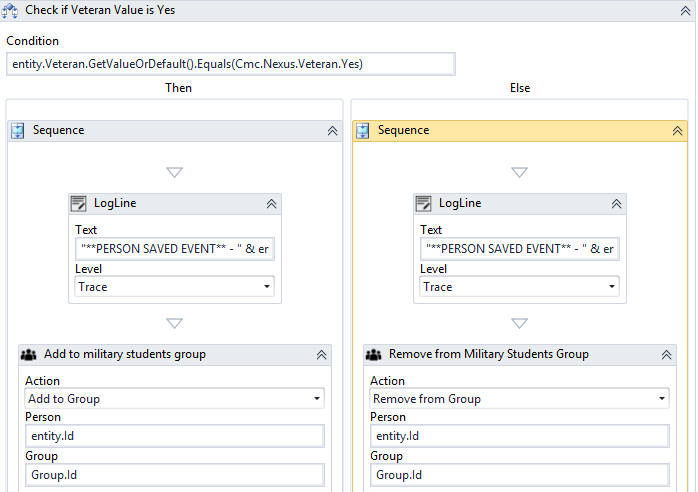
In the Toolbox, under Cmc.Core.Workflow.Activities, select the LogLine activity and drag it into the Then sequence of the second If condition.
-
Specify the following expression in the Text field of the LogLine activity:
"**PERSON SAVED EVENT** - " & entity.FirstName.ToString() & " " & entity.LastName.ToString() & " added to Military Students group"

-
In the Toolbox, under Cmc.Nexus.Workflow, select the ManageGroupMembership activity and drag it into the Then sequence of the second If condition.
-
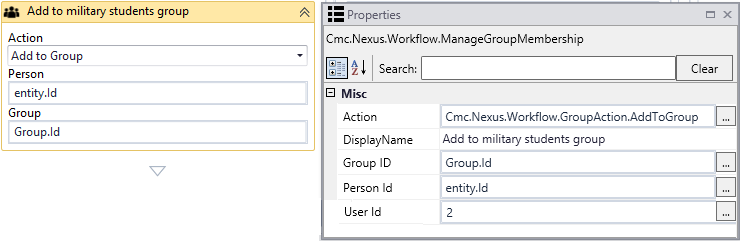
In the Properties pane for the ManageGroupMembership activity, specify the following values:
-
In the Action field, select Add to Group.
-
In the DisplayName field, specify Add to military students group.
-
In the Group field, specify Group.Id.
-
In the Person field, specify entity.Id.
-
In the User Id field, specify the User Id of the staff who is adding the group member.
The Group.Id is a variable from the LookupGroup activity that will be used in the ManageGroupMembership activity.
The Add to Group action will only add the student to the group if the student is not already a group member.
-
-
Drag a LogLine activity into the Else sequence of the If condition named Check if the Veteran Value is Yes.
-
Specify the following expression in the Text field of the LogLine activity:
"**PERSON SAVED EVENT** - " & entity.FirstName.ToString() & " " & entity.LastName.ToString() & " removed from Military Students group"
-
Drag a ManageGroupMembership activity into the Else sequence of the If condition named Check if the Veteran Value is Yes.
-
In the Properties pane of the ManageGroupMembership activity, specify the following values:
-
In the Action field, select Remove from Group.
-
In the DisplayName field, specify Remove from Military Students Group.
-
In the Group field, specify Group.Id.
-
In the Person field, specify entity.Id.
-
In the User Id field, specify the User Id of the staff who is adding the group member.
The Group.Id is a variable from the LookupGroup activity that will be used in the ManageGroupMembership activity.
The Remove from Group action will only remove the student from the group if the student is a group member.
-
-
Check your workflow. Use the fit to screen button located at the bottom of the Designer pane to see the whole workflow based on your screen resolution.
-
Click Publish. The New Workflow Definition Version window is displayed.
-
If you want the workflow to be run as soon as the event occurs on the entity, select Enable This Workflow Version, otherwise leave the check box cleared.
-
Click Save, then Cancel to close the publisher window.