Message History
When you select Messages in the navigation bar, you can view and search your SAIG message history. This history includes both incoming and outgoing mail. The Search Criteria provides tools to filter the displayed list. You can also download selected messages from this page. If your user account does not have an assigned Mailbox/TG Number, the SAIG Message History page will not display any messages.
This functionality requires the following permissions for your assigned role:
-
Can Access/View the Messages Tab
-
Can Download Message Class File
-
Can Search for Message History

The list displays 10 records per page by default. Set the Records Per Page option at the top left of the list to change the list pagination. Use the page controls at the bottom of the list to select a page number or scroll forward or backward through the page sequence.
The list displays the following information related to each message in a column format:
Message Search Criteria
Use the Search Criteria to filter the displayed message list and quickly locate the needed message class files. You can mix and match search criteria to create queries that return messages applicable to your needs. After you set the options for your search, select the Search button.

You can use the following options to set the search criteria:
| Option | Usage |
|---|---|
| Class Group |
Use this option to filter the list of displayed messages using the class group:
|
| Message Class |
Use this option to filter the list of displayed messages using the message class. The available message classes depend on the selected Class Group. You can simply select the class or begin entering the name to limit the items for selection. The default setting is “All” which displays all message classes. |
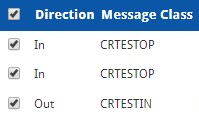
| Direction |
Use this option to filter the list of displayed messages using the FTP transfer direction:
|
| Mailbox |
Use this option to filter the list of displayed messages using the mailbox. The available mailboxes depend on what is configured for your institution. The default setting is “All” which displays all mailboxes. |
| Sender Type |
Use this option to filter the list of displayed messages using the sender type:
|
| Downloaded |
Use this option to filter the list of displayed messages using the download status:
|
| Start Date - End Date |
Use these options to filter the list of displayed messages using a date range of received and/or transmitted files. The system uses a default range of a 30-days, using the current date as the end date, to eliminate bulk messages in the viewing pane. You can expand or narrow this range as needed. |
Download Messages
When you locate the messages that you need, you can select and download them. Typically, you use the Search Criteria to filter the list of displayed messages so that it displays only those messages that you want to browse or download.
In the displayed list, there is a check box next to each message item.

To select and download messages:
-
Select the check box for each message that you want to include. If you want to include all the items in the filtered list, select the box in the title row to select all displayed messages.

-
When the messages that you need are selected, select the Download Checked button. The system generates a .zip archive file that contains all the messages you marked for download. Your web browser delivers the file to the default download location.
Export Message Records
When you access the SAIG Message History list, you can export the message records to an Excel file. This is useful for producing information for audits and other compliance requests. The Excel worksheet contains the following columns:
- Direction
- MessageClass
- SenderMailbox
- ReceiverMailbox
- DocumentID
- BatchNumber
- ReceivedDate
- SystemReceivedDate
- Sender
To export message records:
-
Select Messages in the navigation bar.
-
Select an option at the top of the grid:
-
To export only the records displayed on the current page, select Export Current Page.
-
To export all rows on all pages, selectExport All Rows.

This produces the Excel file and downloads it to your local system where you can save it as needed.
-
 ) if the message has been downloaded at least once
  ) in this column if there is a note attached to this message. Select the icon to view additional information for the message.