Wake up the Long Running Workflow
This workflow resumes the long running workflow when an advisor approves or denies a student's request to drop a course and the Contact Manager activity is closed.
-
Launch Workflow Designer.
-
On the Home tab, click New Event Workflow.
-
In the Name field, type Resume Drop Course Workflow.
-
In the Entities area, expand Cmc.Nexus.Contracts > Cmc.Nexus.Crm and select Task {Task).
-
In the Events area, expand Cmc.Core.Eventing and select Saved (SavedEvent).
-
Click OK.
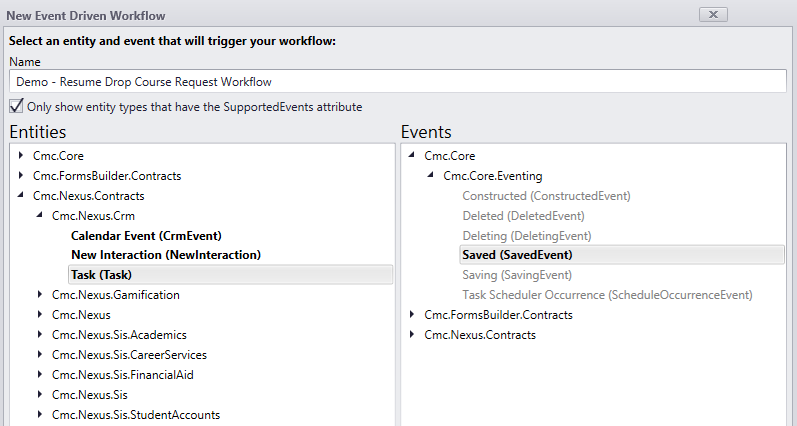
This workflow uses a Flowchart instead of a Sequence. Flowcharts are better used when many decisions need to be considered. In this case, we are really looking for the result of the activity; however, the result is not required in the database. We need to handle approved, denied, and nothing, or a NULL results. This is best done with flow decisions.
-
In the Designer pane, right-click the default Sequence and select Delete.
-
In the Toolbox under Flowchart, find the Flowchart activity and drag it on to the Designer pane.
-
In the Properties pane, change the DisplayName to Resume Drop Course Workflow.

In the Variables pane, create variables with the following names and types:
| Name | Variable type (see Note) | Default |
|---|---|---|
| ActivityResultDenied | LookupReferenceItem (Cmc.Nexus.Common.Workflow) |
|
| ActivityResultApproved | ||
| ActivityStatusClosed | ||
| DropActivity | ||
| BookmarkName | String | "Denied" |
| Result | Int32 | |
| WorkflowId | Guid (mscorlib > System > Guid) | |
| Note: If you don’t see the Variable type you need, click Browse for Types. | ||
Working with flowcharts is nice because you can really organize the steps and activities.
-
Drag a Sequence activity below the Start circle of the Flowchart.
-
In the Properties pane, change the DisplayName to Initialize.
-
Double-click the Sequence. Inside this sequence, we will add some logging and look up some information that we will use in our first flow decision.

-
Drag a LogLine activity into the sequence.
-
Drag two LookupReferenceItem activities into the sequence.
-
In the LogLine activity, change the DisplayName to Begin Workflow.
-
In the Text field of the LogLine activity, type:
"Check event for conditions - the CmEventId is -" + entity.Id.ToString + " the StatusId is - " + entity.TaskStatusId.ToString + " the ResultId is - " + entity.TaskResultId.ToString
-
In the first LookupReferenceItem, specify the following:
DisplayName: Find the Drop Activity Status Reference Item Type: Task Status Reference Item: ActivityStatusClosed (This is one of the variables created above.) -
In the second LookupReferenceItem, specify the following:
DisplayName: Find Drop Activity Reference Item Type: Task Template Reference Item: DropActivity (This is one of the variables created above.)
-
Click Flowchart in the breadcrumbs at the top of the Designer pane.
-
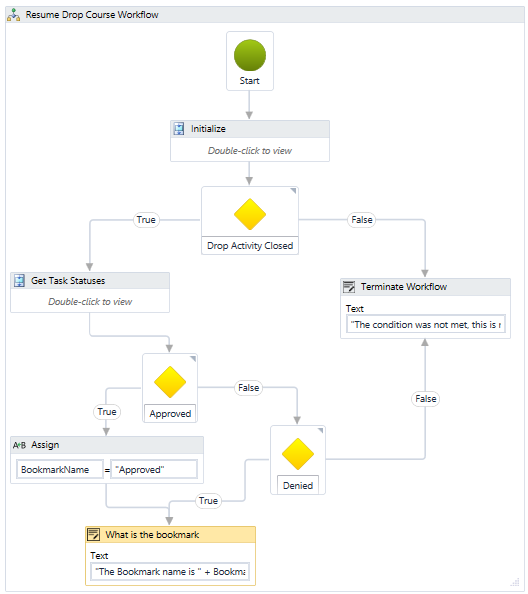
Drag the Flow Decision activity below the sequence we just created.
-
In the Properties pane of the Flow Decision, change the DisplayName to Drop Activity Closed.
-
In the Condition field, type:
entity.HasChanged(task.TaskStatusIdProperty) and entity.TaskStatusId = ActivityStatusClosed.Id and entity.TaskTypeId = DropActivity.Id
This condition checks if the Contact Manager Drop activity was closed.
-
If it isn’t the Drop Activity, and the status wasn’t what was updated, we will end the workflow.
-
If it is the one we are looking for, we will check for the result.
-
-
Hover the cursor over the Start icon. Little shapes appear around the outside.
-
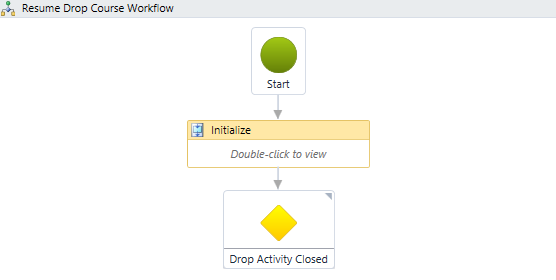
Draw an arrow from the Start icon to the Initialize sequence.
-
Draw another arrow from the Initialize sequence to the Flow Decision.
-
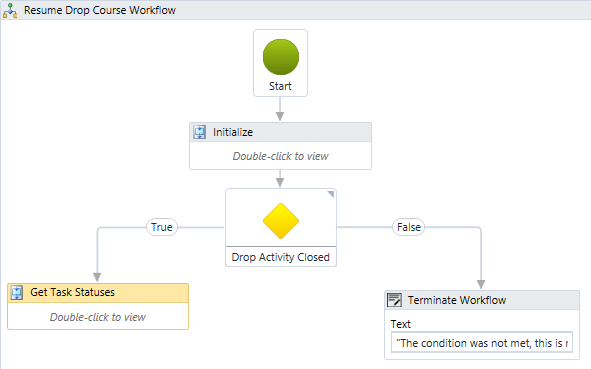
The output of the Flow Decision is a True or False branch. You can change the labels of the a True or False branches; however, regardless of the labels, the condition is either met or not met. In our case, the condition is not met if the activity is not the Drop Activity or if the update did not close the status on that activity.
-
Drag a LogLine activity to the right and slightly below the Flow Decision.
-
In the Properties pane, change the DisplayName to Terminate Workflow.
-
In the Text field, type: “The condition was not met, this is not a Drop Activity".
-
Drag a Sequence to the left and slightly below the Flow Decision.
-
In the Properties pane, change the DisplayName to Get Task Statuses.
-
Connect the Flow Decision to each of the sequences.
-
Double-click the Get Task Statuses sequence.
-
Drag two LookupReferenceItem activities and a LogLine activity into this sequence.
-
In the first LookupReferenceItem, specify the following:
DisplayName: Activity Result Approved Reference Item Type: Task Result Reference Item: ActivityResultApproved (This is one of the variables created above.) -
In the second LookupReferenceItem, specify the following:
DisplayName: Activity Result Denied Reference Item Type: Task Result Reference Item: ActivityResultDenied (This is one of the variables created above.) -
In the Text field of the LogLine activity, type:
"The ApprovalID is " + ActivityResultApproved.Id.ToString + " the DeniedId is " + ActivityResultDenied.Id.ToString
-
In the Properties pane of the LogLine activity, change the DisplayName to Log the Result Ids.
-
Drag two more Flow Decisions into the workflow.
-
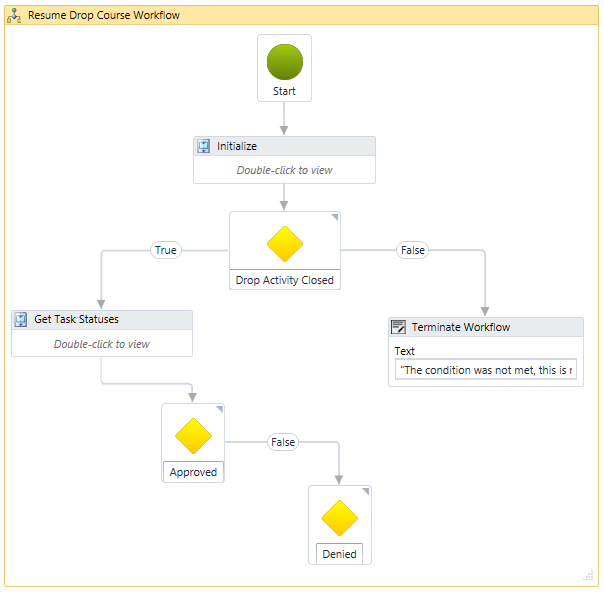
Connect the Get Task Statuses sequence to the first Flow Decision.
-
In the Properties pane, change the DisplayName to Approved.
-
Connect the False line of the Approved decision to the top of the Denied Flow Decision.
-
In the Properties pane, change the DisplayName to Denied.
-
Set the Condition field for the Approved decision to:
entity.TaskResultId.Value = ActivityResultApproved.Id
-
Set the Condition field for the Denied decision to:
entity.TaskResultId.Value = ActivityResultDenied.Id
-
Drag the Assign activity near and below the True side of the Approved decision.
When the Approved decision goes down the True path, we are going to set the value of the variable BookmarkName to Approved. Remember, we set the default value to Denied (see step 3).
-
Drag a LogLine activity below the Assign activity.
-
In the Text field, type: “The Bookmark name is “ + BookmarkName
-
In the Properties pane of the LogLine activity, change the DisplayNameto What is the bookmark.
-
Connect the Approved True line to the Assign activity.
-
Connect the Assign activity to the LogLine activity.
-
Connect the False line of the Denied decision to the Terminate workflow activity.
-
Connect the True line to the What is the bookmark LogLine activity.
-
Drag another Sequence into the workflow.
-
In the Properties pane, change the DisplayName to Kick Off the Persisted Workflow.
We need to get the WorkflowInstanceId and resume the bookmark that is waiting in our Pick Branch from our long running workflow.
-
Drag the ExecuteDataReader activity into the sequence.
-
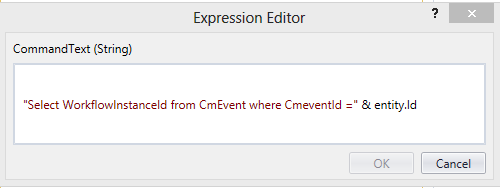
In the Command field, type:
"Select WorkflowInstanceId from CmEvent where CmeventId =" & entity.Id
-
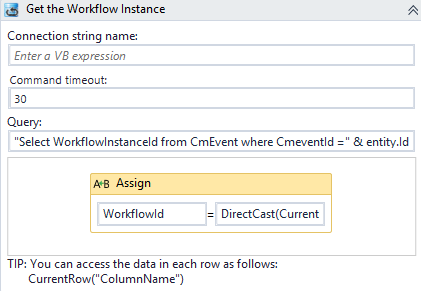
Drag the Assign activity into the Get the Workflow Instance activity.
-
In the To property, type WorkflowId. This is the GUID variable we created earlier.
-
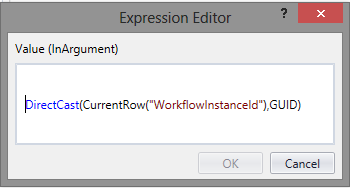
In the Value property, type: DirectCast(CurrentRow("WorkflowInstanceId"),GUID)
Results that come from the ExecuteDataReader activity are always strings, but we need a GUID. Therefore, we are casting the result into the correct data type.
Important: It is critical that the spelling inside CurrentRow() is exactly as it is in our SELECT statement. Otherwise, the string to string comparison will fail.
-
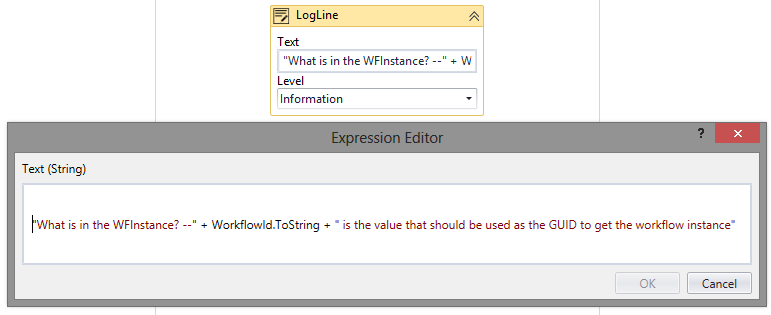
Drag a LogLine activity under the Get the Workflow Instance activity.
-
In the Text field, type:
"What is in the WFInstance? --" + WorkflowId.ToString + " is the value that should be used as the GUID to get the workflow instance"
-
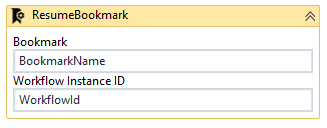
In the Toolbox under Cmc.Core.Workflow.Activities, find the ResumeBookmark activity and drag it under the LogLine activity.
-
We have the BookmarkName set by our decision logic and we now have our WorkflowId assigned to the instance we are looking for.
-
In the Bookmark field, add the BookmarkName variable.
-
In the Workflow Instance Id field, add the WorkflowId variable.
-
-
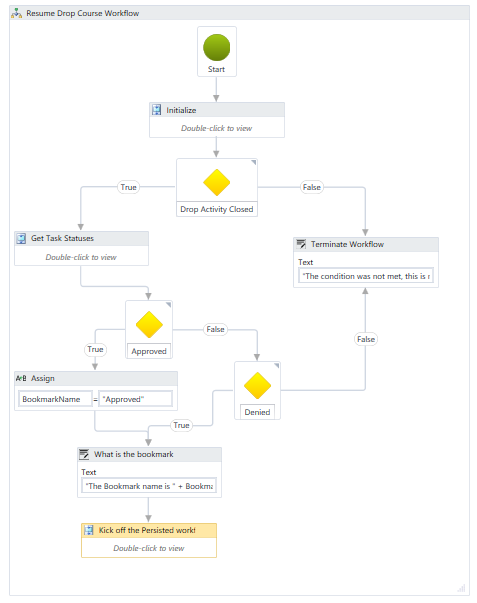
Connect the What is the bookmark LogLine activity to the Kick off the Persisted Workflow.
-
Check your workflow. Scroll through the workflow or use the fit to screen button located at the bottom of the Designer pane to see the whole workflow based on your screen resolution.
-
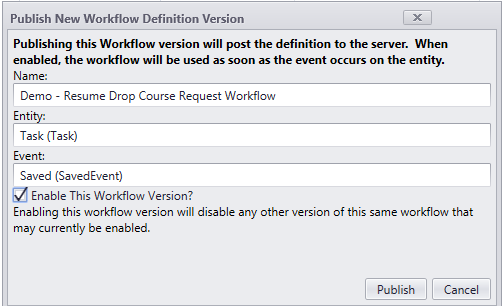
Click Publish. The Publish Workflow Definition Version window is displayed.
-
Select Enable This Workflow Version.
-
Click Publish, then Cancel to close the publisher window.
Continue with Test the Workflow Sequence.