Transfer Student Monitoring Export
You can use the Transfer Student Monitoring Export page to select individual students and/or student groups to include in a Transfer Student Monitoring (TSM) Batch Inform file with message class TRNINFIN. The export process places the TRNINFIN file in a Virtual Machine File System (VMFS) or Azure File Share (AFS) folder which can be accessed by EdConnect or Mailbox Manager.
The export process:
-
Adds students to a database table to enable review and tracking of Transfer Student Monitoring
-
Adds students to a previously configured hold group (see General Settings for Financial Aid)
On the Transfer Student Monitoring Export page, you can manually trigger the export of files, set up schedules for automated exports, and view the results of manually queued jobs and scheduled jobs.
-
On the Process tab, specify the data selection criteria and manually queue an export job. The queued job will run in the background. The Process tab is not used when the export process is automated via schedules.
-
On the History tab, review the results of manually queued jobs and scheduled jobs.
-
On the Schedule tab, create, edit, activate, deactivate, delete schedules, and specify file export options (i.e., selection criteria). You can also view detailed information on the last 5 runs of a scheduled export process and manually trigger an export process.
Financial Aid Processes File Management
Anthology Student version 22.0 and later enables customers to manage files in Azure File Storage using the Financial Aid Processes File Management form under Processes > System Administration. Without this form, users cannot upload or download files to Azure File Storage due to security restrictions. The file management functionality enables you to place files in the location where specific financial aid processes (e.g., Application Data Export/Import, Clearinghouse, NSLDS Reports, and others) expect to find the files. For more details, see Financial Aid Processes File Management.
Prerequisites
You must have the following authorization:
-
Common - Processes - View
-
Financial Aid - Processes - Transfer Student Monitoring - Export
You should be familiar with the Background for Transfer Student Monitoring.
Access Method
Select the Processes tile > expand Financial Aid > select Transfer Student Monitoring Export.
Procedure to Export Transfer Student Monitoring Files
Process Tab
Use the Process tab to specify the record selection criteria and manually queue export jobs. For automated exports, use the Schedule tab to specify the export options.
The selection process gathers students from initial enrollments and re-entry enrollments. If the re-entry date is null, the start date is used. If the start date is null, the expected start date is used.
-
Select an OPEID. The drop-down list contains all configured OPEIDs in the Anthology Student database to which you have access.
Note about School Code, Branch Number, and OPEID
Anthology Student supports institutions that use a numeric School Code and Branch Number, as well as institutions that use an OPEID.
If your institution uses a School Code and Branch Number, Anthology Student processes will append the 2-digit Branch Number to the 6-digit School Code (also known as Pell ID) and create the 8-digit OPEID.
The OPEID must be used instead of the School Code and Branch Number in the following processes:
- Clearinghouse Export
- COD Export
- Enrollment Reporting (SSCR Processing)
- FISAP
- Transfer Student Monitoring
When Financial Aid Automation is used and the School Code for your institution contains the letter G, B, or E, replace the letter with a 0 (zero).
-
The Campuses field is read-only. It displays the campus name(s) associated with the selected OPEID.
-
The Campus EDE Path field is read-only. It displays the configured EDE path for the campus(es).
-
Select one of the following Batch Type options:
-
New (default) - This option requires entries in the Request Type, Start Type, Student Group, and Status Category fields.
-
Students to Delete
-
-
Select one of the following Request Type options:
-
Transfer Student Monitoring
-
Financial Aid History
-
Both
-
-
Select one of the following Start Type options:
-
Expected Start Date - Specify the date range in the Expected Start Date From/To fields.
For Financial Aid History requests, the date range is not validated. For Transfer Student Monitoring or Both, the date range is validated as follows:
-
Enrollment Begin date is not less than the current date minus 90 days.
-
Enrollment Begin date is not greater than the current date plus 18 months (548 days).
-
-
Term - Select one or more values in the Terms search field and select the Select button.
-
-
Select a group in the Student Group field.
-
For Financial Aid History requests, select one or more values in the Program Versions field.
-
Select one or multiple student statuses in the Status Category field.
-
Select Next.
The Selection Criteria section will be collapsed and the Results section will be expanded.
-
Review the data in the Results grid.
-
Select specific records you want to export for transfer monitoring or select Select All Across Pages to select all records.
-
Select Queue Transfer Student Monitoring Export.
-
A message indicates the number of correction records that will be extracted. Select Yes to continue.
-
This starts the job of processing the data and creating batches asynchronously from the selection criteria.
The batch is displayed on the History tab so that you can review the job results.
Continue with the History tab.
History Tab
Use the History tab to check the results of manually queued jobs and scheduled jobs.
-
Review the grid listing the Transfer Student Monitoring Export batches.
-
Select the refresh icon (
 ) in the footer of the grid to retrieve the current status of the background jobs.
 -
If the job status is "Completed" and there is a "Details" link in the Results column indicating that the job did not succeed, you can select the Retry Batch button in the grid toolbar to resubmit the job. This option can be useful if an error occurred after the job was submitted (e.g., network issues, SQL cannot be reached).
- To remove a batch, select the Cancel Batch button in the grid toolbar. You can remove only failed jobs.
-
For a job with a status of Succeeded, select the link in the Batch Num column to review the records in the batch.
The Job Results section appears below the Batches grid.
-
Review the records in the Job Results grid.
-
To view the Student Profile for a record, select the link on the student name. The Student Profile page for the selected record is displayed in a new browser tab if you have permission to view student data.
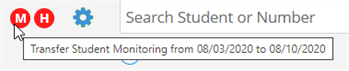
The Profile of students in Transfer Student Monitoring or Alerted status displays the visual indicator
 at the top right of the page. When you hover over the icon, the tooltip displays the following information:
Transfer Student Monitoring from <Expected Start Date> to <Expected Start Date + Monitor Duration Days >
When the monitor duration period is expired or the student is removed from monitoring, the icon is no longer displayed.
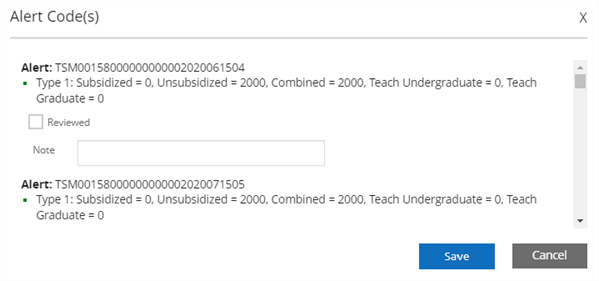
When an NSLDS alert file is imported, Anthology Student displays an alert indicator for each student on their Awards page. You can review the alerts, capture notes, and mark them as reviewed for each student. The system removes the student from the TSM disbursement hold and changes the student's TSM status from alerted back to monitoring if you save with all alerts marked as reviewed.
The alerts message bar displays TSM Alerts when there are un-reviewed alerts from NSLDS for the student.

The TSM alert pop-up displays the alert file and the records with changes at NSLDS that triggered the alert. You can capture a note and mark the alert as reviewed. When all alerts for the student are marked as reviewed, the system will remove the student from the configured TSM disbursement hold.
Schedule Tab
Use this tab to create, edit, activate, deactivate, delete schedules, and specify Transfer Student Monitoring Export options (i.e., selection criteria).
You can also view detailed information on the last 5 runs of a scheduled export process and manually trigger the execution of an export process.
-
Review the grid listing the previously created schedules for Transfer Student Monitoring Export.
-
To remove a schedule, select the schedule and select Delete.
-
To activate an inactive schedule, select the schedule and select Activate.
-
To prevent an active schedule from running, select the schedule and select Deactivate.
-
To trigger a scheduled export process to run immediately, select an active schedule and select Run Now.
-
To view details of a previously scheduled job, select the expand icon (
 ) in the left column. The following details are displayed:
 -
To edit a schedule, select the link in the Name column. The Edit Schedule - <Name> form is displayed below the grid.
- To create a schedule, select the New button in the grid toolbar. The New Schedule form is displayed below the grid.
-
Specify or edit the following properties for the New Schedule:
Specify or edit the following Transfer Student Export Monitoring Options:
-
If you want to save and:
-
Continue making changes, select the Save button
-
Continue to add another item to the list, select the Save & New button
-
Close, select the Save & Close button
-
-
To close the New Schedule or Edit Schedule form, select Cancel.