Permissions Required
Edit Print Template - To modify Print Templates.
You can insert or remove base Object Properties from the Content tab of the Print Template or by opening the Print Template in MS Word.
You can insert or remove Properties that were selected when the Print Template was created or when base Object Properties, Properties of Objects related to the base Object, or logged in User Properties, were added to it. In addition, you can type relevant text in the Content tab of the Print Template or the MS Word document.
1. Open the required Print Template.
2. View the Print Template in MS Word in the Content tab.
- OR -
Click  . A new MS Word file is displayed.
Properties selected to be inserted into the Print Template are displayed in the Merge Fields area.
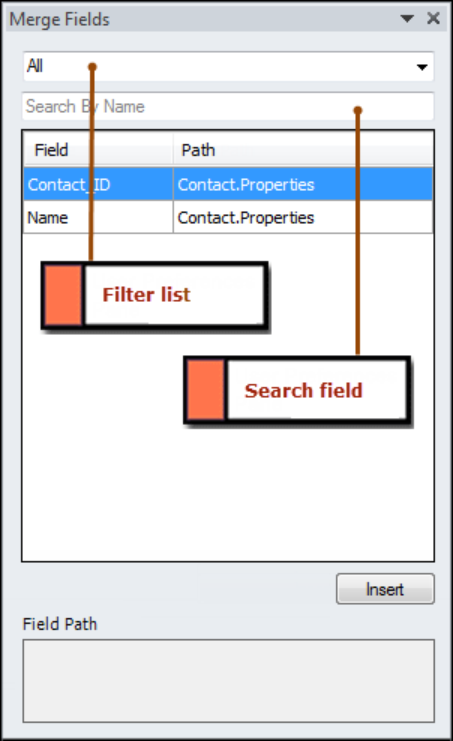
The Merge Fields Area
The Merge Fields area also includes filters that govern the display of Properties that you can select. Select the Property, List or Conditional Merge filter and then type the first few characters of a merge field name in the search field. Search results are filtered dynamically as you type additional characters. You can also type the first few characters of a merge field name when the All filter is selected.
The following table describes the available filters:
|
Filter |
Description |
|---|---|
|
All |
This option is selected by default. The following Properties are displayed: • Base Object Properties • Related Object Properties up to two levels of a One to One Relationship from the base Object • Object list type tabs of Objects related up to a single level in a One to Many or Many to Many Relationship of the base Object • User Object Properties • Conditions created in the Conditional Merge Manager |
| Property |
Displays Properties that are selected in the Properties tab of the base Object. In addition, selected base Object Properties if the base Object is on the one side of a relationship are displayed. Property values that are inserted into the Print Template are displayed in the following format:
|
| List |
Displays tabs of related Objects in which Properties are selected and that are on the many side of a one to many relationship. Additionally, RecordList tabs of the base Object are also displayed. List values that are inserted into the Print Template are displayed in the following format:
|
|
Conditional Merge |
Displays conditions that are created for the Print Template. Conditions that are inserted into the Print Template are displayed in the following format:
|
3. If the Print Template is of type Letter, position your cursor in the Print Template, select the filtered Property and then click Insert or double-click the Property. The Property is inserted into the Print Template as a merge field.
If the Print Template is of type Label, the Update Labels button is displayed in the Merge Fields area.
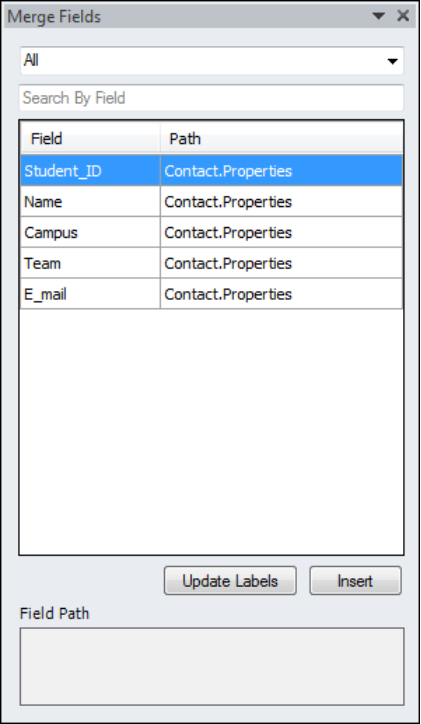
The Update Labels Button in the Merge Fields Area
View the Print Template in the Content tab or in MS Word. After inserting the required fields and text in the first label, click Update Labels. Text from the first label is copied to all labels in the Print Template. Text or merge fields that were available in other labels are overwritten with content that is available in the first label.
|
Note If the first label in a Print Template is empty or contains content that is different from other labels, the Print Template will not be merged. To prevent this error from occurring, ensure that all labels have the same content. |
4. Save the changes.
◦ Text in the first non-empty label in the top row is automatically copied to labels that contain information.
◦ Non-empty labels in other rows are cleared If all labels in the top row are blank.
5. From the File menu, select Close.
- OR -
Close the Print Template window.
The Print Template is saved with the changed Object Properties.
• Select the inserted Property and press DELETE. Alternatively, right-click the selected Property and select Remove Content Control from the shortcut menu. The Property is removed from the Print Template.
In Label Print Templates, delete the inserted Property or text from the first label and then click Update Labels to update all labels in the Print Template.
|
Note • Merging of properties inserted in the header and footer of a print template is not supported. • You can copy inserted merge fields to a different location in the same Print Template. However, do not copy a merge field to another Print Template as the content is not merged into the copied field when you use the Print Template. • Position the cursor on an inserted merge field to view its path in the Field Path area. If the full text of the path exceeds the available space, drag the left edge of the Merge Field area to the left to widen its display. The following table lists display formats of inserted elements in the Field Path area:
• The Merge Fields area is not displayed in the following scenarios: ◦ If you migrate from a compatible 32-bit version of MS Office to a 64-bit version or vice versa. ◦ You installed a compatible version of MS Office after installing or upgrading Talisma Client. Reinstall Talisma client to view the Merge Fields area. • When the name of a Property, tab, or Conditional Merge that is inserted into a Print Template is changed in Talisma Business Administrator, the changed value of the element is displayed in the Merge Fields area when you view the Select Properties dialog box and click Save. While the original name of the element is retained in the Print Template and in the Field Path area, values are successfully merged into the element when the Print Template is used. • The Merge Fields area cannot be closed even if you click X or select Close in the top right corner. • If a computed Property is inserted in a Print Template, update the value of the Property before you merge the Print Template. • In the Content tab and in the MS Word document, when you insert Properties of the following tabs into a Print Template, you can view only the tab names and not the selected Properties: ◦ The RecordList tab of the base Object. ◦ Object List type tabs in relationships between the base Object and other Objects. When you merge the Print Template, Properties that were selected in the above tabs are displayed in tabular format in the order in which they were selected in the Select Properties dialog box. • When you modify the Print Template using MS Word, if you select File, Save As and then save the file with a different name, it loses its association with the base Object that was set. • Changes incorporated in the Print Template from MS Word are displayed in the Content tab only after you save and close the MS Word document. |
Send feedback on this topic (documentation@campusmgmt.com)
Last Updated: 9/16/2019
© 2019 Talisma Corporation Private Ltd., a subsidiary of Campus Management Corp. | www.campusmanagement.com