Prerequisite: To create a Print Template, the following components must be installed on the Talisma Client computer:
• MS Word 2010 SP2 Standard or higher (32-bit)
OR
MS Word 2013 SP1 Standard or higher (32-bit or 64-bit)
• Visual Studio 2010 Tools for Office Runtime
• Microsoft .NET Framework 4.5
Permissions Required
Create Print Template - To create Print Templates.
Talisma enables you to create a Print Template in which you can view or print Property details of the following Objects:
• The Object that is set as the base Object
• Related Objects
• Custom Objects
• User Object
1. Click the ID of the required Print Template from your Workspace's Print Template Table View.
2. From the File menu, select New Print Template.
- OR -
Click  .
.
The New Print Template window is displayed.
3. Click the Properties tab.
4. Type the name of the Print Template in the Name field. This field is mandatory.
5. Select the name of the owner of the Print Template in the Owner list. If you do not specify an owner, the name of the logged on User is automatically updated in this field when the Print Template is saved. This is a mandatory field.
6. From the Base Object list, select the Object that you want to set as the base Object for the Print Template. This field is mandatory.
7. In the Template Type list, select the type of Print Template you want to create:
◦ Letter - This option is selected by default. Creating a Letter type of Print Template enables you to view or print documents in a standardized format.
◦ Label - Creating Labels using the Print Template Object enables you to label postal mail that you want to dispatch to your clients.
8. From the Language list, select the language of the Print Template. After the Print Template is saved, you cannot change this language.
9. Select the Share tab. From the Share to Teams list, select the Teams with which you want to share the Print Template. You must select at least one Team.
10. From the Print Template menu, select Select Properties.
- OR -
Click  .
.
The Select Properties dialog box is displayed.
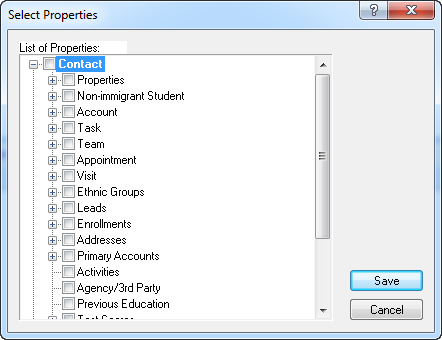
The Select Properties Dialog Box
The List of Properties area includes Properties of the base Object, Objects related to the base Object, and User Object Properties that are listed in the Logged in User list. The Logged in User is the Talisma User who uses the Print Template to print Object details.
Select Object Properties that you want to insert into the Print Template and click Save.
The Select Properties dialog box is closed and the Content tab is automatically selected in the Print Template window.
11. You can insert the selected Properties into the Print Template. You can also insert the selected Properties by opening the Print Template in MS Word.
|
Example You selected the Name, E-mail, Date of birth and Phone Contact Properties in the Select Properties dialog box. When you insert the Name and E-mail Properties into the Print Template, they function as placeholders in which values are merged when you use the Print Template to print Contact details. You need to save the MS Word document after you insert base Object Properties. |
12. You can insert Conditional text in the Print Template.
|
Example a. As the Admissions Coordinator at Neptune University, you dispatch letters to students who enroll for undergraduate courses for the forthcoming academic year. Student admissions are based on SAT scores in the SAT Score Contact Property. b. In the Year2014 Print Template, you create and insert the SAT Call and SAT Waitlist Conditions. Students will receive letters based on their scores as specified in the SAT Score Contact Property: ◦ The SAT Call Condition: invites students whose SAT scores exceed 2200 to join Neptune University. ◦ The SAT Waitlist Condition: informs students that their applications are waitlisted as their SAT scores are less than or equal to 2200. c. Using the Year2014 Print Template, letters based on the SAT Call Condition are printed for students whose SAT scores exceed 2200, and waitlist letters based on the SAT Waitlist Condition are printed for students whose SAT scores are less than or equal to 2200.
|
13. In the Content tab, save the MS Word document.
|
Note • For Label type of Print Templates, if labels are not displayed when you view the Print Template in the Content tab or MS Word, enable the display of labels in MS Word. • After the Print Template is saved, you cannot change the base Object that is set for it. • The Print Template is also saved when you click Save in the Select Properties dialog box. • Values in the Created On and Last Updated fields are automatically updated by Talisma. • For information on the Properties you can set for this Object, see Print Template Tabs and Properties. |
Send feedback on this topic (documentation@campusmgmt.com)
Last Updated: 9/16/2019
© 2019 Talisma Corporation Private Ltd., a subsidiary of Campus Management Corp. | www.campusmanagement.com