Inserting Event Nodes
In a Campaign Workflow, an Event triggers the Action that follows it, and is represented by an ellipsis. There are two types of Events in Talisma: Wait Event and Non-wait Event.
Wait Event
A Wait Event is a time-based event. Wait Events can be scheduled after a specified duration, or on a particular date at a specific time. A Wait Event can also recur after a specified interval. For example, “Wait for 5 days” is a Wait Event, “Recur every Tuesday” is a recurring Wait Event.
You can use the Wait Event functionality to schedule Actions in the Campaign to "wait", or occur after a specific duration, or on a particular date at a specific time. Actions following the Wait Event can also be made to recur daily, weekly, or monthly. The following list depicts the text that is displayed in the Wait Event based on the type of wait criteria you define:
• Wait for 1 day
• Wait until 8/9/2007 2:00:00 PM
• Wait until (Condition)
• Recurring Event
|
Example WorldWaves is launching a Campaign to introduce a new brand of its latest product line. As part of this Campaign, you have dispatched Mailers to a set of Targets in San Diego. You have decided to wait for three days before sending out a follow-up Mailer to Targets who do not respond to the Mailer. In this scenario, you need to insert a Wait Event, following the Send mailer Action in the Workflow of the Campaign. Define On elapse of 3 days, as the Property for the Wait Event. Define a Filter for the Connector preceding the Wait Event, such that Targets who do not respond to the original Mailer transition to the next Step. Only such Targets will receive the follow-up Mailer. |
To Insert a Wait Event
1. In the Workflow tab of the Campaign window, select the Connector to which the event needs to be connected. Ensure that the Connector does not follow another Event. It can only follow an Action.
2. From the Add menu, select Wait Event.
- OR -
Click  .
.
An ellipse is attached to the last Connector in the Workflow and the list of its associated Properties is displayed in the Right pane.
3. Type a name for the Node in the Name field.
4. In the Right pane, specify when the Wait Event must occur. The following table describes the options you can select:
|
Option |
Description |
|
On elapse of n days |
The Action that follows the Wait Event is triggered when the specified duration has lapsed. |
|
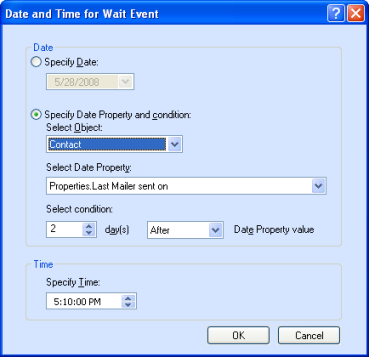
Wait until <date> |
The Action that follows the Wait Event will be triggered at a particular date and time, or when a specified duration has elapsed.
The Date and Time for Wait Event Dialog Box To Specify a Date and Time 1. Click 2. Select the Specify Date option. By default, the current date, and time of your computer are displayed in the date, and time fields. Select a date in the date list, and select a time in the Specify Time spin control. You cannot specify a date, and time that occurred in the past. The Action that follows the Wait Event will be triggered when the specified date, and time occur in Talisma Main Database.
To Specify a Condition 3. In the Select Object list, select an Object or Relationship whose Date type of Property you want to use in the condition. You can select the base Object, Target, Participant or Event Object in this list. 4. In the Select Date Property list, select a Date type of Property of the Object. This list includes date Properties that belong to tabs shared with the Team in which you are creating the Campaign. You can also select a related Object's Date type of Property. The Properties in this list are displayed in the <Tab Name>.<Group Name>.<Property Name> format. 5. In the Select condition area, specify a count of days in the days spin control. The default value is 0. The maximum value you can specify is 999. 6. Select one of the following options in the Date Property value list:
7. Select a time in the Specify Time spin control. 8. Click OK. The Action following the Wait Event is configured to be triggered based on the values specified in the condition. Note • When you specify the value 0 in the days spin control, the Action following the Wait Event will be triggered on the date selected in the Select Date Property list. • You can only view those Date type of Properties that occur in tabs shared with Teams to which you have been granted access. • Ensure that the number of days after which the Action following the Wait Event is scheduled to occur is lower than the count of days set in the If Target does not make a Transition for n days, remove from Campaign option. This is because the Target will be removed when the count of days specified in the If Target does not make a Transition for n days, remove from Campaign option elapses, and Targets will not progress when the Wait Event occurs. Example The Credit Card Promotion Campaign is designed to have two Send mailer Actions with a Wait Event between each Action. The first Send mailer Action sends an introductory Mailer to Targets. Targets then progress to the Wait Event. The second Send mailer Action is scheduled to send a reminder Mailer 20 days after the introductory Mailer was sent. In this scenario, ensure that the value in the If Target does not make a Transition for n days, remove from Campaign option is set to a value that is greater than 20. For more information, see Removing Inactive Targets. |
|
Recur |
The Action following the Event is scheduled to recur daily, weekly, or monthly at a specific time.
The Schedule Dialog Box By default, the time in the Recurring Time field is based on the locale set for the Talisma Client computer. |
 . The Date and Time for Wait Event dialog box is displayed.
9. Click the Node in the Workflow to view the selected Event.
Non-wait Event
A Non-wait Event is triggered when a Target performs a specific action. For example, On response to mailer is a Non-wait Event.
|
Example You have dispatched a Mailer announcing a discount offer to your customers in Seattle. You want Talisma to send a Canned Response containing the details of the offer to Targets who respond to the Mailer. In this scenario, you can define the On response to mailer Non-wait Event following the Send mailer Action. |
To Insert a Non-wait Event
You can insert a Non-wait Event only if it is preceded by the Make Call, Send Mailer, Create Letter, Create Label or Send SMS Action.
1. From the Add menu, select Non-wait Event.
- OR -
In the Workflow tab of the Campaign window, click  .
.
An ellipse is attached to the last Connector in the Workflow, and its associated Properties are listed in the Right pane, for which you need to set values.
2. Type a name for the Node in the Name field.
3. Select an event from the Select Event list. For the Make Call, Send mailer, and Send SMS Actions, the following table describes the various options you can select:
|
Action |
Option |
Description |
|
Make Call |
Failure |
This Event is triggered when the outbound phone call with the Target has failed. The Call Outcome Message Object Property is set to Failure. For example, an outbound phone call can fail when a Target is not interested in the product, or service that is being offered. |
|
Success |
This Event is triggered when the outbound phone call with the Target was a success. The Call Outcome Message Object Property is set to Success. For example, an outbound phone call can succeed when the Target is interested in the product, or service that is being offered. |
|
|
Send mailer
|
No responses to mailer |
This Event is triggered when a Target does not respond to a Mailer. You can then define the Action to take on this set of Targets. This is a time-based Event. Note When you select this option, specify the number of days in the On elapse of field. |
|
On web form fill |
You can insert a Web Form in a Mailer. This Event is triggered when a Target fills the Web Form inserted in a Mailer. Talisma creates an Interaction when a Target submits a Web Form sent in a Mailer. |
|
|
On URL click |
This Event is triggered when a Target clicks a Trackable URL contained in a Mailer. Talisma tracks the URL clicked by the Targets, which you can use to route Targets through the relevant sequence of steps and Nodes. You can also build conditions to track a URL that was not clicked, and route the relevant set of Targets through an alternate path in the Campaign Workflow. |
|
|
On response to mailer |
This Event is triggered when the Target responds to a Mailer. Talisma creates an Interaction using the response from the Target. Depending on the response, the Targets can be routed through the relevant sequence of Nodes in the Workflow. Note By default, Talisma automatically creates Interactions for all responses that are received. Therefore, Interactions are created for Out of Office replies and undelivered messages that are automatically sent out by the e-mail clients of recipients. To avoid this problem, you can configure the OPT file not to create Interactions for responses containing the text 'Out of Office' and 'Undelivered' in the subject line. For information about configuring the OPT file, see Installation Manager Help. |
|
|
Send Mailer - Preferences Matched |
Targets are moved to this step if at least one selected preference on the Send mailer step matches with a preference (the value Yes in the Email property) in the Preferences tab of the contact. |
|
|
Send Mailer – Preferences Mismatched
|
Targets who do not qualify for the Send Mailer - Preferences Matched step will flow through to this step. Note Targets are also moved to this step if the value in the Email property in the Preferences tab of the contact is blank. |
|
|
Send SMS
|
On Response to SMS |
This Event is triggered when the Target responds to the outbound SMS message from Talisma. Based on the Target’s response, the Target can be routed through the relevant sequence of nodes. Note In a scenario where multiple Targets have the same value in the Mobile Property, the Target to whom the SMS message was sent most recently will progress to the action that follows this non-wait event. |
|
No Response to SMS |
This Event is triggered when Targets choose not to respond to the SMS Mailer. You can route such Targets to flow through a set of Actions that is defined for such Targets. This is a time-based Event. Note When you select this option, specify the number of days in the On elapse of field. |
|
|
Send SMS – Preferences Matched |
Targets are moved to this step if at least one selected preference on the Send SMS step matches with a preference (the value Yes in the SMS property) in the Preferences tab of the contact. |
|
|
Send SMS – Preferences Mismatched |
Targets who do not qualify for the Send SMS - Preferences Matched step will flow through to this step. Note Targets are also moved to this step if the value in the SMS property in the Preferences tab of the contact is blank. |
|
|
Create Letter
|
Create Letter – Preferences Matched |
Targets are moved to this step if at least one selected preference on the Create Letter step matches with a preference (the value Yes in the Letter property) in the Preferences tab of the contact. |
|
Create Letter – Preferences Mismatched
|
Targets who do not qualify for the Create Letter - Preferences Matched step will flow through to this step. Note Targets are also moved to this step if the value in the Letter property in the Preferences tab of the contact is blank. |
|
|
Create Label
|
Create Label – Preferences Matched
|
Targets are moved to this step if at least one selected preference on the Create Label step matches with a preference (the value Yes in the Letter property) in the Preferences tab of the contact. |
|
Create Label – Preferences Mismatched
|
Targets who do not qualify for the Create Label - Preferences Matched step will flow through to this step. Note Targets are also moved to this step if the value in the Letter property in the Preferences tab of the contact is blank. |
4. Click the Node in the Workflow. The selected Event is displayed in the Node.
|
Note • You can use space in the Notes area to add notes about Wait and Non-wait Events. In a saved Campaign, click the Event to view its notes in the Notes area. • If custom values have been specified for the Call Outcome Message Object Property in Talisma Business Administrator, Campaign Users can select the values from the Select Event list in the Right pane of the Campaign Workflow when specifying Non-wait Events after the Make Call step. • If a value specified for the Call Outcome Message Object Property is subsequently modified or deleted in Talisma Business Administrator, the modification or deletion is not reflected in Campaigns in which the deleted Non-wait Events have been specified. However, when you create a new Campaign, you can select Non-wait Events based on the new list of Call Outcome Property values. |