Sharing a Workspace
Permissions Required
Share Workspace - Sharing Workspaces with other Users.
When you share a Workspace with one or more Users, you remain its owner. Modifications made to a shared Workspace are available to all Users with whom the Workspace is shared. Users with whom a Workspace is shared can modify or delete the Workspace if they have the Edit/Delete Shared Workspace Permission.
To Share a Workspace
1. From the Edit menu, select Workspaces.
The Workspace Manager is displayed.
2. Select the required Workspace(s), and click Share with.
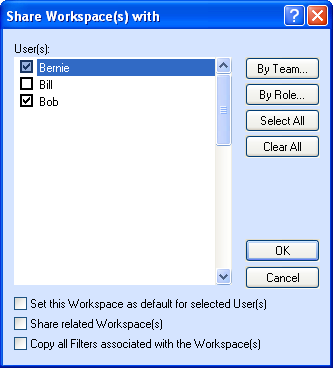
The Share Workspace(s) with dialog box is displayed.

The Share Workspace(s) with Dialog Box
|
Note • In the Share Workspace(s) with dialog box, Users with whom the selected Workspace is already shared appear selected, and their relevant check boxes are grayed. • If the Workspace(s) are shared with a Team, all the Users in the Team appear selected, and their relevant check boxes are grayed. |
3. Select the Users, Teams, or Roles with which you want to share the Workspace(s).
Click Select All to select all the Users listed in the dialog box, and Clear All to clear the selection.
4. Select the Set this Workspace as default for selected User(s) option to set the selected Workspace as the default Workspace for the Users, Teams, or Roles you selected in step 3.
The selected Workspace is not set as the default Workspace for the Users, Teams and Roles with which the Workspace was shared earlier. To set the Workspace as the default for such Users, Teams, or Roles, select the required Users, Teams, or Roles by clearing the gray highlight, and select the Set this Workspace as default for selected User(s) option.
|
Note The Set this Workspace as default for selected User(s) option is disabled when more than one Workspace is selected. |
Select the Share related Workspace(s) option to share all the Workspaces related to the selected Workspace with Users, Teams, or Roles that you selected in step 3.
The related Workspace(s) are not shared with Users, Teams, or Roles with which the Workspace was shared earlier. To share the related Workspace(s) with such Users, Teams, and Roles, select the relevant Users, Teams, or Roles by clearing the gray highlight and selecting the Share related Workspace(s) option.
|
Note The Share related Workspace(s) option is disabled when more than one Workspace is selected. |
Select the Copy all Filters associated with the Workspace(s) option to share the Filters created in the selected Workspace(s) with Users, Teams, or Roles that you selected in step 3.
The Filters belonging to the selected Workspace are not copied to Users, Teams, or Roles with whom the Workspace was shared earlier. To copy all the Filters belonging to the selected Workspace with such Users, Teams, and Roles, select the relevant Users, Teams, or Roles by clearing the gray highlight, and select the Copy all Filters associated with the Workspace(s) option.
5. Click OK.
|
Note • When you share a workspace in which a predefined workspace is specified as a related workspace, the related workspace cannot be viewed by a user in Desktop Client or Web Client. • When a new User is added to a Team or Role with which you have shared a Workspace, you must manually share the Workspace with the new User. • If you want to share a Workspace with other Users, and copy the Filters associated with it, you must have both the Copy Filters to other Users and Share Workspace Permissions. • If a Workspace has been shared with you after you have logged on to Talisma, log off from Talisma and log on again to view the Workspace from the GoTo menu. |