Prerequisites and Configurations for Hyland Perceptive Content
The topics in this section provide information on the prerequisites and configurations for integrating Anthology Reach with Hyland Perceptive Content.
Prerequisites
-
Obtain the Service Principle User account details from the institution.
The implementation team must raise a Support ticket to create Secrets for the following keys in the Key Vault in the Azure resource group created for the institution:
-
DocumentManagementIntegrationUsername
-
DocumentManagementIntegrationPassword
Note: The Service Principle User account is used for the integration between Anthology Reach and the Document Imaging System.
-
-
The following table provides the prerequisite configurations for integrating with Hyland Perceptive Content.
In Hyland Perceptive Content...
In Anthology Reach... -
Ensure that the following details are configured:
-
Drawer
-
Document Type
-
-
Obtain the following details:
-
Experience URL
-
Integration Server URL
-
Experience Capture Profile
-
External Id for Synchronization
-
For details, see Hyland Perceptive Content Documentation.
-
Enable Entities for Document Imaging System.
-
Sync or create records of the following entities that map with the Document Imaging System:
-
Drawer records that map with the Drawer records in Hyland Perceptive Content.
-
Document Type records that map with the Document type records in Hyland Perceptive Content.
-
For more information on the above configurations, see Configure Entities and Dataset for Hyland Perceptive Content
-
Configuring the Integration Details for Hyland Perceptive Content
Configuring the integration details for Hyland Perceptive Content consists of the following steps:
-
In the Anthology Reach solution, navigate to the Document Imaging Configuration page (under Settings > Customization > Document Management).
-
Click New.
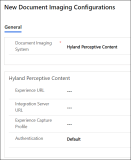
The New Document Imaging Configuration page is displayed.
-
In the Document Imaging System field, select Hyland Perceptive Content.
-
In the Hyland Perceptive Content section, specify values in the following fields:
-
Experience URL
-
Integration Server URL
-
Experience Capture Profile
-
-
Click Save.
-
Entities whose documents are required to be synchronized are enabled for synchronization with the Document Imaging System.
-
The drawers and document type records are synchronized with the latest records in the Document Imaging System.
-
Configure access to documents based on the roles assigned to the Drawers and Document Types on the Document Imaging System.
For details, see Configure Entities and Dataset for a Document Imaging System.
Steps to Configure Entities
-
Navigate to the Document Imaging Configuration record (under Settings > Customization > Document Management).
-
In the Document Imaging Entity Sync section, click New Document Imaging EntitySync.
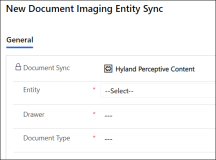
The New Document Imaging Entity Sync page is displayed.
-
Specify values for the following fields:
-
Entity - Select the Anthology Reach base entity whose documents need to be synced with Hyland Perceptive Content.
The entities listed in this field are based on the entities selected in the Entities Enabled for Document Management page. For details, see Configure Entities and Dataset for Hyland Perceptive Content.
-
Drawer - Select the drawer name.
The attachment / documents of the selected entities will be synced / pushed to this drawer of the imaging system to be synchronized for the selected entity.
Note: The Drawer names in this field are displayed based on the Drawer records created or synchronized in the Drawer tab in the Hyland Perceptive Contentform in the Active Document Configuration Settings page. For details, see Configure Entities and Dataset for a Document Imaging System.
-
Document Type - Select the document type.
The attachment / documents of the selected entities will be mapped to this Document type of the imaging system.
Note: The Document Type names in this field are displayed based on the Document Type records created or synchronized in the Active Document Configuration Settings page. For details, see Configure Entities and Dataset for a Document Imaging System.
-
-
Click Save.
-
Repeat steps 1 through 3 for each entity whose attachments / docs are required to be synchronized.
For each entity, along with the documents, it is a best practice to send the information of the properties / attributes associated with the entity to the Document Imaging System. The additional property details of the entity is stored in the Document Imaging System along with the document for future reference.
Example - When a document related to the Contact entity is pushed to the imaging system, it is a best practice to send additional contact details (such as “Contact Name, Type, Email etc.) along with the document.
Perform the following steps for each Document Imaging Entity Sync record to configure the Document Imaging Attributes that must be synchronized with the Hyland Perceptive Content.
Steps to Configure Entity Attributes
-
In the Document Imaging Configuration record (under Settings > Customization > Document Imaging Configuration), select a Document Imaging Entity Sync record to view its details.
-
In the Document Imaging Attributes section, click New Document Imaging Attributes.
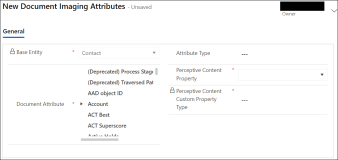
The New Document Imaging Attributes page is displayed.
-
Specify values in the following fields:
-
Document Attribute - Select the property of the Anthology Reach base entity that must be synced with Hyland Perceptive Content along with the documents.
Note: This field displays properties of the selected base entity and its related entities.
-
Attribute Type - Select one of the following values to map the Property configured in Perceptive Content with the Document Attribute for storing document details:
-
Default Property - Indicates the default property in Perceptive Content.
-
Custom Property - Indicates a custom property configured in Perceptive Content for storing additional document details in Perceptive Content.
-
-
Perceptive Content Default Property - When Default Property is selected in the Attribute Type field, select the name of the default property in Perceptive Content.
-
Perceptive Content Property - When Custom Property is selected in the Attribute Type field, select the name of the custom property in Perceptive Content that must be synchronized with the Reach entity's property.
-
-
Click Save.
-
Repeat steps 1 through 4 to create the required mapping fields for each Document Imaging Entity Sync record.
The Security and Access Control tab enables institutions to manage access to Document Types based on security roles. By default, the following two roles in Anthology Reach have access to all the Drawers and Document Types:
-
CMC - Global Business Administrator
-
CMC - Portal User
If institutions have extended the CMC - Portal User role to create a new role, then the new role must be provided access to the required Drawers and Document Types to be able to access the documents on the Portal.
-
In the Anthology Reach solution, navigate to the Document Management Settings page (under Settings > Customization > Document ManagementSettings).
-
Click the Active Document Configuration Settings option.
-
Select the OnBase form.
-
In the Security and Access Control tab, perform the following steps:
-
Click the Add button.
-
In the Roles column, select the desired role.
-
In the Drawers column, select the Drawer that can be accessed by users assigned to the selected role.
Note: If a security role needs to be given access to all drawers, select the All Drawers** option in the Drawers drop-down. It is recommended to use this option for a user with the System administrator role. -
In the Document Types column, select the Document Types that can be accessed by users assigned to the selected role.
Note: If a security role needs to be given access to all document types, select the All Document Types** option in the Document Types drop down. It is recommended to use this option for a user with the System administrator role. -
Repeat steps a to d to assign additional roles to Document Types
Note: To remove the assignment of a role associated with document type(s), select the record(s) and click the Remove button. -
-
Click the Save button to save the changes.
Institutions can configure business rules based on which entity data can be sent to the desired Drawer and Document Type. For example, institutions can create a business rule to identify whether the logged in user belongs to a specific business unit and department and send the entity data to the Drawer and Document type specified in the business rule. Further, you can create more than one business rule and configure the order in which the business rule must be applied.
Note: If a business rule is not created for an entity or none of the business rules created are satisfied, the default Drawer and Document Type configured in the Document Imaging Entity Sync record will be used to send entity data.
Use Case
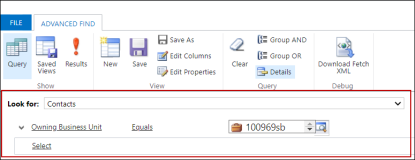
The Campus University needs to send all the documents uploaded for Contact records to the following drawers and document type based on the business unit the user belongs:
-
If the user belongs to the business unit, 100969sb, send the documents to the ABC Drawer and assign it to the Document Type DT-ABC.
-
If the user does not belong to the business unit, 100969sb, send the documents to the XYZ Drawer and assign it to the Document Type DT-XYZ
The following image illustrates the query condition created for the above use case:
Steps to Configure Business Rule for an Entity
-
In the Document Imaging Configuration record (under Settings > Customization > Document Imaging Configuration), select a Document Imaging Entity Sync record to view its details.
-
In the Document Imaging Rules section, click New Document Imaging Rule.
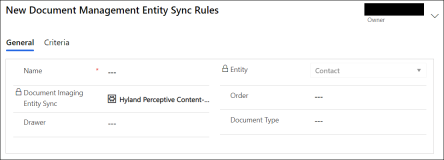
The New Document Imaging Rule page is displayed.
-
Click the General tab, and specify values in the following fields:
-
Name - Specify a name for the Business Rule.
-
Order - Specify a number in this field to indicate the order in which the business rule needs to be applied.
-
Drawer - Select the drawer name to be synchronized for the selected entity for this business rule.
Note: The Drawer names in this field are displayed based on the Drawer records created or synchronized in the Hyland Perceptive Contenttab of the Active Document Configuration Settings page. For details, see Configure Entities and Dataset for Hyland Perceptive Content.
-
Document Type - Select the document type to be synchronized for the selected entity for this business rule.
Note: The Document Type names in this field are displayed based on the Document Type records created or synchronized in the Active Document Configuration Settings page. For details, see Configure Entities and Dataset for Hyland Perceptive Content.
-
-
Click Save.
-
Click the Criteria tab and use one of the following options to define the query condition:
 Option 1 - Create a New Query
The following steps enable you to define the query logic which will be used for shortlisting the records.
 Create Query Using the Legacy Advanced Find Feature
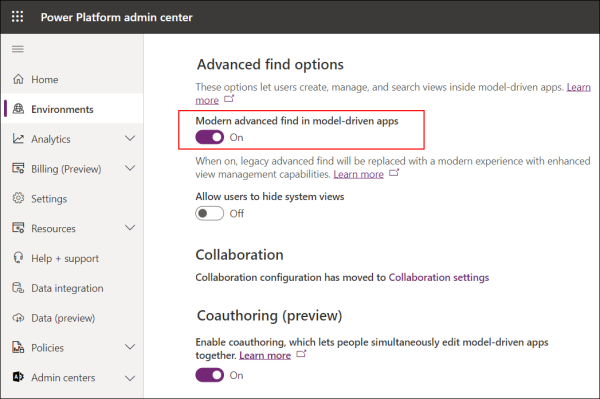
Prerequisite - The Use modern advanced find check box must be cleared.
Create Query Using the Legacy Advanced Find Feature
Prerequisite - The Use modern advanced find check box must be cleared.-
Click Create/Edit Query to view the Advanced Find page.
- Without making any changes, click
 and then specify conditions that align with logic that you want to define.
 - Click Save and close the dialog.
XML details of the query will be listed in the Query XML area. - If required:
- Modify the XML conditions in this area,
- Ensure that modifications are error free, and then click Save.
 Create Query Using the Modern Advanced Find Feature
Prerequisite
Create Query Using the Modern Advanced Find Feature
Prerequisite-
Click Create/Edit Query to view the Query Editor page.
Note: Do not change the default view, Temp_<view name>, that is populated by default in the Query Editor page. -
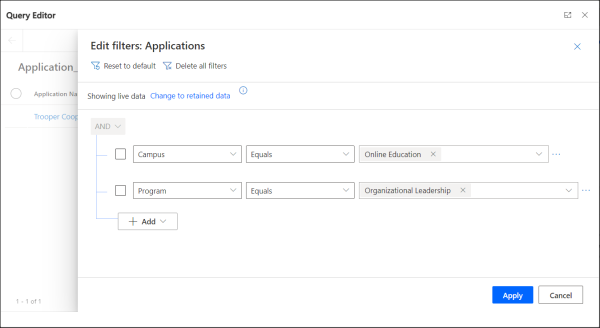
Click the Edit Filters button.
-
Configure the filter conditions that align with the logic to shortlist the records.

-
Click the Apply button.
-
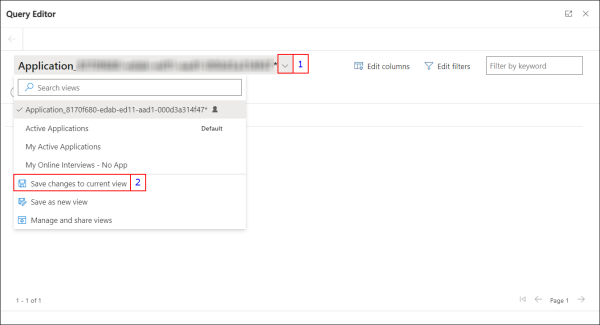
Click the drop-down next to the view name and select Save changes to current view.
-
Close the dialog.
XML details of the query will be listed in the Query XML area.
-
If required, modify the displayed XML conditions and then click Save. Ensure that manual modifications to the XML conditions are error-free.
 Option 2 - Create a Query Based on an Existing View
The following steps enable you to use an existing view that contains applicable logic.
-
Click Use Existing View.
-
From the list, select the view and then click Use Query.
Note:
-
The drop-down list displays the default system views and personal views created by the logged in user.
-
The Nearby Contact query filters saved by the logged-in user, will not be available for selection in this drop-down list.
Conditions defined in the view will be displayed in the Query XML area.
-
- If required, modify the displayed XML conditions and then click Save. Ensure that manual modifications to the XML conditions are error-free.
-
-
Click Save.
-
Repeat steps 1 through 6 to create additional business rules.
