Nearby Contacts Feature
The Nearby Contact functionality uses the distance calculator to find contacts who are within a certain miles of a location. Using this feature you can find out, contacts who are near a planned Trip Activity location. For example, you can determine if the Trip Activity location is feasible for a trip and has a good density of prospects or contacts.
You can also find out Contacts who are near another Contact or Contacts who are near an Account in Reach. For example, a College Campus or High School where the institution's staff or recruiters are planning to go for a visit or a School fare event.
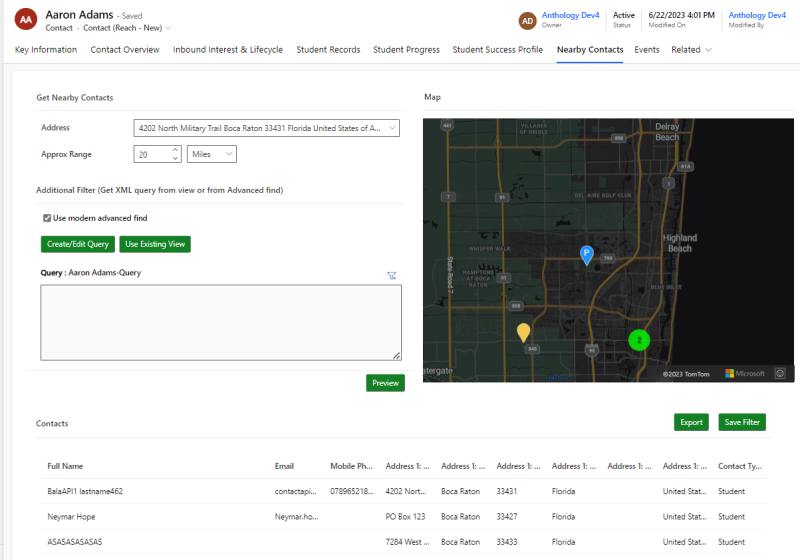
The Nearby Contacts tab in the Contact, Account, and Trip Activity forms enable Reach users to search and display students who are within certain miles from the address of the Contact, Account, or Trip activity.
Prerequisite
-
Enable Azure Maps on the Anthology Reach environment. For more information, see Enabling Azure Maps
View Nearby Contact Records
-
Navigate to the required entity record.
-
Click the Nearby Contacts tab.
-
In the Get Nearby Contacts section, perform the following steps:
-
In the Address field, select an address if it is not already selected. By default the Primary address is selected.
Note: For the Trip Activity record, this field is Location. It displays the Location of the Trip Activity record and it cannot be edited. -
In the Approx Range field specify a number and the unit of measurement as MILES or KM.
This value will be used to get contacts within the specified range. By default, it is set to 1 MILES.
-
-
In the Additional Filter (Get XML query from view or from Advanced find), define filter conditions, to further filter the list of nearby contacts thereby refining the criteria to get the desired set of contacts based on your requirements.
Note: It is recommended to configure additional filter conditions to improve the search result for finding nearby contacts in the range specified in the Approx Range field. Option 1 - Create a New Query
The following steps enable you to define the query logic which will be used for shortlisting the records.
 Create Query Using the Legacy Advanced Find Feature
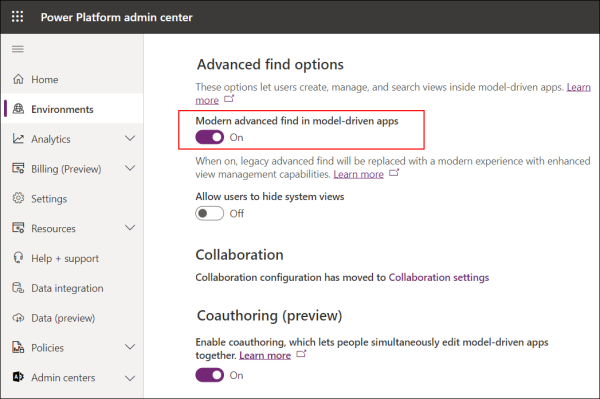
Prerequisite - The Use modern advanced find check box must be cleared.
Create Query Using the Legacy Advanced Find Feature
Prerequisite - The Use modern advanced find check box must be cleared.-
Click Create/Edit Query to view the Advanced Find page.
- Without making any changes, click
 and then specify conditions that align with logic that you want to define.
 - Click Save and close the dialog.
XML details of the query will be listed in the Query XML area. - If required:
- Modify the XML conditions in this area,
- Ensure that modifications are error free, and then click Save.
 Create Query Using the Modern Advanced Find Feature
Prerequisite
Create Query Using the Modern Advanced Find Feature
Prerequisite-
Click Create/Edit Query to view the Query Editor page.
Note: Do not change the default view, Temp_<view name>, that is populated by default in the Query Editor page. -
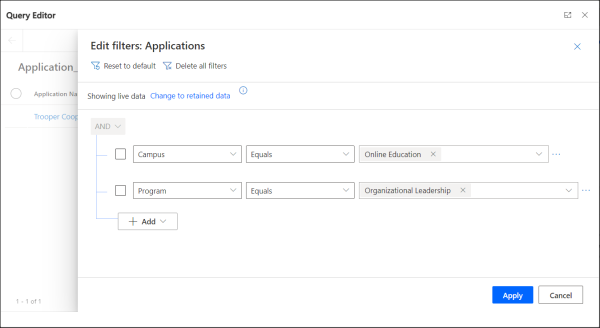
Click the Edit Filters button.
-
Configure the filter conditions that align with the logic to shortlist the records.

-
Click the Apply button.
-
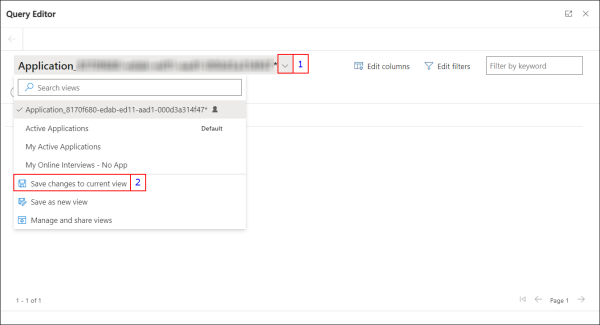
Click the drop-down next to the view name and select Save changes to current view.
-
Close the dialog.
XML details of the query will be listed in the Query XML area.
-
If required, modify the displayed XML conditions and then click Save. Ensure that manual modifications to the XML conditions are error-free.
 Option 2 - Create a Query Based on an Existing View
The following steps enable you to use an existing view that contains applicable logic.
-
Click Use Existing View.
-
From the list, select the view and then click Use Query.
Note:
-
The drop-down list displays the default system views and personal views created by the logged in user.
-
The Nearby Contact query filters saved by the logged-in user, will not be available for selection in this drop-down list.
Conditions defined in the view will be displayed in the Query XML area.
-
- If required, modify the displayed XML conditions and then click Save. Ensure that manual modifications to the XML conditions are error-free.
-
-
Click the Preview button to get the results.
The contacts that are within the specified range of the address of the selected entity record are displayed in the MAP and the Contacts grid.

-
Click the Export button to export the contact records to an excel file.
-
Click the Save Filter button to save the filter condition as a personal Contact View (filter), which can later be reused to view the contact records from the entities page.
Note: The views will be saved with the prefix, NBC, and will be available in the Entity's Views only for the Reach user who created it.
Important Points While Using the Nearby Contacts Feature
-
Saved filters will be saved as User’s personal Contact Views and will not be shared with other Users.
-
Distance Range is approximate (not a perfect circular radius). This is done to fine-tune the algorithm to manage performance.
-
The map can populate up to 20,000 nearby contact records.
-
The Export to Excel option will timeout after one minute.
-
If the number of contacts within the specified range is more, refine the search criteria to reduce the number of contacts in the search result to better manage system performance, timeouts, and results.


