Multiple Renderer URLs
Using a single instance of Forms Builder (Designer and Renderer), you can design form sequences to be displayed at different URLs with different branding.
Note: The example described below dynamically modifies styles/logos by using the Apply Themes Dynamically sequence property and modifies sequences at run-time based on workflows on the issuer site. This method is applicable only when Forms Builder is installed on premises or for non-Azure customers.
Campus Example
An institution with multiple campuses (Campus A, B, and C) has a Portal website with unique URLs and distinct branding such as logos for each campus. The campuses share an Anthology Student database and/or a CampusNexus CRM database and use the same forms for applications, requests for information, etc.
The Forms Builder Renderer website of the institution is configured with bindings for the URLs of Campuses A, B, and C as shown below in Installation Manager.
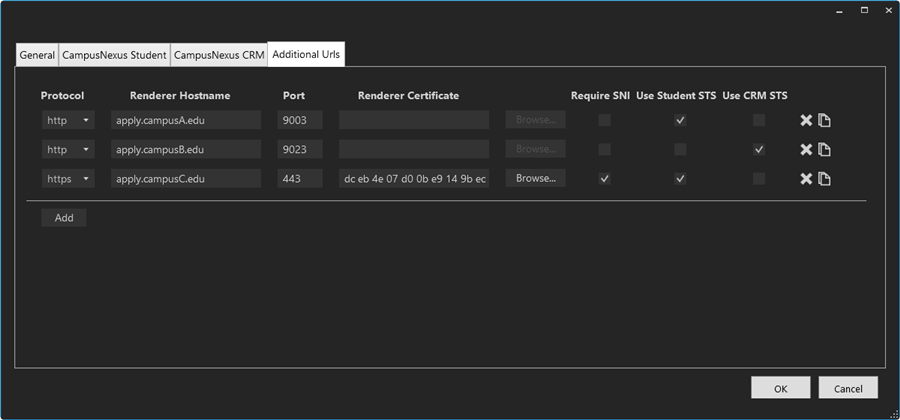
The settings specified on the Additional Urls tab are written to the <authenticationConfigSection> section in the Renderer web.config file.
-
The
<realms>section contains a key and value for each additional incoming Renderer URL. -
The
<issuers>section contains a key and value for the authentication services, i.e., Student STS and CRM STS. -
The
<mappings>section contains the mapping between realm keys and STS keys.
<authenticationConfigSection>
<!-- incoming urls --><realms>
<!-- <url key="" value="" /> -->
<url key="CampusA" value="http://apply.CampusA.edu/" />
<url key="CampusB" value="http://apply.CampusB.edu/" />
<url key="CampusC" value="http://apply.CampusC.edu/" />
</realms><!-- STS redirect urls -->
<issuers>
<!-- <url key="" value="" /> -->
<url key="CampusASTS" value="https://studentsts.CampusA.edu:81"/>
<url key="CampusBSTS" value="https://crmsts.CampusB.edu:81"/>
<url key="CampusCSTS" value="https://studentsts.CampusC.edu:81"/>
<url key="Student STS" value="https://<server>.anthology.com:811"/>
<url key="CRM STS" value="https://<server>.anthology.com/cmc.crm.sts/"/>
</issuers><mappings>
<!-- <mapping realmKeys=" comma separated realm keys or * for wildcard match "
product=" name of the product or * for wildcard match "
issuerKey=" url key of the issuer " /> --><mapping realmKeys="CampusA" product="Student" issuerKey="CampusASTS"/>
<mapping realmKeys="CampusB" product="CRM" issuerKey="CampusBSTS"/>
<mapping realmKeys="CampusC" product="Student" issuerKey="CampusCSTS"/>
<mapping realmKeys="*" product="Student" issuerKey="Student STS"/>
<mapping realmKeys="*" product="CRM" issuerKey="CRM STS"/>
</mappings></authenticationConfigSection>
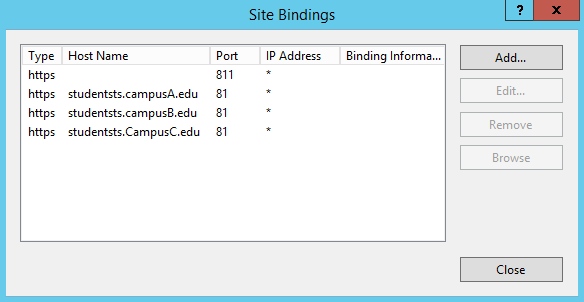
Multiple Renderer URLs for Multiple Student STS Instances
Installation Manager currently supports a single Student STS with multiple Renderer URLs. If an institution has set up additional binding URLs for Student STS instances (see example below), the additional STS URLs need to be manually updated in the <issuer> and <mapping> sections of the Renderer web.config file.
The additional Student STS URLs need to be added to the StudentSTSURL column of the wpURL table in the Portal database.
Add Custom Style Sheets and Images
Custom style sheets that will be applied to form sequences accessed from each campus need to be added to the Custom Content workspace of Form Designer. In our example, the institution named "MyUniversity" has 3 campuses with unique logos. So, we add custom .css files for CampusA, CampusB, and CampusC, and custom logos for each campus to custom content.
In our example, each .css file modifies the image that is displayed in the top left corner of the form sequences. We customized the following style definition:
.navbar-brand {
    padding: 0;
    background: url('images/CampusNexus-SVG.svg') center / contain no-repeat;
    width: 200px;
    margin-left: 5px;
    }
Note: We changed the image and the way it's referenced, added the !important rule to override the default logo, and removed width and margin.
.navbar-brand {
    padding: 0;
    background: url(getCustomContentDataAsFile?src=CampusA_logo.png) center / contain no-repeat !important;
    }
Associate Sequences With Uploaded CSS Files
The form sequences that will be accessed from different campuses need to be associated with the uploaded CSS files.
-
In Sequence Designer, open your sequence.
-
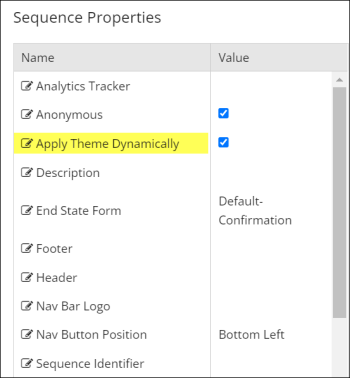
In the Sequence Properties, select Apply Themes Dynamically.
-
Save the sequence.
Select Style Sheets Using Workflow Activities
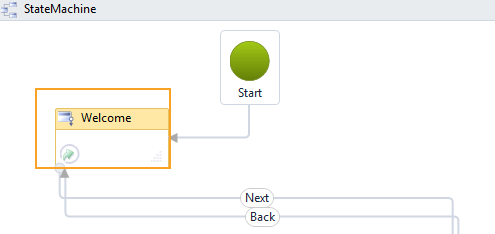
The first state in the form sequence workflows needs to be modified to create the association between URLs and custom style sheets.
-
Launch Workflow Composer and open the workflow. See Open the Workflow for a Sequence.
-
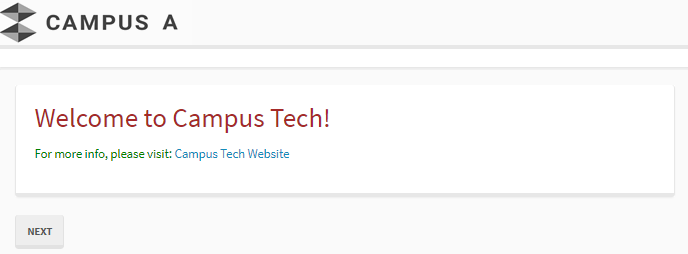
Double-click the first state in the workflow. In our example it is the Welcome form.

-
Drag a Sequence activity into the Entry section of the Welcome form.
-
Create a variable of type System Uri.

-
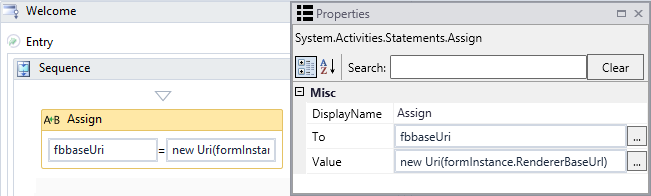
Drag an Assign activity into the new Sequence and specify the following properties:
- To: fbbaseUri (the name of the variable created in the previous step)
- Value: new Uri(formInstance.RendererBaseUrl)
-
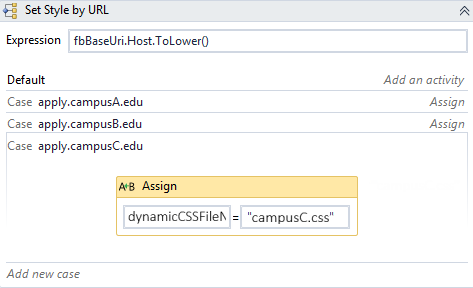
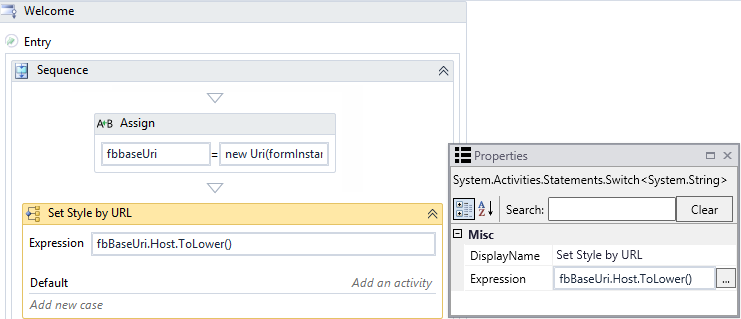
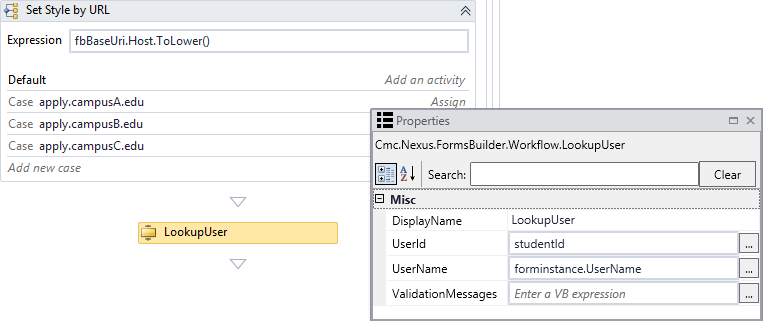
Drag a Switch activity below the Assign activity and specify the following properties:
- Type: System.String (Use the "Browse for Type" option to find this type.)
- Display Name: Set Style by URL
- Expression: fbBaseUri.Host.ToLower()
-
Click Add new case in the Switch activity.
-
In the Case Value field, specify apply.campusA.edu (This is the URL for Campus A. It is defined in the IIS bindings.)
-
Drag an Assign activity into the Case section and specify the following properties:
- To: dynamicCSSFileName (This is the model name that's stored in the database for institutions that use the Apply Themes Dynamically option, and this model name will be referenced in workflows for CSS assignment.)
- Value: "campusA.css" (This is a css file that is uploaded to custom content.)
Repeat this step for any other custom style sheets. In our example, we added the assign statements for the style sheets of Campus B and Campus C.
You can copy and paste the sequence with the Assign statement for the BaseUrl and the Switch activity to other form sequences that are rendered using the custom style sheets.
Note: Additionally, dynamicCSSFileName must be declared as a custom argument of String type and In/Out direction.
-
-
Drag a LookupUser activity into the workflow. Specify the following properties:
- Userid: studentId (This variable of type Int32 must be defined in the workflow.)
- UserName: formInstance.UserName
-
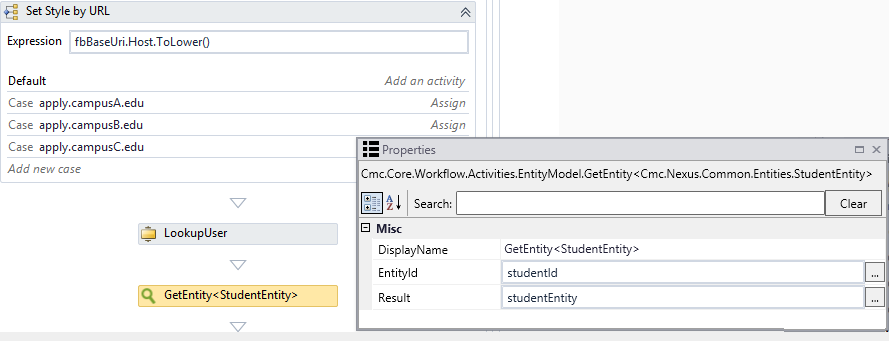
Drag a GetEntity<> activity into the workflow. Browse for entity type <StudentEntity> and specify the following properties:
- EntityId: studentId
- Result: studentEntity
If your form sequences need to retrieve student records from the database, you may want to add the LookupUser and GetEntity activities to the copied sequence.
Using a single instance of Forms Builder (Designer and Renderer), you can design form sequences to be displayed at different URLs with different branding.
Note: The example described below dynamically modifies styles/logos using the {{vm.models.cssFileName}} binding in Custom-Themes from the Settings pane and modifies sequences at run-time based on workflows on the issuer site. This method is applicable only when Forms Builder is installed on premises, i.e., for non-Azure customers that can access their file systems locally. The Custom Content/database method for Azure customers does not support this dynamic style change.
Campus Example
An institution with multiple campuses (Campus A, B, and C) has a Portal website with a unique URLs and distinct branding for each campus. The campuses share an Anthology Student database and/or a CampusNexus CRM database and use the same forms for applications, requests for information, etc.
The Forms Builder Renderer website of the institution is configured with bindings for the URLs of Campus A, B, and C as shown below in Installation Manager.
The settings specified on the Additional Urls tab are written to the <authenticationConfigSection> section in the Renderer web.config file.
-
The
<realms>section contains a key and value for each additional incoming Renderer URL. -
The
<issuers>section contains a key and value for the authentication services, i.e., Student STS and CRM STS. -
The
<mappings>section contains the mapping between realm keys and STS keys.
<authenticationConfigSection>
<!-- incoming urls --><realms>
<!-- <url key="" value="" /> -->
<url key="CampusA" value="http://apply.CampusA.edu/" />
<url key="CampusB" value="http://apply.CampusB.edu/" />
<url key="CampusC" value="http://apply.CampusC.edu/" />
</realms><!-- STS redirect urls -->
<issuers>
<!-- <url key="" value="" /> -->
<url key="CampusASTS" value="https://studentsts.CampusA.edu:81"/>
<url key="CampusBSTS" value="https://crmsts.CampusB.edu:81"/>
<url key="CampusCSTS" value="https://studentsts.CampusC.edu:81"/>
<url key="Student STS" value="https://<server>.anthology.com:811"/>
<url key="CRM STS" value="https://<server>.anthology.com/cmc.crm.sts/"/>
</issuers><mappings>
<!-- <mapping realmKeys=" comma separated realm keys or * for wildcard match "
product=" name of the product or * for wildcard match "
issuerKey=" url key of the issuer " /> --><mapping realmKeys="CampusA" product="Student" issuerKey="CampusASTS"/>
<mapping realmKeys="CampusB" product="CRM" issuerKey="CampusBSTS"/>
<mapping realmKeys="CampusC" product="Student" issuerKey="CampusCSTS"/>
<mapping realmKeys="*" product="Student" issuerKey="Student STS"/>
<mapping realmKeys="*" product="CRM" issuerKey="CRM STS"/>
</mappings></authenticationConfigSection>
Multiple Renderer URLs for Multiple Student STS Instances
Installation Manager currently supports a single Student STS with multiple Renderer URLs. If an institution has set up additional binding URLs for Student STS instances (see example below), the additional STS URLs need to be manually updated in the <issuer> and <mapping> sections of the Renderer web.config file.
The additional Student STS URLs need to be added to the StudentSTSURL column of the wpURL table in the Portal database.
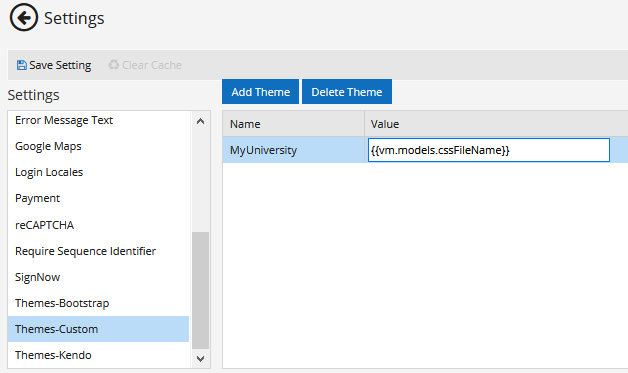
Add a Custom Theme to Settings
To create form sequences for multiple Renderer URLs, in the Settings workspace of Form Designer associate a custom theme with an AngularJS expression that will be used to select style sheets in the workflows. ![]()
-
In the Settings workspace of Form Designer, select Themes-Custom.
-
Click Add Theme. The Add New Theme window is displayed.
-
In the Name field specify a name for your theme.
-
In the Value field, specify the following expression: {{vm.models.cssFileName}}
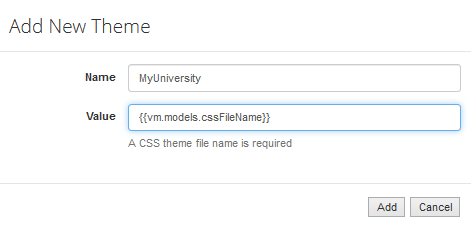
- Click Add. The Add New Theme window is closed.
-
Click Save in the Settings workspace.
Add Custom Style Sheets to Renderer
Custom style sheets that will be applied to form sequences accessed from each campus need to be added to the CMCFormsRenderer_V3\Content\Custom folder. In our example, the institution named "MyUniversity" has three campuses with unique logos. So, we added custom .css files for CampusA, CampusB, and CampusC to Renderer. ![]()
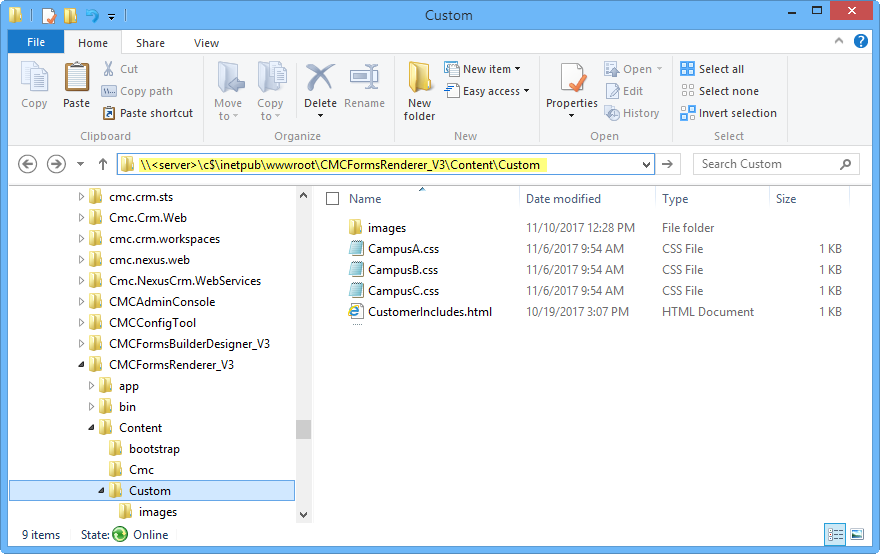
In our example, each .css file modifies the image that is displayed in the top left corner of the form sequences. We customized the following style definition:
.navbar-brand {
    padding: 0;
    background: url('images/CampusNexus-SVG.svg') center / contain no-repeat;
    width: 200px;
    margin-left: 5px;
    }
Note: We changed the image, added the !important rule to override the default logo, and removed width and margin.
.navbar-brand {
    padding: 0;
    background: url('images/CampusA_logo.png') center / contain no-repeat !important;
    }
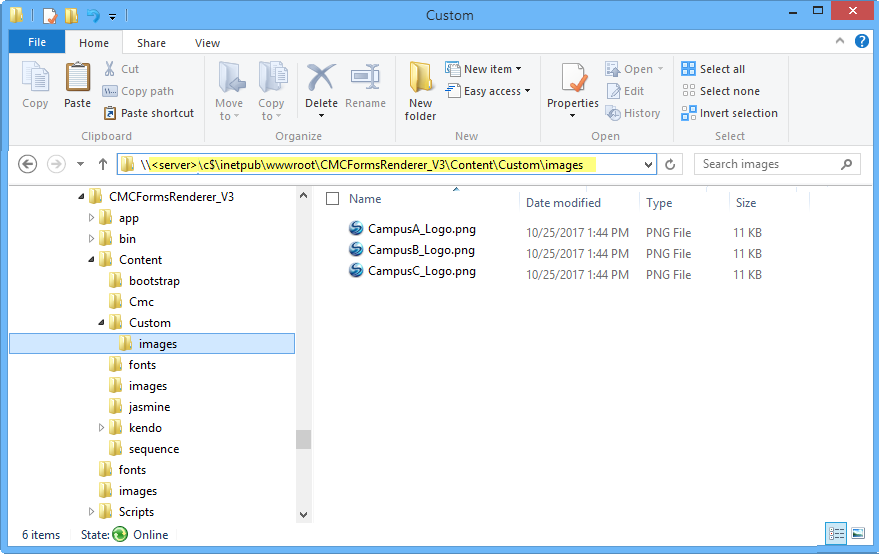
The images referenced in each .css file are stored in the CMCFormsRenderer_V3\Content\Custom\images folder. ![]()
Depending on your branding needs, you can customize other style definitions. For more information, see Custom Styles.
Associate Sequences with a Custom Theme
The form sequences that will be accessed from the different campuses need to be associated with the custom theme that uses the {{vm.models.cssFileName}} expression.
-
In Sequence Designer, open your sequence.
-
In the Theme-Custom value drop-down list, select the name custom theme created in the Settings above.

-
Save the sequence.
Select Style Sheets Using Workflow Activities
The first state in the form sequence workflows needs to be modified to create the association between URLs and custom style sheets.
-
Launch Workflow Composer and open the workflow. See Open the Workflow for a Sequence.
-
Double-click the first state in the workflow. In our example it is the Welcome form.
-
Drag a Sequence activity into the Entry section of the Welcome form.
-
Create a variable of type System Uri.
-
Drag an Assign activity into the new Sequence and specify the following properties:
- To: fbbaseUri (the name of the variable created in the previous step)
- Value: new Uri(formInstance.RendererBaseUrl)
-
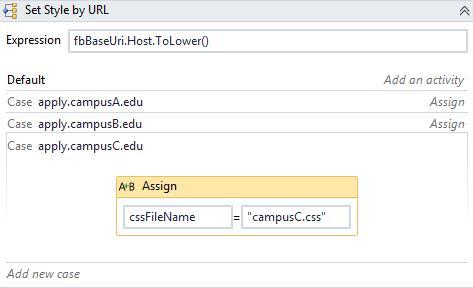
Drag a Switch activity below the Assign activity and specify the following properties:
- Type: System.String (Use the "Browse for Type" option to find this type.)
- Display Name: Set Style by URL
- Expression: fbBaseUri.Host.ToLower()
-
Click Add new case in the Switch activity.
-
In the Case Value field, specify apply.campusA.edu (This is the URL for Campus A. It is defined in the IIS bindings.)
-
Drag an Assign activity into the Case section and specify the following properties:
- To: cssFileName
- Value: "campusA.css" (This is a css file located in the CMCFormsRenderer_V3\Content\Custom folder.)
Repeat this step for any other custom style sheets. In our example, we added the assign statements for the style sheets of Campus B and Campus C.
You can copy and paste the sequence with the Assign statement for the BaseUrl and the Switch activity to other form sequences that are rendered using the custom style sheets.
-
-
Drag a LookupUser activity into the workflow. Specify the following properties:
- Userid: studentId (This variable of type Int32 must be defined in the workflow.)
- UserName: formInstance.UserName
-
Drag a GetEntity<> activity into the workflow. Browse for entity type <StudentEntity> and specify the following properties:
- EntityId: studentId
- Result: studentEntity
If your form sequences need to retrieve student records from the database, you may want to add the LookupUser and GetEntity activities to the copied sequence.