Web Client
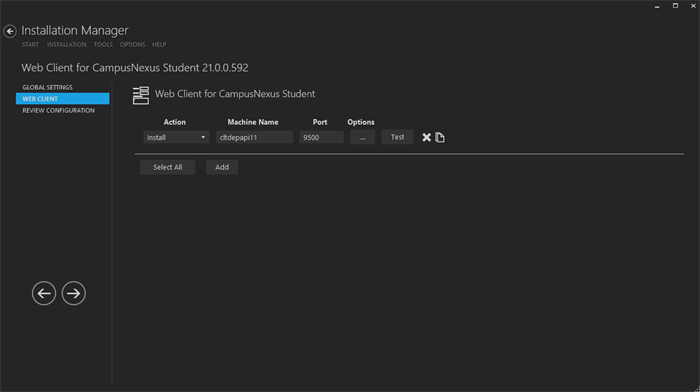
This screen enables you to select the actions to be taken by Installation Manager (e.g., install, upgrade, uninstall) and to specify the machine name and options of the standard interface (web client) for CampusNexus Student.
Prerequisites
CampusNexus Student version 17.1.0 or later requires the Staff STS component to be installed. Go to the Start screen and select Package Manager. Download the Staff STS package and install it. For more details, see Staff STS.
During installation of CampusNexus Student, the following is added to the web.config of the Staff STS:
<SecurityServiceConfigSection>
<SecurityServiceCollection>
<add name="NexusWebClient" address="http://<server>:<port>/" enabled="true" />
</SecurityServiceCollection>
</SecurityServiceConfigSection>
Set Up the Web Client
-
In the Installation menu, click Web Client. The Web Client for CampusNexus Student screen is displayed. 
-
Click Add to add a line to the Settings screen.
-
Select an appropriate Action. The following Action values are available:
-
None – Performs no action.
-
Install – Performs a fresh installation or upgrade of a component. You can install or upgrade multiple components at same time.
-
Uninstall – Removes all subcomponents on that machine and uninstalls the component from Programs and Features.
Optional: Click Select All to set the Action field to Install for all components listed on this screen. Click Unselect All to set the Action field to None.
-
Enter the Machine Name for the component to be installed.
-
In the Port field, specify a port number of accept the default (80). If you specify a custom port, Installation Manager will update the port number in the config file of CampusNexus Student
-
Click  to copy a line. Edit the copied line as needed.
-
Click  to view and edit the Options form.
CampusNexus Student Tab
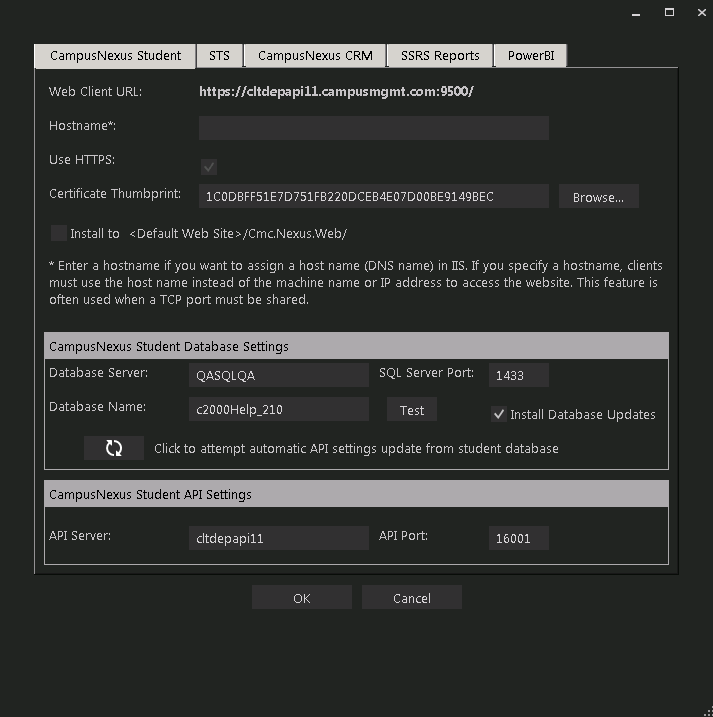
Use this tab to specify the URL, the connections to the CampusNexus Student API server and database server. 
CampusNexus Student Tab Fields
| Web Client URL |
The URL is populated with <machine name.domain.com> by default. You can override the default URL with another URL. The specified URL will be updated in the web.config file of CampusNexus Student and in the CampusNexus Student database.  If you change the URL during an upgrade in an environment where Forms Builder is used, the URL must be manually updated in the web.config files of Forms Builder Designer and Renderer. If you change the URL during an upgrade in an environment where Forms Builder is used, the URL must be manually updated in the web.config files of Forms Builder Designer and Renderer.
|
| Hostname |
This is an optional field. When selected, the web.config file of CampusNexus Student will be updated with the custom host URL. If this field is left blank, the URL in the config files will be
http(s)://machinename.domain.com:port Enter a hostname if you want to assign a hostname (DNS name) in IIS. If you specify a hostname, clients must use the hostname instead of the machine name or IP address to access the web site. This feature is often used when a TCP Port must be shared. |
| Use HTTPS |
This option is selected by default and cannot be cleared. All components must use HTTPS. |
| Certificate Thumbprint |
Certificate thumbprint from IIS. This certificate is required only when HTTPS is selected. It is not added to the web.config file. This certificate is used only for CampusNexus Student, which provides authentication for Renderer (and Portal) to applicants, students, and employers. Click Browse to navigate to the IIS Server Certificates to select the thumbprint.  To extract a .CER file from IIS: Open Internet Information Services (IIS) Manager and choose the certificate to be used from Server Certificates. 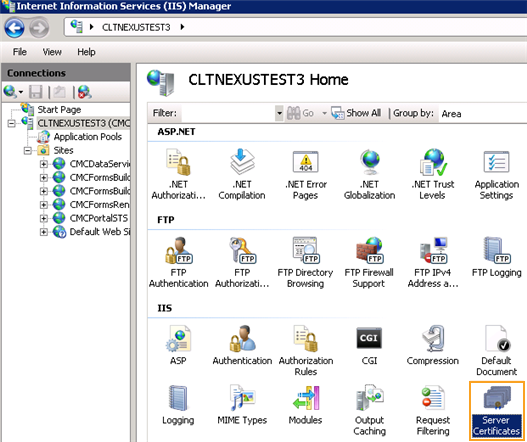
Double-click to open the certificate properties. 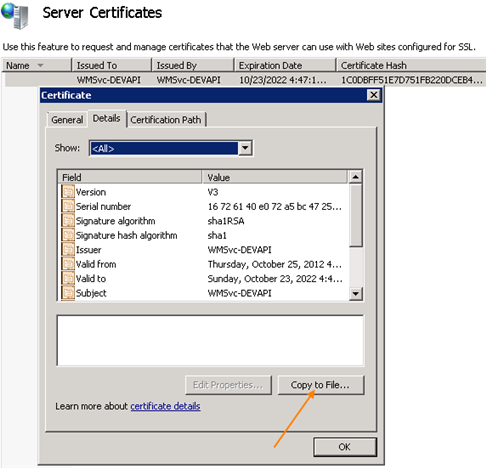
Select Root level and in the Details tab, click the Copy to File… button. Click Next. Select No, do not export the private key and click Next. Select DER encoded binary X.509 (.CER) and click Next. Specify a file path and name (root) to export to and click Next. Click Finish
|
| Install to <Default Web Site>/Cmc.Nexus.Web/ |
The default behavior of Installation Manager is to install CampusNexus Student to its own web site under the IIS sites. If backward compatibility requires the continued use of the default web site, select the Install to <Default Web Site>/Cmc.Nexus.Web/ check box.
In this case an upgrade will not delete the web site and reinstall the web site as is it did previously. Any manual configurations made to the web site (via IIS manager for example) will be retained on upgrade. An uninstall will remove the web site to clean up the environment.
|
| CampusNexus Student Database Settings
|
| Database Server |
Name of the SQL server on which the CampusNexus Student database resides. |
| SQL Server Port |
Specify the port number of the SQL server or accept the default (1433).
|
| Database Name |
Name of the CampusNexus Student SQL database. |
| Test |
Click Test to verify the database connection. |
| Install Database Updates |
Select this check box to install updates to the CampusNexus Student database. Click Test to verify the database connection. |

|
Click the Refresh button to attempt an automatic settings update. |
| CampusNexus Student API Settings
|
| API Server |
Name of the CampusNexus Student API server. |
| API Port |
Specify the port number of the API server or accept the default (18001).
|
STS Tab
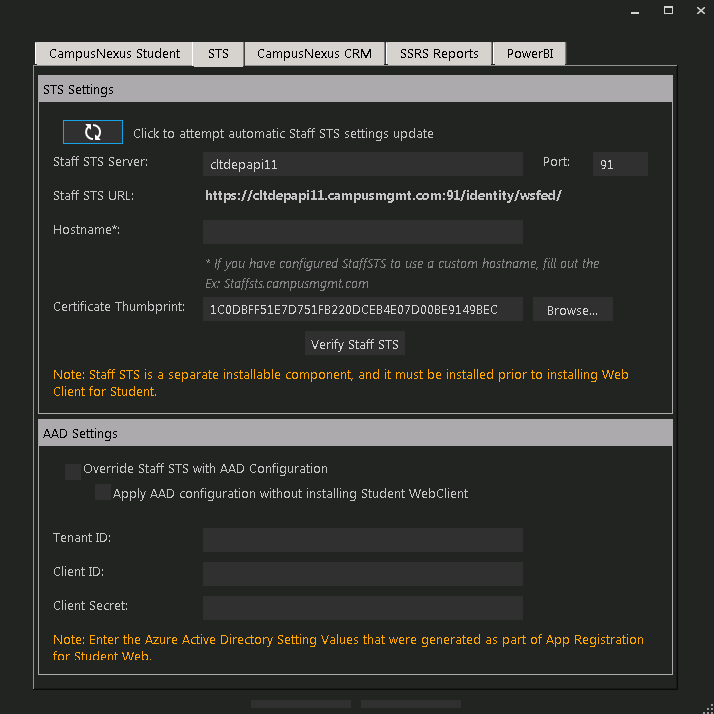
Use this tab to specify the STS server, port, and certificate. Note that Staff STS must be installed prior to installing CampusNexus Student.
For deployments in a cloud environment, specify the Azure Active Directory (AAD) settings. Enter the values that were generated as part of the web application registration for CampusNexus Student in the AAD tenant. 
STS Tab Fields
| STS Settings
|

|
Click the Refresh button to attempt an automatic settings update. |
| Staff STS Server |
Specify the name of the Staff STS Server. The Staff STS Server must have been previously installed. See Staff STS. |
| Port |
Specify the port number of the installed Staff STS server or accept the default (91).
|
| Staff STS URL |
Staff STS URL is populated by default with machine name.domain.com. The user can override it with custom URL, e.g., Studentweb.campusmgmt.com, and that URL will be updated in the CampusNexus Student config file and CampusNexus Student database.
|
| Hostname |
If you have configured Staff STS to use a custom hostname, fill out the hostname. Example: Staffsts.campusmgmt.com |
| Certificate Thumbprint |
Certificate thumbprint from IIS. The same certificate thumbprint that is used on the Staff STS must be used here. Copy and paste the thumbprint from the Staff STS into this field, or click Browse to navigate to the IIS Server Certificates to select the thumbprint. The thumbprint is added to the Designer web.config
file.  To extract a .CER file from IIS: Open Internet Information Services (IIS) Manager and choose the certificate to be used from Server Certificates. 
Double-click to open the certificate properties. 
Select Root level and in the Details tab, click the Copy to File… button. Click Next. Select No, do not export the private key and click Next. Select DER encoded binary X.509 (.CER) and click Next. Specify a file path and name (root) to export to and click Next. Click Finish
|
| Verify Staff STS |
Click Verify Staff STS. This button:- Verifies that the Staff STS is installed.
- Validates that the certificate is installed in the personal store.
|
| AAD Settings
|
| Override Staff STS with AAD Configuration |
Select this check box to enable the AAD Settings fields. |
| Apply AAD configuration without installing Student Web Client |
Select this check box if AAD is used without installing CampusNexus Student. |
| Tenant ID |
Specify the Azure tenant identifier. |
Customers create app registrations in their Azure AD tenant and provide the Tenant ID, Client ID, and Client Secret that are generated as part of creating the app registration.
Note: One app registration is created for CampusNexus Student legacy interface and standard interface.
|
| Client ID |
Specify the Azure client identifier. |
| Client Secret |
Specify the Azure client secret. |
CampusNexus CRM Tab
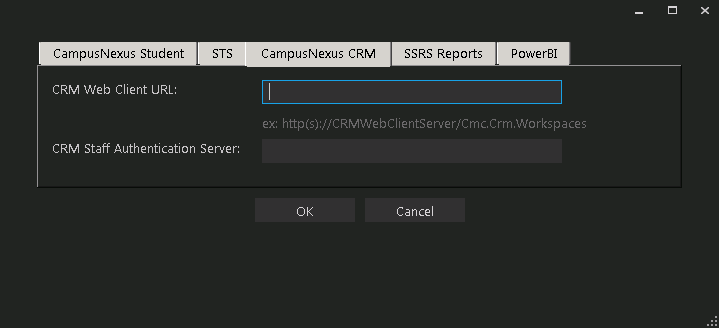
If CampusNexus CRM is deployed, specify the URL and the authentication server for the CampusNexus CRM web client. 
CampusNexus CRM Tab Fields
| CRM Web Client URL |
If applicable, enter the URL of the CampusNexus CRM web client, for example:
http(s)://CRMWebClientServer/Cmc.Crm.WorkspacesThe URL will be added as a key in the web.config file of CampusNexus Student. The format of the key is as follows:
<add key="uri:CRM" value="{{CrmWebClientUrl}}"/> |
| CRM Staff Authentication Server |
If applicable, enter the name of the server where the CRM Staff Authentication Service is installed.
Installation Manager will construct the complete URL based on the Server name. http://StaffAuthenticationServiceServer/Cmc.NexusCrm.WebServices The CRMStaffAuthenticationServiceURL will be inserted into the syregistry table in the CampusNexus Student database.
|
SSRS Reports Tab
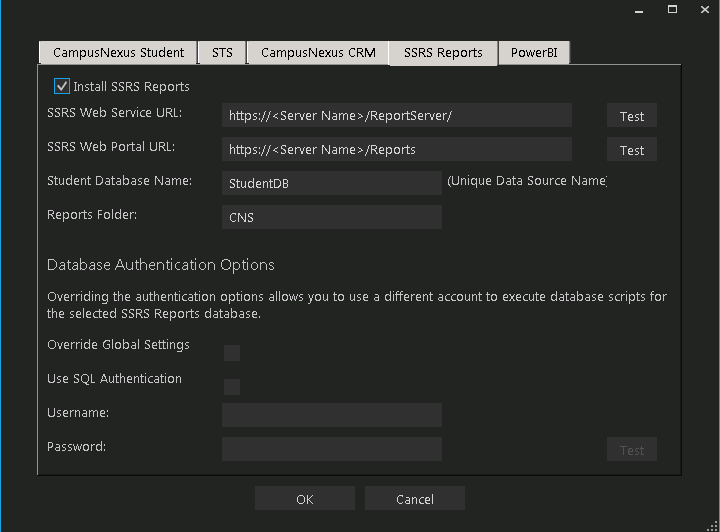
Use this tab to integrate SQL Server Reporting Services (SSRS) 2016, the server-based report generating software system, into CampusNexus Student. 
SSRS Reports Tab Fields
| Install SSRS Reports |
Select this check box to enable the fields on this tab. |
| SSRS Web Service URL |
Specify the Web Service URL configured to access the Report Server. The specified URL will be stored in the web.config file. This URL is set while configuring the reporting service and can be found in Reporting Services Configuration Manager.  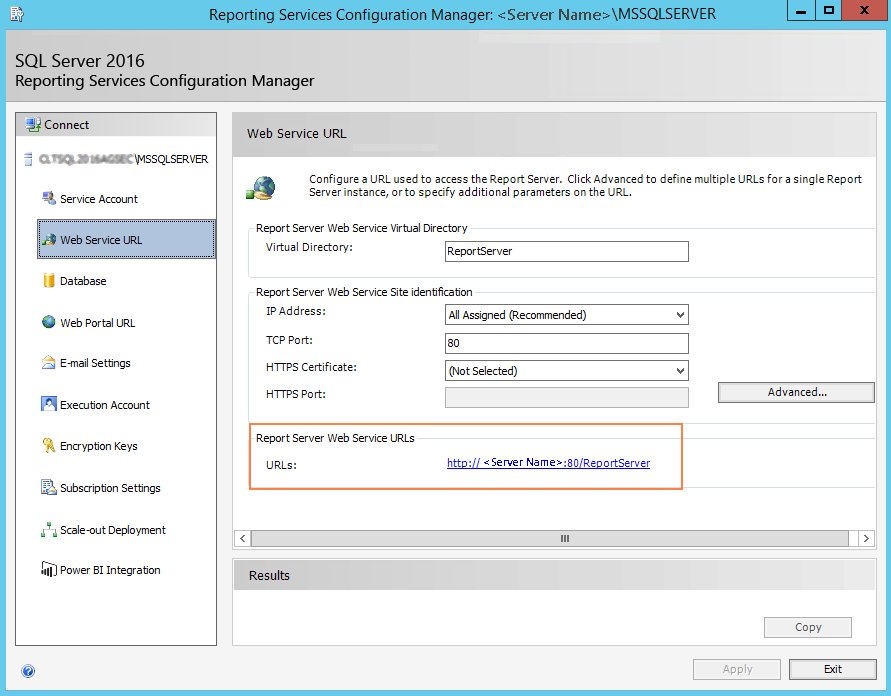
|
| SSRS Web Portal URL |
Specify the Web Portal URL configured to access the Web Portal. The specified URL will be stored in the web.config file. This URL is set while configuring the reporting service and can be found in Reporting Services Configuration Manager page.  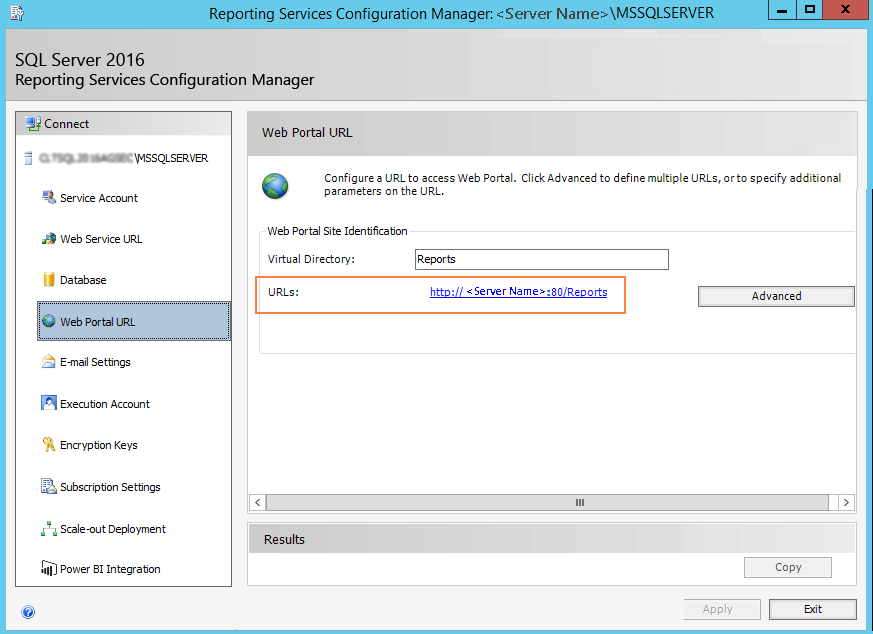
|
| Data Source Name |
Specify the name of the CampusNexus Student database that is the source for the reports. |
| Reports Folder |
Specify the path for the reports folder on the Report Server. A folder will be created if one does not exist. The folder name can be unique to the environment. The reports folder root path will be stored in the web.config file. Example QA/CNS where QA is one folder and Student_Test is a folder under QA.
|
| Database Authentication Options
|
| Override Global Settings |
Optional: Select this check box to enable the database authentication options.
|
| Use SQL Authentication |
Optional: Select this check box if SQL authentication is applied. |
| Username |
Enter the user name of the account that is given override permissions for the SSRS reports database. |
| Password |
Enter the password of the account that is given override permissions for the SSRS reports database. |
| Test |
Click Test to ensure the user authentication settings are correct. A confirmation message is displayed. |
In addition to the settings on the SSRS Reports tab in Installation Manager, the setup of reporting services requires configurations in the SQL Server Reporting Services Configuration Manager (see Configure Access to Reports).
You also need to create folders in the CampusNexus Student and assign permissions using the Security Console. For more details, see the Administration Guide. Check the Documentation Center in MyCampusInsight for the latest revision of the Administration Guide (logon required).
Configure Access to Reports
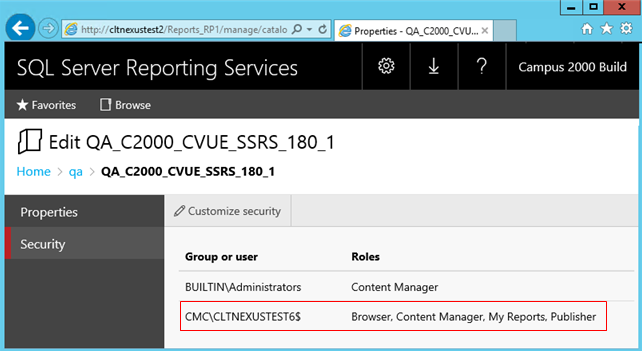
To enable access to the “Reports” menu item in CampusNexus Student, perform the following steps in the Reporting Services Configuration Manager on the report server:
-
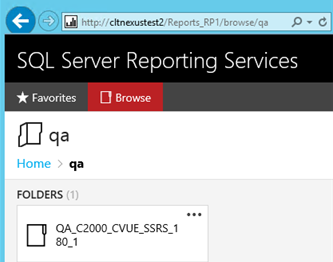
Navigate to the /Reports folder path. 
In the example below the reports folder path is http://cltnexustest2/Reports_RP1/browse/qa.
-
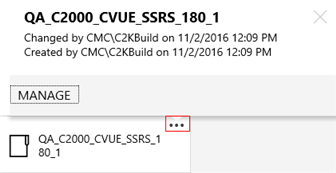
Right-click on the ellipsis of the reports folder root and select Manage. 
-
Select the Security tab, click Customize security, and click Add group or user.
-
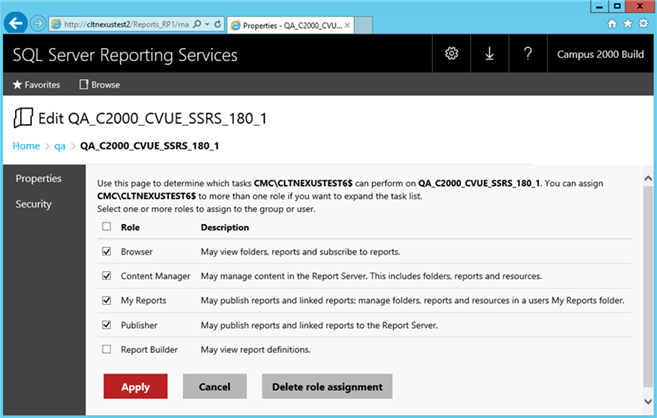
Add the domain\<machine name$> of CampusNexus Student and select the following Roles: 
- Browser
- Content Manager
- My Reports
- Publisher
-
Click Apply.
Security for the Reporting Service should be set up as shown below, where CMC\CLTNEXUSTEST6 is the domain\machine name of CampusNexus Student from which the reports are accessed.
Configure SSRS for HTTPS
Once the reporting services are installed and configured, test access to the reports in CampusNexus Student. Select the Reports tile and navigate to any report listed in the menu.
If CampusNexus Student displays only the title of the report (without any data selection fields), use the browser developer tools (F12) and check the Console tab. If an error similar to the following is displayed, configure SSRS for secure access with an SSL certificate. For detailed instructions, see https://docs.microsoft.com/en-us/sql/reporting-services/security/configure-ssl-connections-on-a-native-mode-report-server

Power BI Tab
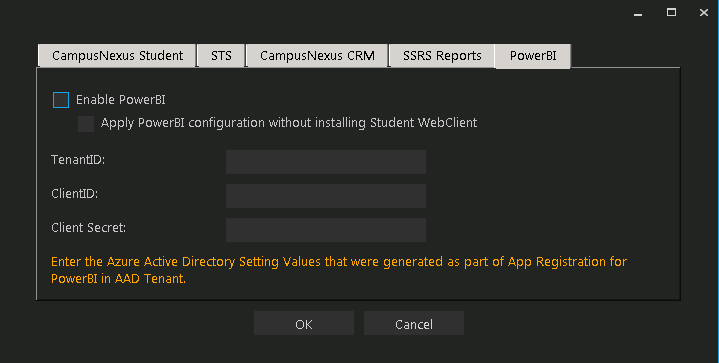
If Power BI used for applications such as Occupation Insight or Analytics for CampusNexus, configure settings on the Power BI tab. Enter the Azure Active Directory Setting values that were generated as part of the web application registration for the Power BI in the AAD tenant. 
Power BI Tab Fields
| Enable Power BI |
Select this check box to enable the Power BI setting fields. |
| Apply Power BI configuration without installing Student Web Client |
Select this check box if Power BI is used without installing the standard interface (web client) for CampusNexus Student. |
| Tenant ID |
Specify the Azure tenant identifier. |
Customers create app registrations in their Azure AD tenant and provide the Tenant ID, Client ID, and Client Secret that are generated as part of creating the app registration.
Note: One app registration is created for CampusNexus Student legacy interface and standard interface.
|
| Client ID |
Specify the Azure client identifier. |
| Client Secret |
Specify the Azure client secret. |
-
Click OK to save changes on the Options form. The form is closed.
-
Click  to delete a selected line.
-
Click Test to ensure the setup for the corresponding line is correct. If a test on a particular line fails, check all associated fields and click Test again.
-
If all tests pass, click  .
.

 to copy a line. Edit the copied line as needed.
 to view and edit the Options form.


 to delete a selected line.
  .
. 


