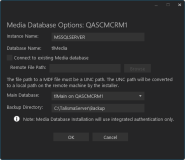
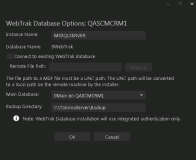
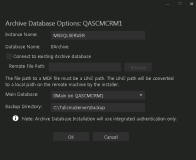
The Database component is a Microsoft SQL Server that services the Main database for requests from Client, Business Administrator, and Database Administrator. The Main database is attached to the Microsoft SQL Server when the Database component is installed.
Note: The Database component was referred to as "Talisma Server" or "Talisma Main Database" in previous versions.
Preinstallation Tasks
Identify and install the prerequisite software. See Software Requirements by Component — Database.
Important: While installing the Main database of multiple customers on a single SQL Server instance, ensure to specify unique license keys for each customer database. You can specify the license key when installing the database in the Global Settings screen of Installation Manager or while running the setup.exe of the Database component.
-
Uninstall and reinstall MSDTC service on the computer where you plan to install the Database component. To do so:
-
Log in as the administrator of the computer.
-
Open the command prompt and run the MSDTC -uninstall command.
-
Restart the computer.
-
Type Services.msc in the Run dialog box. The Services screen is displayed.
-
Ensure that the Distributed Transaction Coordinator service is removed from the list.
-
Open the command prompt and run the MSDTC -install command.
-
Open the Services.msc and set the Startup type for the Distributed Transaction Coordinator service to Automatic.
-
-
In a distributed server scenario, ensure that the SQL Server Agent service is stopped on all the servers.
-
In an environment where the Main database and Subscriber database have to be installed, ensure that you complete the installation of the Main database followed by the Subscriber database.
Notes:
-
After installing the Database component in a distributed environment, depending on the permission of the SQL Login of the user who performed the installation, the option in the Linked Server Properties dialog box for the Publisher and Subscriber databases is set to the following:
-
Be made using the login's current security context – If the SQL Login has the sysadmin Role.
-
Not be made – If the SQL Login does not have the sysadmin Role.
-
-
The recommended option to be set in the Linked Server Properties dialog box is Be made using the login’s current security context. However, if you want to further tighten the security for connecting with the linked servers, you can select the Not be made option. When this option is selected, even if the user has sysadmin permission, the user will not be able to access the databases of the Linked Server. The user must be explicitly mapped to the appropriate users in the Local server login to remote server login mappings area to perform the required operations.
For example, to run a CampusNexus CRM installer, the user must be added as a Local Login in the Local server login to remote server login mappings area and the Remote User must be a SQL Login that has SQL Server Authentication with sysadmin permission on all the Subscriber databases.
Preinstallation Tasks in a Distributed Environment
-
Before installing a Subscriber database (Analytics, Archive, Media, or WebTrak), ensure that the Require distributed transactions for server-to-server communication option in MS SQL Server Management Studio is cleared.
-
Ensure that the Windows user who installs the Database component has a corresponding SQL Login with sysadmin role.
Installation in a Cluster Server Environment
-
Configure and install the Main database, Distributor database, and all Subscriber databases on the Primary Node (Active) of the MS Cluster Server.
-
Provide the path of the Cluster Disk for the target and backup folders of the Database component during installation.
Note: It is not mandatory to install Distributor and Subscriber databases in a clustered environment. The Destination directory should be on a shared drive.
On the Database screen in Installation Manager, use the following options for the Main database, Distributor database, and all Subscriber databases:
- Specify the SQL Cluster Name in the SQL Server field.
- Select the Cluster check box.
- Enter the name of the Active cluster node in the Cluster Node field.
For more details, see Cluster Server Environment.
Support for Multiple Databases on a Single Server
In previous versions, multiple versions of the Database component could not be installed on a single SQL Server instance. In this release, CampusNexus CRM provides the ability to install multiple versions of the Database component on a single SQL server instance. On a single Database, databases of multiple customers can be installed and hosted simultaneously.
Important: You can install only one of the following:
-
Multiple versions of Database and its components (such as Higher Education Foundation, and Event Management on a single SQL Server instance.
-
Database of a single customer along with other components.
You cannot install multiple versions of Databases and other components such as Application Server, Services, Web Components, Web Client, Client, or Data Management Utility on a single computer.
This enhancement has the following impact on CampusNexus CRM:
-
Services – In previous releases, Health Check Service, Job Service, and Offline Sync Service were created by the Database installer. In this release, you can create these services using Database Administrator on any computer.
Note: In this release, Offline Service is renamed to Webform Sync Services.
In addition, Scheduled Report (TLRptXL.exe) will also be removed. You can create this service using Database Administrator on any computer.
-
Database folders – While installing the Database component, you must specify the name of the Main databases of multiple customers being installed. For example, if you are hosting databases of WorldWaves University and Global Education Society, you can specify the database names as WorldWaves_tlmain and Global_tlmain during the installation process. When the installation is complete, the following folders are created on the computer where the Database component is installed:
For WorldWaves-tlmain
<Drive name>:\Program Files\Common Files\Talisma Shared\WorldWaves_tlMain\
<Drive name>:\Program Files(x86)\Common Files\Talisma Shared\WorldWaves_tlMain\
<Drive name>:\TalismaServer\WorldWaves_tlmain
For Global-tlmain
<Drive name>:\Program Files\Common Files\Talisma Shared\Global_tlMain\
<Drive name>:\Program Files(x86)\Common Files\Talisma Shared\Global_tlMain\
<Drive name>:\TalismaServer\Global_tlmain
-
Setup Logs – Log folders are suffixed with the database name. For example, if the name of the WorldWaves database is WorldWaves-tlmain, log files of the WorldWaves database will be stored in the <Drive name>:\Program Files\Common Files\Talisma Shared\SetupLog\WorldWaves-tlmain folder.
-
Registry keys – Registry key folder suffixed by the database name is created in the HKEY_ LOCAL_MACHINE\SOFTWARE\Talisma\Talisma Server\<database name> path. For example, if the database name specified during the installation of Database is WorldWaves- DB, the registry keys are created in the HKEY_ LOCAL_MACHINE\SOFTWARE\Talisma\TalismaServer\WorldWaves-tlmain path.
-
The TLSchExport.exe will now be copied in the <Drive name>:\Program Files (x86) \Common Files\Talisma Shared\<database name> path. Hence, if you have multiple versions of database installed on a single SQL server instances, TLSchExport.exe will be available for every database.
Set Up Databases
-
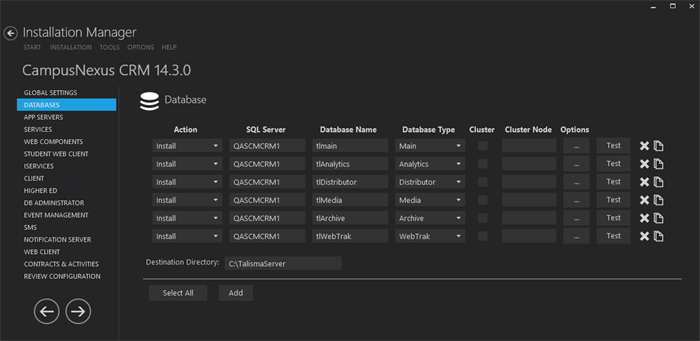
In the Installation menu, click Database. The Database Settings screen is displayed.

The Database screen contains configurable fields that users can change to add, delete, copy, and test databases being used in an installation. The elements of this screen are unique to the CampusNexus CRM installation.
Note: Ensure that the default SQL Server settings are appropriate.
-
Installation Manager supports multiple databases (listed in the Database Type column), but only one type of database is allowed to be installed at a time on one machine.
-
Multiple databases cannot be installed on the same SQL Server at the same time.
-
Different Database Types can be installed on different SQL servers at the same time.
-
To install multiple Main databases on a same server, one must be set to Install, but the other Main database must be set to None.
-
A Main database must be present on this screen with action set to None, even if the Main database is not going to be installed.
-
All Subscriber databases must be pointed to a Main database.
-
-
Click Add to add a line to the Settings screen.
-
Select an appropriate Action. The following Action values are available:
-
None – Performs no action.
-
Install – Performs a fresh installation or upgrade of a component. You can install or upgrade multiple components at the same time.
-
Detach – Detaches one Subscriber database at a time per machine. Action can be set to Detach on multiple Subscriber databases on multiple servers at the same time.
-
Uninstall – Removes all subcomponents on that machine and uninstalls the component from Programs and Features. Select Uninstall from the Action menu to Uninstall all databases on the SQL Server.
Important: Main and Subscriber databases attached to the Main database on the same machine will be uninstalled.
-
Reinstall – Retries to install a subcomponent.
-
InstallFailover - Installs a cluster failover component.
-
AttachFailover - Attaches a cluster failover component.
-
DetachFailover - Detaches a cluster failover component.
-
ReinstallFailover - Reinstalls a cluster failover component.
-
UninstallFailover - Uninstalls a cluster failover component.
Optional: Click Select All to set the Action field to Install for all components listed on this screen. Click Unselect All to set the Action field to None.
-
-
Specify the name of the SQL Server on which the database resides. User credentials from the Global Settings screen are used to access this server.
If CampusNexus CRM is installed in an SQL cluster environment, specify the SQL cluster name (not the node name) in the SQL Server field.
-
Specify the Database Name of a valid CampusNexus CRM database. User credentials supplied in the Global Settings screen are also valid for this database.
-
Select the Database Type. The following Database Types are available:
- Main
- Analytics
- Distributor
- Media
- WebTrak
- Archive
-
If CampusNexus CRM is installed in an SQL cluster environment, select the Cluster check box and specify the name of the Active cluster node in the Cluster Node field for the Main database, Distributor database, and all Subscriber databases.
If a failover cluster is deployed, enter Failover Node name in the Cluster Node field and select an appropriate failover action in the Action field.
Refer to Cluster Server Environment for additional instructions.
-
Click
 to copy a line. Edit the copied line as needed.
Copy as many lines as needed to create the Database / Database Type combinations required for the installation.
-
Click
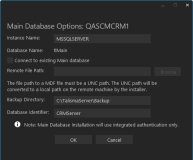
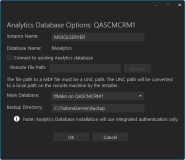
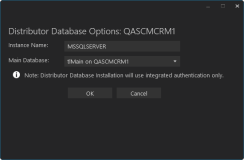
 to view and edit the Options form for each Database / Database Type combination. Options forms include the following:
 - Main Database Options
- Analytics Database Options
- Distributor Database Options (Note: Distributor databases can only be run with SQL Integrated Authorization turned. See Global Settings.)
- Media Database Options
- WebTrak Database Options
- Archive Database Options
-
Click OK to save changes on the Options form. The form is closed.
-
Click
 to delete a selected line.
 -
Accept the default Destination Directory or select a directory where the information for this component is stored. Changing this directory will apply across all machines in the Machine Name column.
To install a Database to a custom path, type the path in the Destination Directory text box. This appends the directory location with Main database name at the time of install.
For example for Main database called ASUMainDB, the default destination directory would be C:\TalismaServer\ASUMainDB and a Subscriber database attaching to this Main database would go under ASUMainDB directory.
-
Click Test to ensure the setup for the corresponding line is correct. If a test on a particular line fails, check all associated fields and click Test again.
-
If all tests pass, click
 .
.
Postinstallation Tasks
-
After installing the Database component, it is mandatory to restart the computer.
In a scenario where multiple customer Main databases are installed, you must restart the computer after installing the Main database of the first customer. Restarting the computer after subsequent installations of other customer databases is optional.
-
Start the SQL Server Agent service manually. Ensure that the service is running in a domain user account which has administrative privileges.
-
In a distributed server scenario, ensure that the value of the Data Access option is True in the Linked Servers Properties dialog box for all the computers where CampusNexus CRM databases are installed. To do so:
-
Open SQL Server Management Studio.
-
Navigate to the Server Objects\Linked Servers folder.
-
Right-click on the server name and select Properties from the shortcut menu. The Linked Server Properties screen is displayed.
-
Click the Server Options in the left pane.
-
In the right pane, ensure that the value of the Data Access option is set to True.
-
-
Ensure that the Talisma-CreatePreDefObjects job has already run. To do so:
-
Start Microsoft SQL Server Management Studio.
-
Navigate to the Jobs node under the SQL Server Agent node.
-
Locate the Talisma-CreatePreDefObjects job, and confirm that the Enable option is dimmed.
-
-
Check the Replication Monitor settings. To do so:
-
Start Microsoft SQL Server Management Studio.
-
Navigate to the Replication node. Right-click on the Replication node and select Launch Replication Monitor.
-
In the Replication Monitor, check whether the Snapshot Agent, Distributor Agent, and Subscriber Agent are created, and whether the Initial Snapshot has been generated.
-
-
If errors are encountered during the setup of the Main database, check all log files in the <Drive name>:\Program Files\Common Files\Talisma Shared\Setuplog\<database name>\ path.
-
When the Database component is installed afresh, by default the value of the Recovery model option for Database is set to Simple. Perform the following step for Distributor Server, Analytics Server, Media Server, and WebTrak Server:
-
Start Microsoft Server Management Studio.
-
Navigate to <Server name>, <Database name for which the Recovery model has to be set>.
-
Right-click and select Properties from the shortcut menu.
-
Select Options and set the Recovery model option to Full.
-
-
In a distributed server environment, on the computer where Main database is installed, navigate to the Securities tab of the Linked Server Properties dialog box, and set the login name (format: Talisma<Main database name>) and password details for subscriber database servers.
Ensure that the login name is set in the Local Login and Remote User fields, and the password must be identical to the value set in the Talismaadmin Password field of the CRM Global Settings screen.
Perform the same step on computers where subscriber databases are installed, i.e., set the same login name and password details for the linked server of Main database server.
-
To create non-clustered indexes for ReportMailer and CampaignTarget, run the following script on the computer where the Main database is installed:
If Not Exists(Select Top 1 1 From sys.indexes Where name = 'IDX_tblOBMReportMailer_nCustomerID_nBaseObjectType' And Object_ID = OBJECT_ID('tblOBMReportMailer'))
Begin
CREATE NONCLUSTERED INDEX IDX_tblOBMReportMailer_nCustomerID_nBaseObjectType
ON [tblOBMReportMailer] ([nCustomerID],[nBaseObjectType])
End
GO
If Not Exists(Select Top 1 1 From sys.indexes Where name = 'IDX_tblCampaignTarget_nCustomerID_nBaseObjectType' And Object_ID = OBJECT_ID('tblCampaignTarget'))
Begin
CREATE NONCLUSTERED INDEX IDX_tblCampaignTarget_nCustomerID_nBaseObjectType
ON [tblCampaignTarget] ([nCustomerID],[nBaseObjectType])
End
GO
-
For scheduled export configurations to run in the current version, perform the following steps on the Main database computer:
-
In the Properties dialog of the scheduled export job, navigate to Steps, Export Step, Edit.
-
Specify the full path of the tlschexport.exe in the following format
’“<Drive name>:\<path>\tlschexport.exe”. . . . .other details’Ensure that the double quotation marks are specified at the beginning (after the single quotation mark) and after
tlschexport.exe. The single quotation marks must continue to be specified at the beginning and at the end.
-
Note: When the Analytics database is moved to a different computer and the Analytics database is attached, jobs specific to scheduled reports will not migrate to the new computer. In this scenario, run the stored procedure sproc_CreateScheduleReportJobForUpgrade after the attachment operation is complete:
-
To create all scheduled jobs in the database after it is attached, type the command Exec sproc_CreateScheduleReportJobForUpgrade N''
-
To create a specific job, type the command Exec tsproc_CreateScheduleReportJobForUpgrade N'50'
-
To create specific jobs in the attached database, type the command Exec sproc_CreateScheduleReportJobForUpgrade N'50,100,150'
In the second statement, the value 50 is an example of a schedule ID. In the final statement, the values 50, 100, and 150 are examples of schedule IDs. The comma character (,) is used as a separator when multiple IDs are specified.
These IDs can be identified from the aScheduleID column of the tblReportSchedule table in the Analytics database.
Database Version in Control Panel
When the Database component is installed, an entry is recorded in the Programs and Features screen of Control Panel. If a single version of Database is installed on a SQL Server instance, the version number of the installed Database is displayed in the Version column. If multiple versions of Database are installed on a single SQL Server instance, the value "Multiple versions" is displayed in the Version column.
Note: You cannot uninstall Database through Control Panel. To uninstall Database, use the Uninstall option in Installation Manager.
