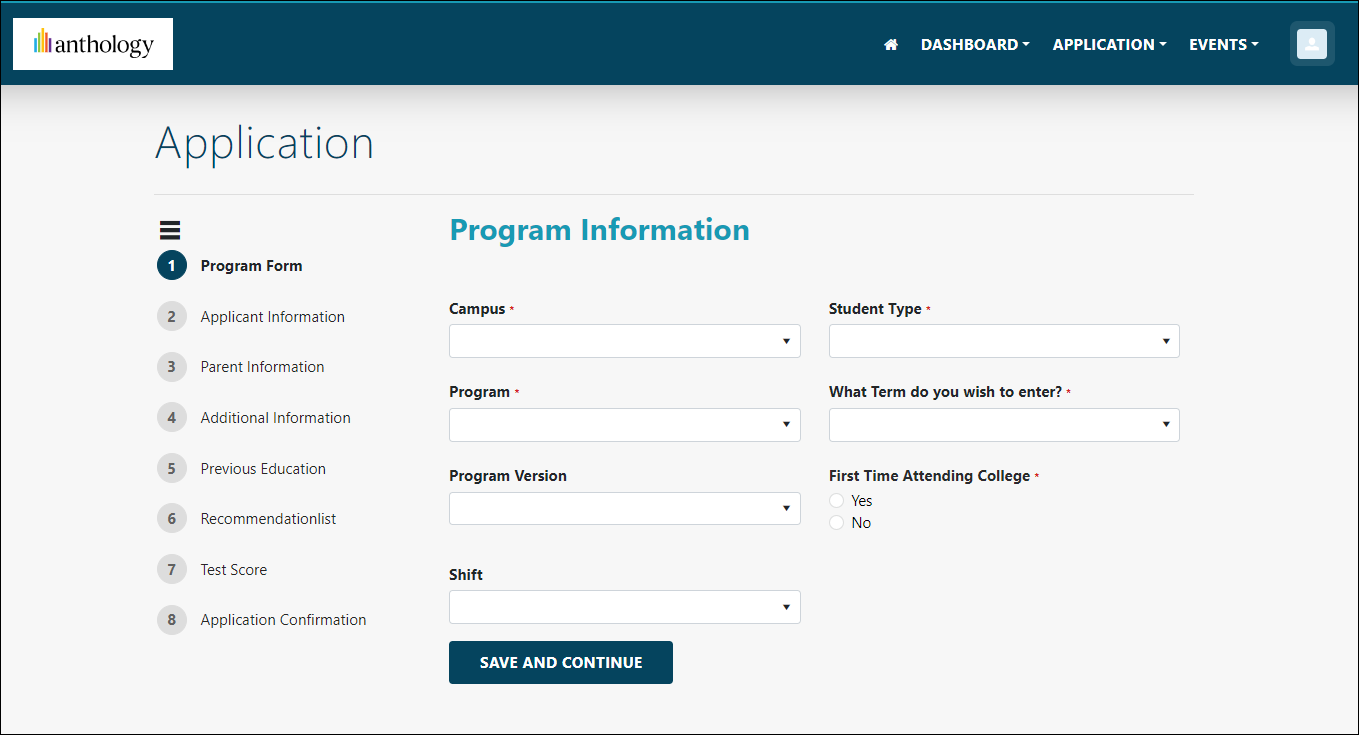
Customizing the Portal
The Anthology Reach portal includes the following page templates and widgets that can be used to customize the portal based on an institution’s requirements:
Important: It is recommended to create a copy of the page templates that are shipped with the portal and create custom portal pages based on the institution’s requirement.
This template is used in all portal pages except the Login page. Use this template to make global changes that must be applied to all pages.
For example, to update the logo for all portal pages, edit this template. For more information see, Updating the Header Logo in the Portal Templates.
The CampusNexusEngageMainTemplate template includes the following sections:
-
Header – Displays a default logo, navigation options, login/logout options, and a user profile image.
-
Main Body
-
Footer
This template is used in the Login page that is shipped with the portal.
The CampusNexusEngageBaseTemplate includes the following sections:
- Header – Displays a default logo which can be updated later. For more information see, Updating the Header Logo in the Portal Templates.
- Main Body – Includes a placeholder control for adding a banner image, and the Login/Logout control.
- Footer
This template inherits configurations of the CampusNexusEngageMainTemplate template. All sample portal pages, excluding the Login page and pop-up pages, are created using this template.
This template does not have a header section and is used in pages that are displayed as a pop-up form from portal pages. Some of the pages where this template is used are:
- Test Score Detail
- Previous Education Details, etc.
The page templates,CampusNexusEngageMainTemplate and CampusNexusEngageBaseTemplate, are shipped with a default logo in the header area, which can be changed by institutions as per their requirements.
This section provides information on adding a logo image and updating the header logo in the Portal templates.
Perform the following steps to update the header logo displayed on the TPC portal pages:
-
Upload the Logo Image to the Portal
-
Update the Header Logo in the Portal Template
Upload the Logo Image to the Portal
-
Launch the Sitefinity URL.
-
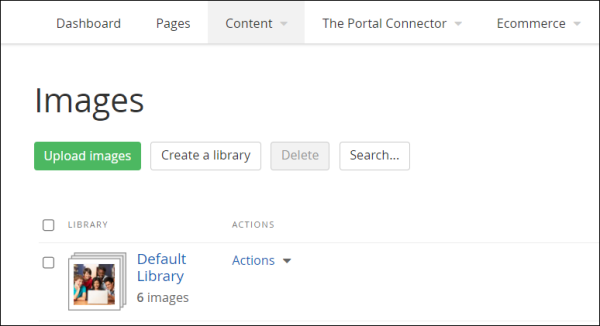
In the top navigation bar, click Content > Images.
-
Select the required image from your computer, select a library, and click Done.
- Click the Publish button to save the uploaded image in the selected library.
-
Click the Back to all images link.
The uploaded image will be available in the image library.
Update the Header Logo in the Portal Template
-
On the Sitefinity URL, on the top navigation, click Design > Page Templates.
-
In the Templates page, locate and click the CampusNexusEngageMainTemplate template.
-
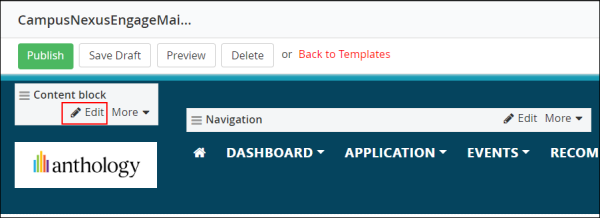
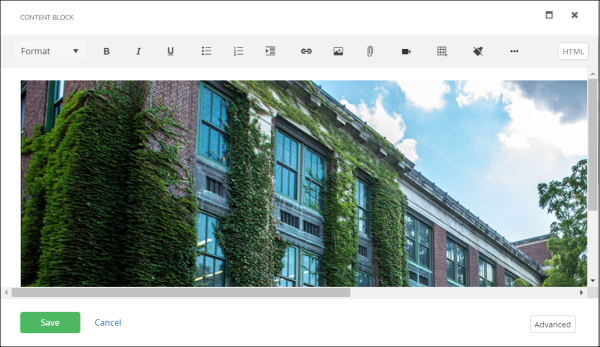
In the CampusNexusEngageMainTemplate page, in the Content block where the default logo is displayed, click Edit.

-
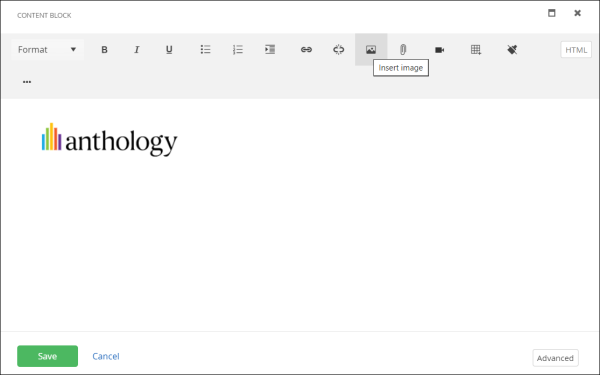
In the Content Block dialog, remove the existing image and click the Insert Image icon.

-
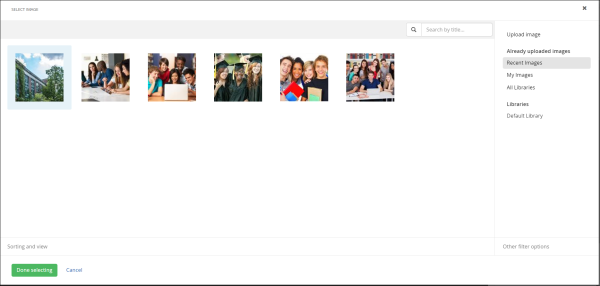
In the Select Image dialog, select an image and click the Done selecting button.

-
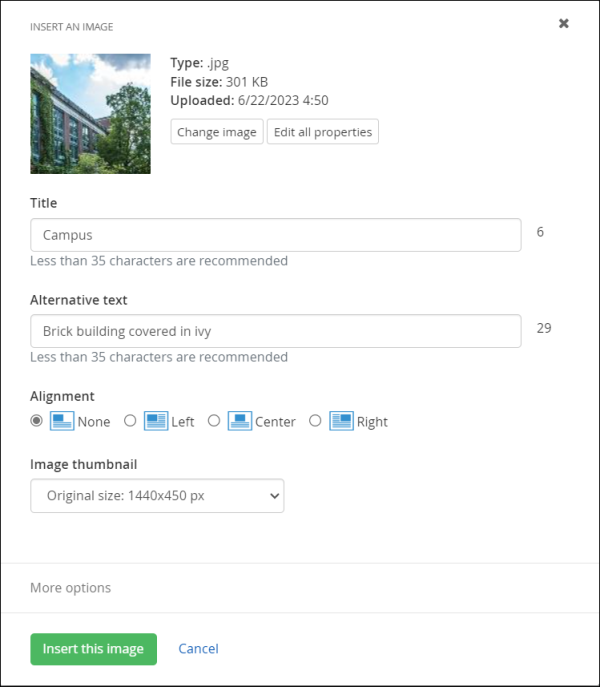
In the Insert an Image dialog update the fields and click the Insert this image button.

-
Click the Save button.
The header logo is updated with the new image in the page template.

-
Click the Publish button to apply the image change.
-
Repeat steps 2 to 8 for the CampusNexusEngageBaseTemplate template.
The Application Dashboard can be customized to view additional fields of the following entities:
-
Application
-
Application Registration
-
Decision Details
Steps to Configure Additional Fields in the Application Dashboard
To add or remove additional fields of the Application, Application Registration, and Decision Details entities, perform the following steps:
-
Log on to the Portal as an administrator user.
-
Navigate to the Application Dashboard page.
-
In the Application Dashboard section, click Edit.

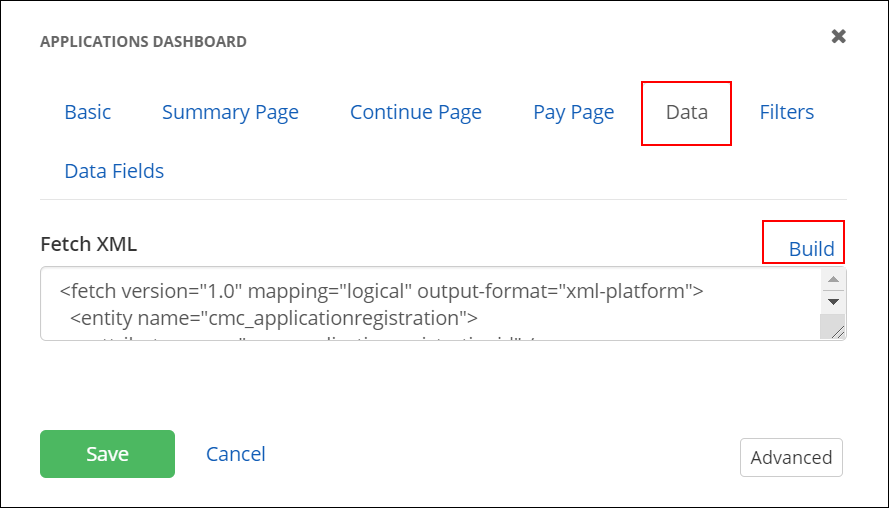
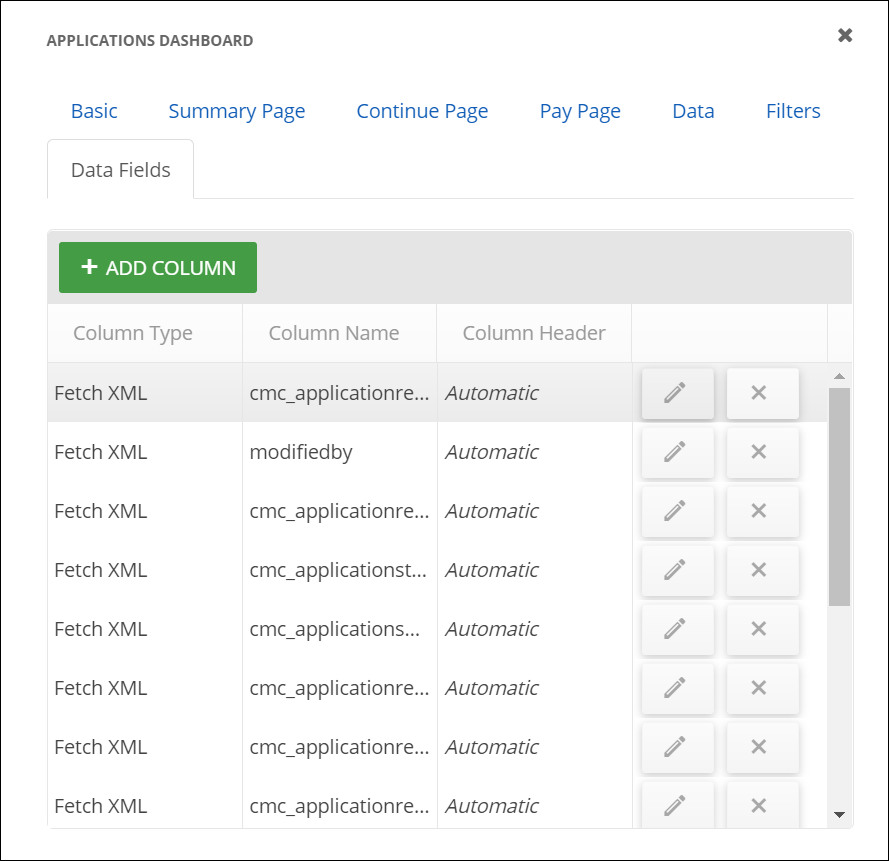
The Application Dashboard dialog box is displayed:
-
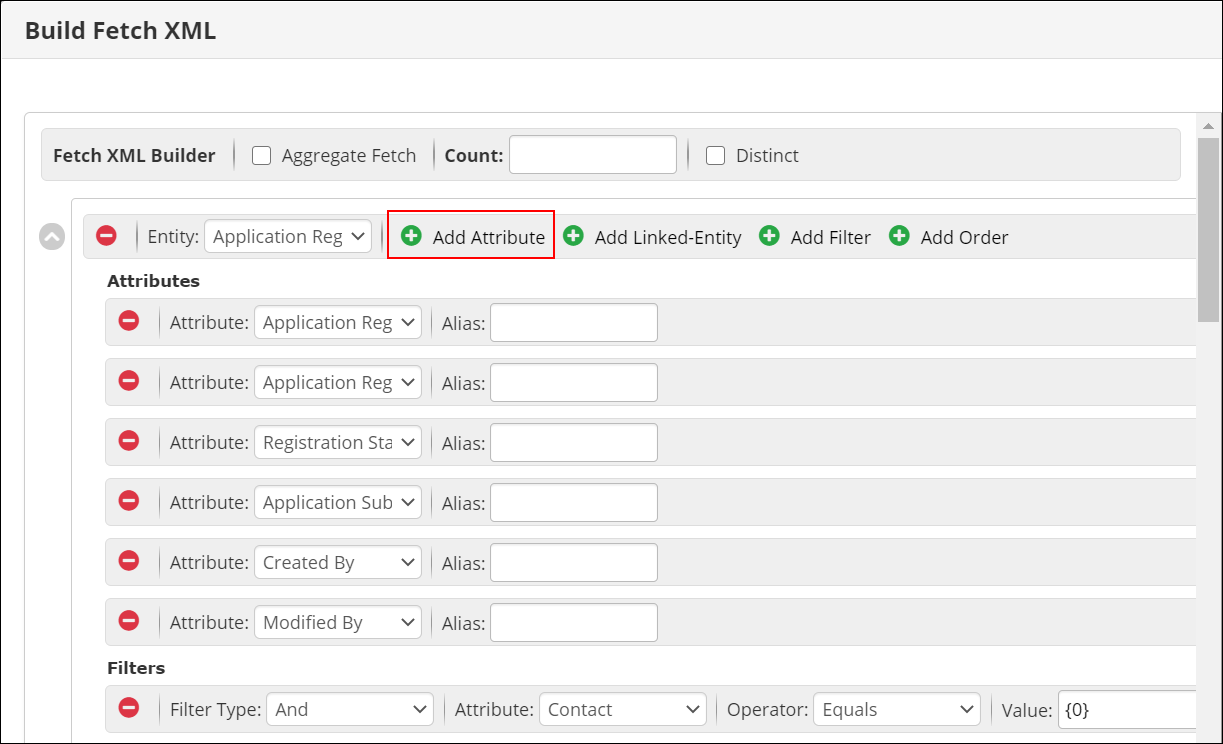
Click the Data tab and then the Build link. The Build Fetch XML page is displayed.
-
In the Build Fetch XML page, add the required attributes for the selected entity.
By default, the Application Registration entity is selected.
- Click Save and Close.
-
In the Application Dashboard dialog box, click the Data Fields tab to view the attributes added in the Data tab.
- For each column name that must be displayed on the Application Dashboard, click the edit icon,
 , and perform the following steps:
- (Optional) Specify a custom name in the Column Header field. Leaving this field blank will show the display name of the field from Anthology Reach.
- Select the Visible check box.
- Click Update.
-
Click Save on the Application Dashboard dialog box.
The newly added fields will be displayed in the Application Dashboard section.
The Consent Management widget and the Consent Settings page are shipped OOTB with the portal, and the Consent Management widget is by default included in the Consent Settings page.
The Consent Settings page on the portal allows the portal user to view and manage their real-time marketing consent settings for various communications channels, such as email, WhatsApp, and SMS directly from the portal. This helps the portal user to manage the messages they can receive from the institutions from various contact points.
For more information on using the Consent Settings page, see Managing Consent for Email, SMS, and WhatsApp (Real-time Journeys).
The OOTB Consent Settings page is included in the CampusNexusEngageBaseTemplate template with the Anthology Reach 2025.4 release.
You can configure a Consent Settings page and use the Consent Management widget on the portal using the following steps:
Step 1 - Create a copy of the OOTB "Consent Settings" page
Prerequisite - Ensure Anthology Reach 2025.4 version is installed on the portal.
-
Launch the Sitefinity URL and navigate to the Pages page.
-
Go to Anthology Reach Portal > User Profile and select Consent Settings and Edit Consent pages, right-click and select Duplicate from the pop-up menu option.
-
In the duplicate page creation form:
-
Rename the Consent Settings file name if required.
-
Select the Duplicate child pages as well check box, to copy the Edit Consent page
-
Select the folder location where the files must be copied, and click Create.
-
-
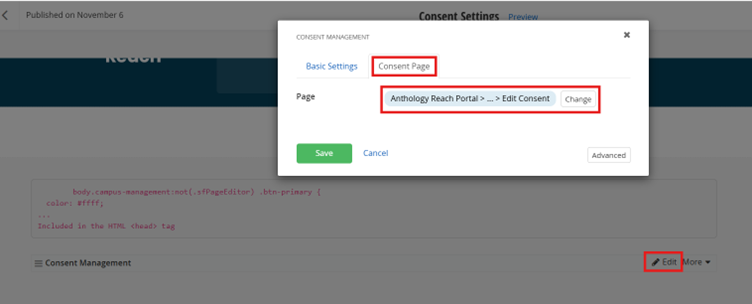
Open the copied Consent Settings page, and select the Edit button in the Consent Management widget.
-
In the Consent Management widget dialog box, select the Consent Page tab and in the Page field select the copied Edit Consent page.
Step 2 - Update the base template to display the "Consent Settings" option on the navigation pane
The navigation for accessing the Consent Settings page is OOTB added in the CampusNexusEngageBaseTemplate template where the Login/Logout button widget is available. Therefore, on the customer's portal you need to add the navigation for the Consent Settings in the base template where the Login/Logout button widget is added.
Perform the following steps to find the base template and configure the "Consent Settings" option to be displayed on the navigation pane:
-
Launch the Sitefinity URL and navigate to the Templatespage and locate the base template where the Login / Logout button widget is added.
-
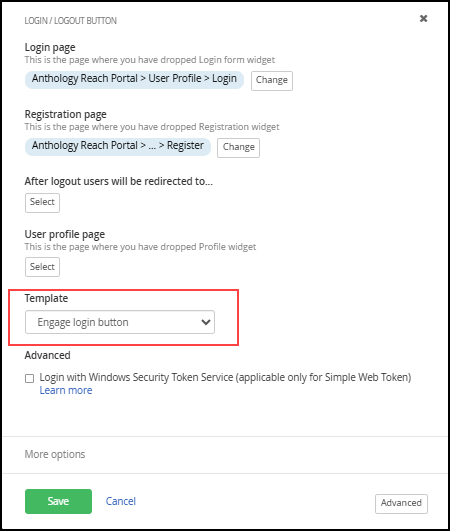
Open the base template and select the Edit button on the Login / Logout button widget.
The template name is displayed in the Template field.
-
Click Cancel and exit the page.
-
On the Sitefinity administration site, open File manager (under Administration > Tools > File Manager).
-
In the Files page, expand ResourcePackages > CampusNexusEngage > MVC > Vews > LoginStatus folder, and locate the Engage Login Button template for Login.
-
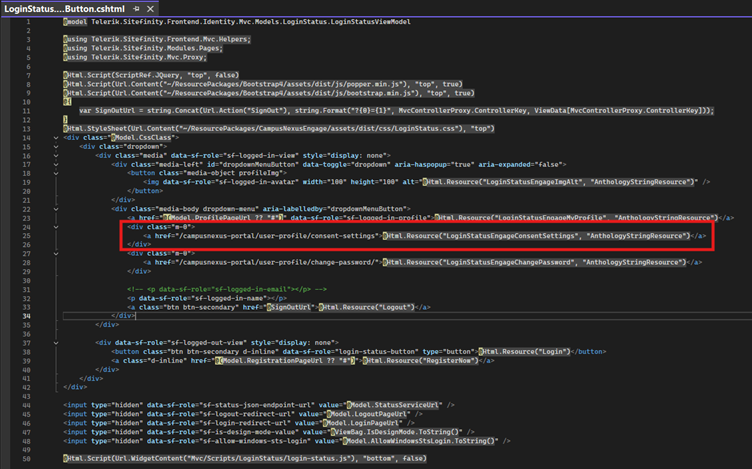
Open the LoginStatus.EngageLoginButton.cshtmland add the following code snippets to display the Consent Settings option
below the My Profile option in the navigation menu.
<div class="m-0"><a href="{{urlofyourconsentsettingpage}}">@Html.Resource("LoginStatusEngageConsentSettings", "AnthologyStringResource")</a></div>
-
Save the file.
The Payment widget shipped with the portal has built-in functionality to:
- Capture the invoice amount that must be billed to a student
- Navigate to the required payment gateway service provider’s page
- Navigate back to the portal page from the payment gateway page
By default, the payment widget is added in the invoice generation page of the portal. However, the portal administrator can add the payment widget in any other portal page.
The following table describes the fields available in the payment widget:
| Field name | Description |
|---|---|
| Button Text | The button text. Clicking this button takes the portal user to the payment configuration page. By default, the text of the button is Pay. |
| Instance Id Control |
The field name that stores comma separated values of invoice instance Ids.
By default, the field name is HiddenField-1, a hidden field on the invoice generation page. |
| Payment Provider Control |
The field name that stores the payment gateway name. By default, the field name is HiddenField-2, a hidden field on the invoice generation page.
The HiddenField-2 can have one of the following values:
The value in the HiddenField-2 field is used to navigate to the desired payment gateway page. |
| Amount Control |
The field name that stores the amount that must be sent to the Payment gateway page for online payment.
By default, the field name is TpcTextFieldController, and it stores the value of the Total amount field on the invoice generation page. |
| Css Class | The custom CSS class that can be applied on the payment widget. |
| Return URL |
The URL to which the portal user navigates to by default from the payment gateway page.
By default, the URL of the payment receipt page is stored in this field: <baseurl>/campusnexus-portal/application/registration/ paymentrecieptpage |
The Page button widget that is shipped with the portal is added to a Portal page as a button that is used to redirect the portal user to a specific page. The following table provides some of the portal pages and the Page Button widgets that are configured, by default.
| Portal page | Page Button widget |
|---|---|
| Home |
|
| Application Registration | <Application Definition Verison name> Application |
| Event Confirmation | My Events |
To Configure the Page Button Widget
- Launch the Sitefinity URL and navigate to the page to configure widgets.
- View the page on which you want to add Page Button widget.
- Expand the CampusNexus Engage group and then drag the Page Button widget from the right pane to the page.
- Click Edit. The Page Button dialog will be displayed.
- In the Basic tab:
Button Text - Type the text for the button label that will be displayed on the portal page.
Include Application version - Select this check box to use the application version details and redirect the user to the desired application registration page. When this check box is selected, the following fields are displayed that must be configured:
Application Version Source - Select one of the following options:
Query String - When this option is selected, specify a value in the Query String Key field and select the Automatic Redirect check box. Select this option when a query string is required for the page to which the user is redirected.
Selected - Select this option if the query string is not required for the page to which the user must be redirected.
Application Version - From the list, select an Application Definition Version that will be used to redirect the user to the corresponding application registration page.
Include FetchXml - Select this check box to use the XML query condition added in the Fetch Xml field in the Data tab to display or hide the button on the page.
Button Classes - Specify the custom CSS class to format the button.
Page - Select the page to which the user should be redirected.
- In the Data tab:
- Fetch XML - Add the XML query condition to set the visibility of the button on the portal page. This condition is used only when the Include FetchXml check box is selected.
- Click Save and then click Publish.
The button is added to the portal page.
The Address Auto Complete widget that is shipped with the portal provides type-ahead behavior and ability to enter address information using the Street 1 field. When a portal user starts typing an address in the Street 1 field, the widget auto-completes the details of the address such as the street, locality, city, state, country and Zip code.
By default, this widget is added in the Profile page on the Portal, however, the administrator can add it to any other page on the portal.
To Configure the Address Auto Complete Widget
-
To use the Address Auto Complete feature on Portal, the Address AutoComplete option in the Default configurations in Anthology Reach must be enabled. For more information, see Default Configurations.
-
The address fields of the Contact or Account entity from Anthology Reach are already configured on the page where the widget needs to be configured.
Further, the auto-complete feature must be enabled for the address fields of these entities in Anthology Reach. For more information, see Address Autocomplete - Updating the Display of Address Fields.
- Launch the Sitefinity URL and navigate to the page to configure widgets.
- View the page on which you want to add Address Auto Complete widget.
-
Expand the CampusNexus Engage group and then drag the Address Auto Complete widget from the right pane to the page.

-
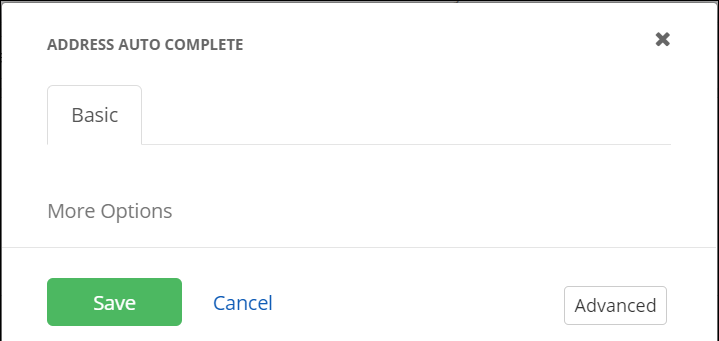
Click Edit. The Address Auto Complete dialog will be displayed.
-
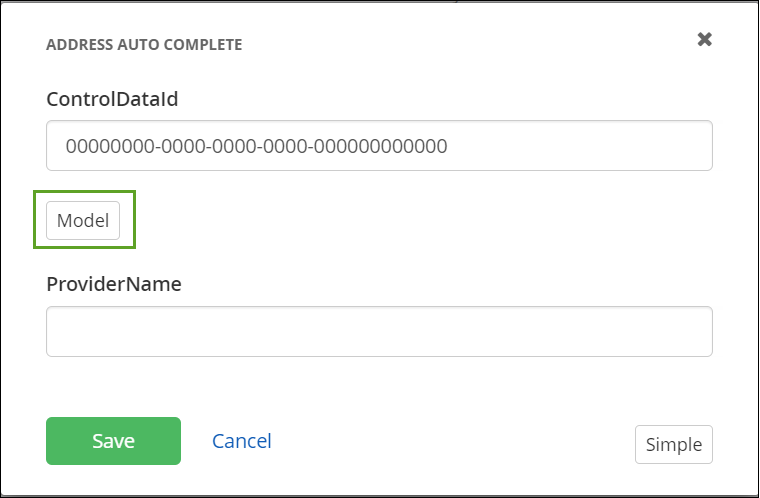
Click the Advanced button.
-
Click the Model button.
-
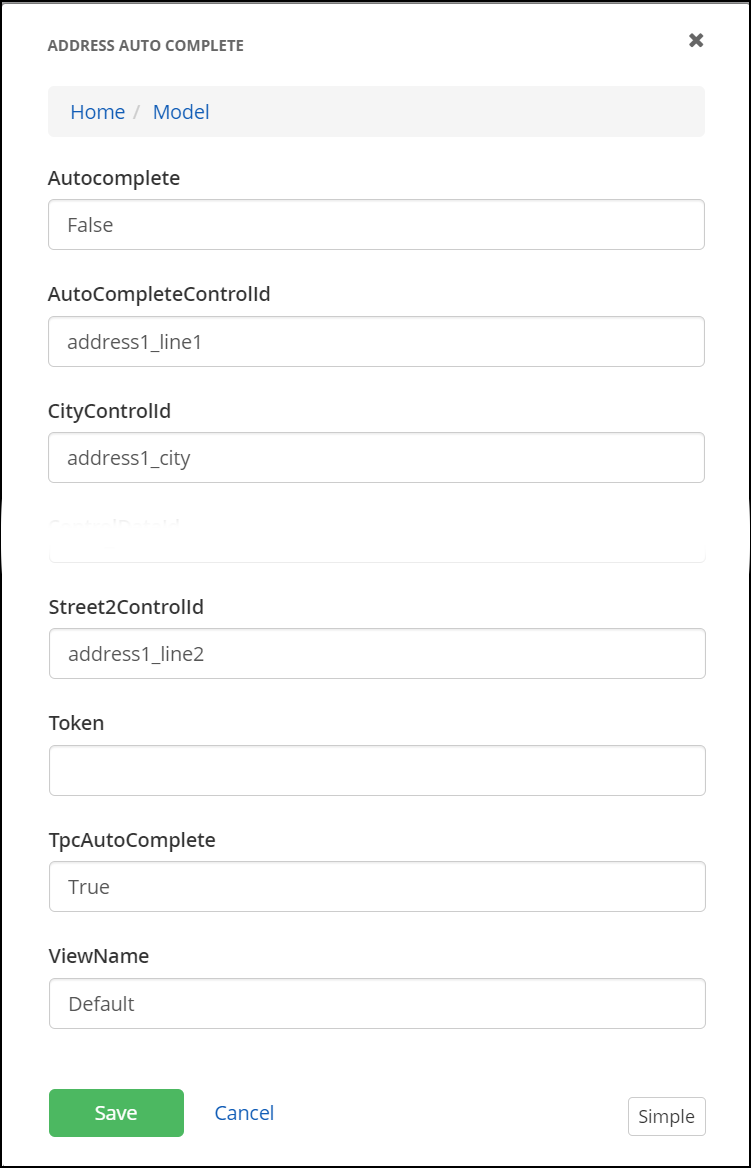
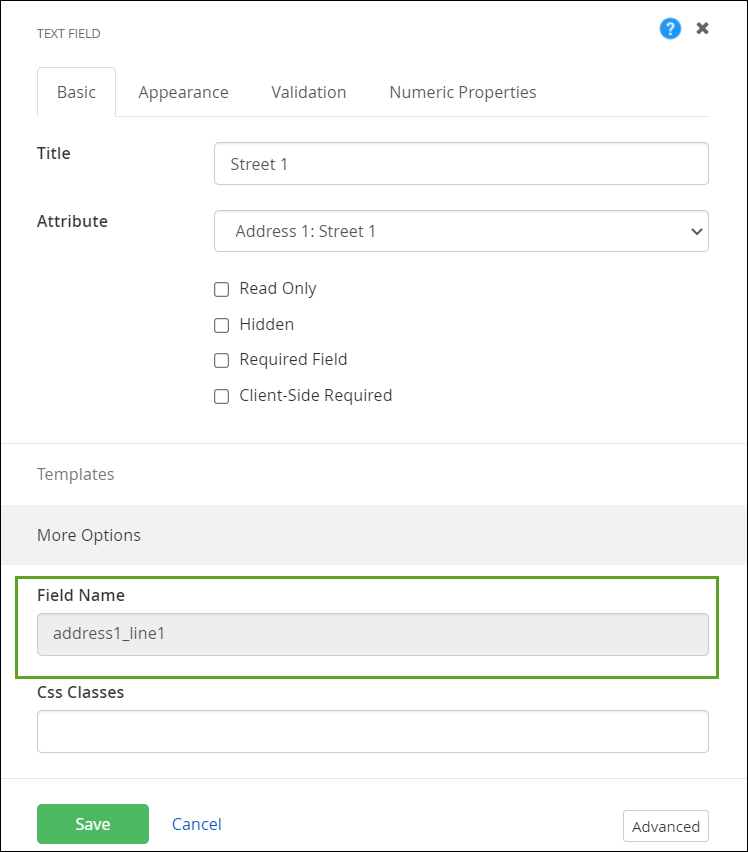
In the TpcAutoComplete field, specify True.
Note: The value in this field determines whether the address auto-complete is enabled for disabled on the Portal. True indicates the auto-complete feature is enabled. -
In the following fields, specify the control ID of the address fields added to the portal page.
-
AutoCompleteControlId
Note: The value in this field is used to get relevant address details to auto-complete the remaining address fields. -
CityControlId
-
CountryControlId
-
PostalCodeControlId
-
StateControlId
-
Street2ControlId
Note: The control ID of a field is the value specified in the Field Name field of the portal control when it is configured on a portal page. -
- Click Save and then click Publish.
Best Practices on Using the Auto Complete Widget
-
Ensure that the Control IDs of the address fields on a portal page are not changed after the Address Auto Complete widget is configured in the portal page.
-
It is not recommended to auto populate the County field in the Address Auto Complete wizard.
The Get Document widget that’s shipped with the portal, enables applicants to view and print documents.
When the Get Document widget is configured, a new button, Get Document, will be displayed to the applicant on the portal page on which it’s configured.
To Configure the Get Document Widget
- Launch the Sitefinity URL and navigate to the page to configure widgets.
- View the page on which you want to include the Get Document widget.
- Expand the CampusNexus Engage group and then drag the Get Document widget from the right pane to the page.
- Click Edit. The Get Document dialog will be displayed.
- In the Template tab:
- Query String: Type the schema name of the field based on which the record of the entity will be searched.
- Is Query String Encrypted: Select this check box If the query string passed from a previous page to the page on which the widget is being included is encrypted.
- Entity: Select the entity for which the Get Document button is being configured.
- Document Template: Select the template that will be used when the applicant clicks the Get Document button. By default, the template that is associated with the entity in Anthology Reach will be available for selection.
Note: Templates will be displayed only if MSCRM addons client is installed.
- Click Advanced and then type or select values in the following fields:
- AzureFunctionAuthorizationKey: Obtain the Azure function key from the Azure portal.
- Button Text: By default, the text Get Document is set, and will be displayed on the button. You can replace the text.
- DownloadingErrorMessage: By default the text “Oops! Something went wrong, try after some time.” is set. This text will be displayed if an error occurs when a user views a document. You can replace this text.
- Click Save and then click Publish.
The Staff Calendar widget is by default included in the following Book Appointment pages:
-
Search by Advisor
-
Search Available Slots
The following steps describe how you can configure the Staff Calendar widget on any other portal page.
- Launch the Sitefinity URL and navigate to the page to configure widgets.
- View the page on which you want to include the Book Appointment widget.
- Expand the CampusNexus Engage group and then drag the Staff Calendar widget from the right pane to the page.
- Click Edit. The Staff Calendar dialog will be displayed.
- Edit the following pages if required:
- My Appointments
- Appointment Details
- Cancel Appointments
- Select the Enhanced Calendar option to view the options available in the Search Available Slots page for booking an appointment.
- Select the Hide Advisor check box to hide the Advisor drop-down field on the book appointment page.
- Click Save and then click Publish.
The following steps describe how to configure the Schedule Appointment page to be launched when applicants click the Book Appointment button.
-
Launch the Sitefinity URL and expand the My Dashboard group.
-
Select the Success Network page.
-
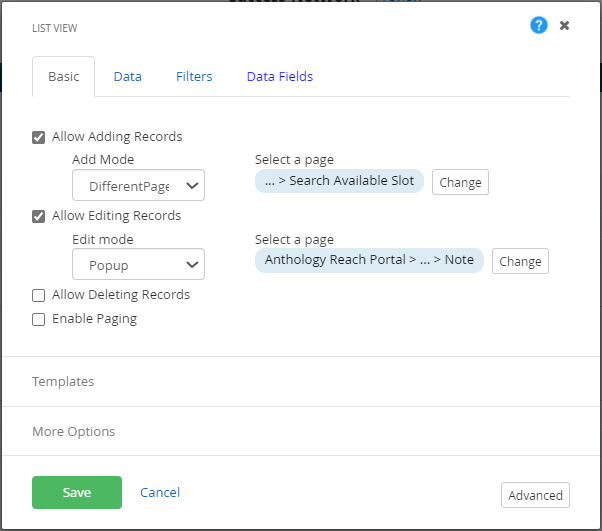
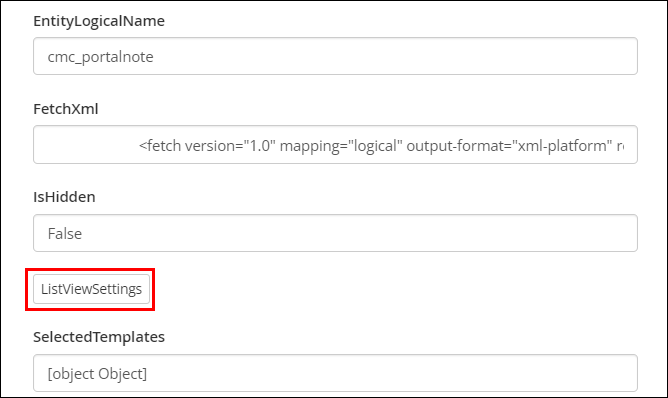
In the List View section, click
 to view the List View dialog.
 -
Click the Allow Adding Records option.
-
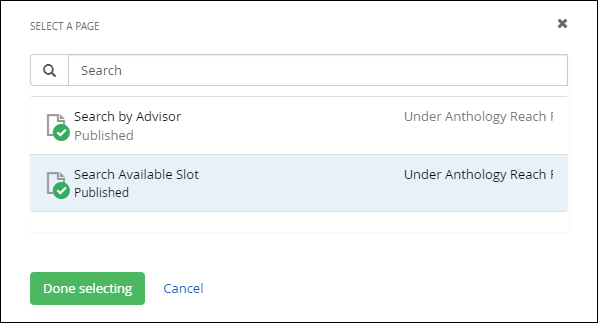
In the Select a page field, click the Change button and select Search Available Slot.
Note:The Search Available Slot is the new book appointment page. Selecting the Search By Advisor page will redirect the user to the old book appointment page. -
Clear the Allow Adding Records option.
-
Click Save and then click Publish.
The following steps enable you to edit the template that’s associated with the My Appointments page, thus changing its look and feel.
Before performing the following steps, ensure that the default template file (MyAppointments) is backed up.
-
Launch the Sitefinity URL and navigate to the page to configure widgets.
-
Double-click the My Appointment widget.
-
In the Scheduler area, click
 . The Scheduler dialog is displayed.
 -
In the Templates area, select the MyAppointments template in the Scheduler list and then click
 to edit the template.
 -
After making the required changes, click Save and then click Publish.
If the default Cancel Appointment URL needs to be changed or if the same page is relocated to a different path, corresponding changes must be made in the URL of the page in the MyAppointment.js file.
- On https://portal.azure.com, view the app service record where your portal is hosted.
- On the displayed page, under Development Tools, click App Service Editor (Preview), and then click
 .
. - In the Explore pane on the left, under WWWROOT > ResourcePackages, navigate to the following path:
ResourcePackages\CampusNexusEngage\assets\dist\Scripts\Pages - Click the MyAppointments.js file in the left pane.
- Make appropriate modifications to the following code:
var url = "/campusnexus-portal/dashboard/cancel-appointment?tpcModalForm=true&ajaxSubmit=true&appointmentId=" + appointmentId;
Perform the following steps in Portal.Azure.com. Steps 1 – 4 can also be performed automatically. For more information, see https://docs.microsoft.com/en-us/azure/cognitive-services/immersive-reader/. However, steps 1 - 4 are included for the benefit of staff in your Professional Services team.
- Create a resource of type Cognitive Services.
- In the resource, create and then register the application Immersive Reader App.
- Specific to the Immersive Reader App, create a client secret.
Values of the following fields will be required to configure the Immersive Reader App on the Portal:
- Application ID
- Directory (tenant) ID
- Client Secret
- The subdomain of the Immersive reader resource – https://<The sub domain>/cognitiveservices.azure.com
- In the API permissions node, the following permissions must be added for the Immersive Reader App:
- User.Impersonation
- User.Read
Perform the following steps to configure Immersive Reader on the Portal
- Launch the Sitefinity URL and navigate to the Advanced page.
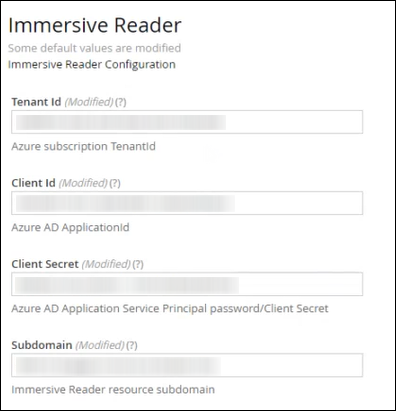
- Click the Immersive Reader option in the left pane:

- In the right pane, type values of step 3 in the following fields and then click Save Changes:
- On the Basic Settings page, navigate to Web Security > Trusted Sources > Edit.
- In the Trusted Sources dialog, add https://contentstorage.onenote.office.net to:
- The Scripts area:
- The Images area (Expand Fonts, images, video and audio):
- Expand Forms, frames, child sources, connect sources, plugins and add *.cognitiveservices.azure.com to the Child Sources area:
The process of configuring the Immersive Reader widget is complete.
Configuring the Immersive Reader Widget on Portal Pages
- On a portal page, drag and drop the Immersive Reader Button widget from the right pane (Content tab) to the area of the page where you want to insert the button.
- Click Edit to view the Immersive Reader Button dialog.
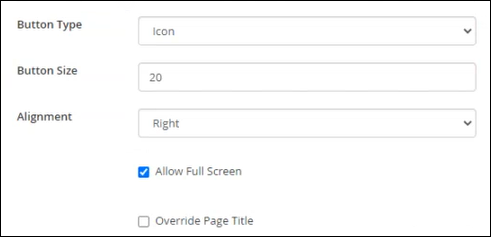
- In the Button tab, choose appropriate options.
- Select options that you want to apply in the Cookies tab and then click Save.
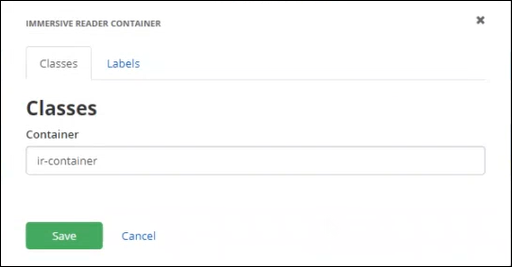
- From the Layouts tab, drag and drop the Immersive Reader Container from the right pane on to the area selected in step 10.
- Drag and drop a Content block (Content tab) from the right pane to the Immersive Reader Container area.

- Click the content block and then add content to the page.
- Click Save and then click Publish. The button to launch the Immersive Reader will be displayed on the page and content can be viewed using its functionality.
Customizing Immersive Reader Supported Content
Perform the following steps to configure specific sections of the page to display content in the Immersive Reader.
- Skip steps 14 and 15.
- From the right pane, drag and drop a content block to the area you added the Immersive Reader widget in step 10 and then click Edit.
- Click the content block and then click </> in the upper right corner. The Code View page will be displayed.
- Include content as indicated in the following sample code snippet.
<div class=”ir-container”>
<Paragraph 1>
</div>
<div>
<Paragraph 2>
</div>
<div class=”ir-container”>
<Paragraph 3>
</div>
- Click Save and then click Publish.
Using the above code snippet, only content of Paragraph 1 and Paragraph 3 will be displayed in the Immersive Reader. Paragraph 2 will be omitted because the ir-container class was not specified.
It's recommended to add the Generate Invoice widget at the top of the InvoiceGeneration page. The widget calls Anthology Reach with a specific FetchXml to trigger invoice generation functionality.
- Launch the Sitefinity URL and navigate to the InvoiceGeneration page.
- From the right pane, drag the Generate invoice widget to the page and then click
 .
. - In the displayed dialog, in the Invoice Type dropdown, select Enrollment Fee to enable the automatic display of the value in the field Record Id Key, and then select Application Fee in the Invoice Type list. The value in the Record Id Key will continue to display.
- Click Save, and then click Publish.
-
Add the Recommendationlist form scripts to the Test Score form:
- Add the file ApplicationRegistrationUpdate_v2.js.
- Add the file QueryString.js.
- Make changes to ensure the Submit button points to the Invoice Generation Page instead of the Recommendation page.
- Change the button’s Fieldname under Advanced Options to TpcSubmitButtonController.
- Launch the portal admin URL and navigate to the page to configure widgets.
- View the page on which you want to include the Event Calendar widget.
- Expand the CampusNexus Engage group and then drag the Event Calendar widget from the right pane to the page.
- Click Edit. The Event Calendar dialog will be displayed.
- Edit the following pages if required:
- My Events page
- Event Details page
-
Click Save and then click Publish.
The following steps describe how the student alert web form can be configured to enable submitters to upload attachments.
- Launch the Sitefinity URL and navigate to the <Alert Web Form> page.
- Drag and drop the File Upload widget from the Portal Connector tools into the form and then click
 .
. - Set a label for the control in the Title field.
- In the File Upload Destination field, choose Notes. Choosing the notes option will enable a Notes tab.
- In the Allowed Extensions field, specify which files are allowed to be uploaded. Each file extension must be separated by a semicolon. For example, ".doc;.docx;.txt;.rtf;.xlsx;.pdf;.zip;.rar;.png;.jpg;.bmp;.jpeg".
- The Allow Multiple File Uploads check box will allow you to upload multiple files without using multiple file upload widgets.
- The Rename File(s) check box will allow you to rename uploaded files, regardless of their original name. When this option is selected, you will be provided with a text field to specify a new filename.
- Click Save and then click Publish.
The Form Duplicate Detection widget shipped with the portal can be configured on TPC forms to perform a duplicate check on base/primary entity records (such as Contact, Application, and Account) based on the Duplicate Detection Rules configured in the Sitefinity Advanced Settings page and Dynamics Duplicate Rules in Reach.
The Form Duplicate Detection widget should be added on the same TPC Form Layout.
To enable duplicate detection of entity records on Portal, administrator must perform the following steps:
-
Configure Duplicate Detection Rules
-
Add the Form Duplicate Detection Widget to the Portal Form
Configuring Duplicate Detection Rules
Administrators need to configure Duplicate Detection Rules for an entity to enable duplicate check for the entity records created on portal. Multiple duplicate detection rules can be configured and all the rules will be executed.
To configure and enable duplicate detection rule(s) for entities, perform the following steps:
-
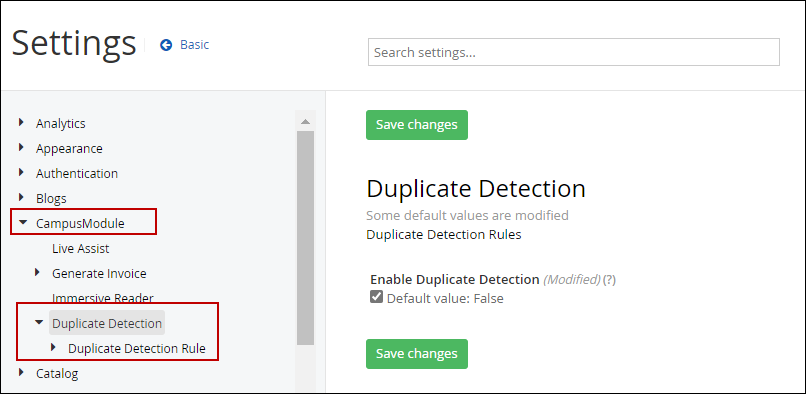
Open the Sitefinity URL and go to the Advanced Settings page (under Administrations > Settings > Advanced).
-
Navigate to CampusModule > Duplicate Detection.
-
In the Duplicate Detection page, select the Enable Duplicate Detection check box and click Save changes.
-
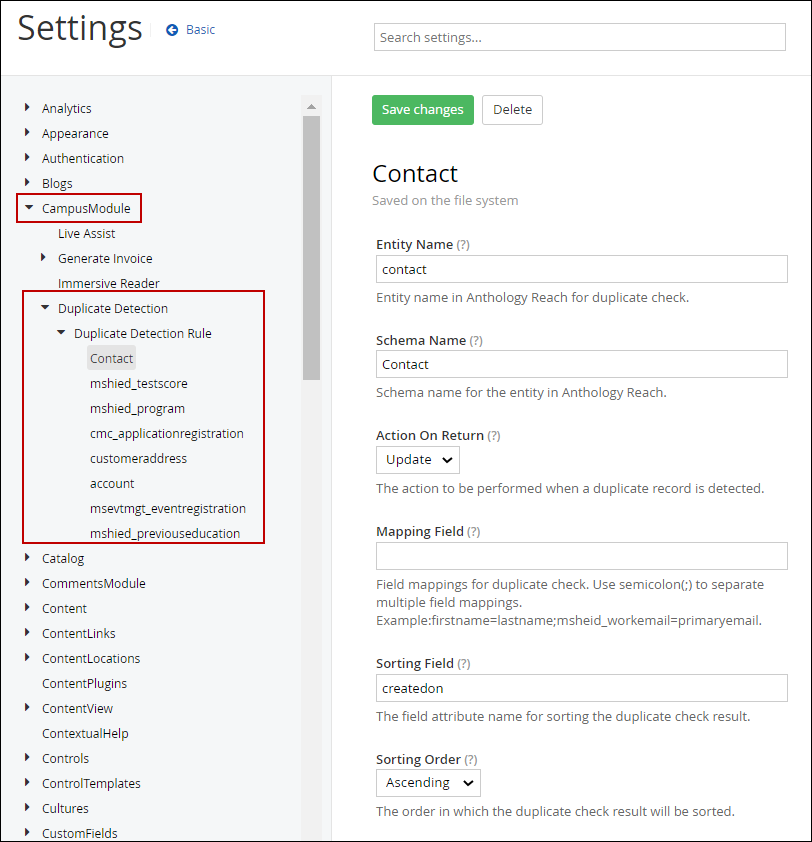
Click Duplicate Detection Rule.
The Duplicate Detection Rule page lists the entities for which the rule is already configured.
-
Click the Create new button to add duplicate detection rule for an entity.
-
Specify values for the following fields for configuring the duplicate detection rule for an entity:
-
Entity Name - The entity name in Anthology Reach.
-
Schema Name - The schema name of the entity in Anthology Reach.
-
Action On Return - Indicates whether the record needs to be updated or not when a duplicate record is detected. You can set one of the following values:
-
Update - The record will be updated when duplicate record is detected in Reach.
-
Stop - The records will not be updated when duplicate record is detected in Reach.
-
-
Mapping Field - The field mappings that will be used for duplicate check. You can add multiple field mappings separated by a semicolon (;).
-
Sorting Field - The field name in Anthology Reach that will be used for sorting.
-
Sorting Type - The order in which the data will be sorted on the field specified in the Sorting Field. It can be set to ascending or descending.
-
-
Click Save Changes.
-
Repeat Steps 5 through 7 for creating Duplicate Detection Rules for additional entities.
Adding the Form Duplicate Detection Widget
Perform the following steps to add the Form Duplicate Detection widget to a TPC form:
-
Launch the Sitefinity URL and navigate to the Form to add the Duplicate Detection widget.
-
Expand the CampusNexus Engage group and drag the Duplicate Detection widget from the right pane to the page.
-
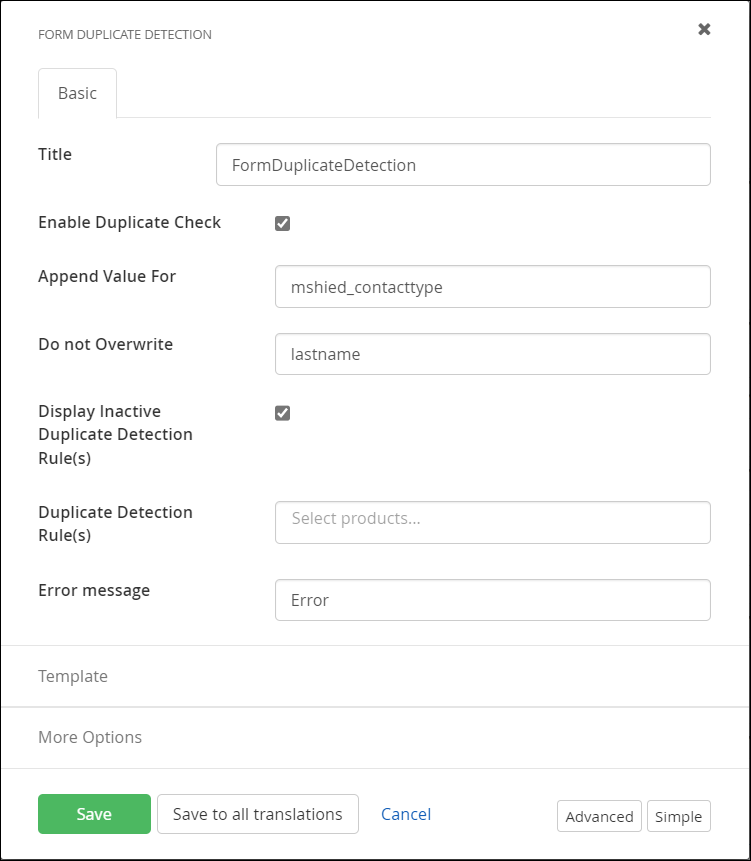
Click Edit. The Duplicate Detection dialog will be displayed.
-
Select the Enable Duplicate Check check box.
-
In the Append Value For field, specify mapping field names separated by semicolon so that new values submitted from portal are appended to the existing value in Reach. For example, new values can be appended in the Contact Type field when a duplicate Contact record is detected.
-
In the Do Not Overwrite field, specify mapping field names so that the existing values are retained when a duplicate record is detected. For example, when the Created Source field is configured, the existing value will be retained.
-
Select the Display Inactive Duplicate Detection Rule(s) check box so that inactive duplicate detection rules can be viewed for selection in the Duplicate Detection Rule(s) field.
-
In the Duplicate Detection Rule(s) field, select duplicate detection rule(s) that must be run on the portal form.
Note
-
If a rule is not selected in the Duplicate Detection Rule(s) field, the duplicate check for the entity on the portal form will be performed based on all active duplicate detection rules for the entity.
-
The following criteria configured for a Duplicate Detection Rule in Reach are ignored when the Duplicate Detection Rule is run on the Portal page:
-
-
In the Error Message field, specify the error message that must be displayed to the portal user when a duplicate record is detected.
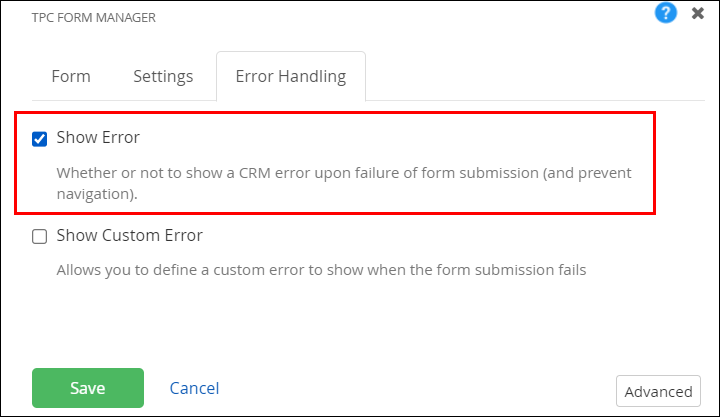
Note:The error message specified in the Error Message field will be displayed to the portal user only when the Show Error check box is selected in the Error Handling tab on the TPC Form Manager page.
The error message will use the following format:
The error message will be prefixed with the text, OnPreFormSubmit Error, as shown below:
OnPreFormSubmit Error <Custom error message>
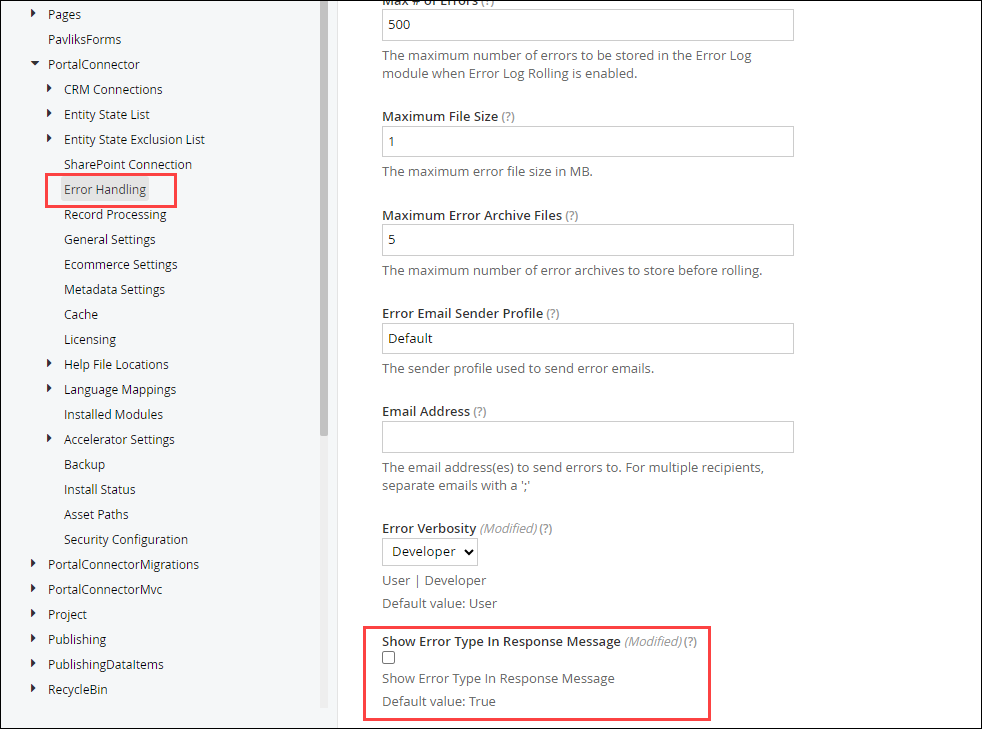
To display the error message without the OnPreFormSubmit Error prefix, clear the Show Error Type in Response Message check box in the Error Handling page (under Sitefinity Administration/Settings/Advanced/PortalConnector/Error Handling).
-
Click Save.
-
Save the Form and click Publish.
The Auto Instrumentation feature shipped with the Portal enables automatically capturing application insights for all or selected pages in the portal.
The application insights from the portal pages can be later used for:
-
Troubleshooting performance related issues on the Portal, and
-
Improving application performance and usability.
Prerequisites
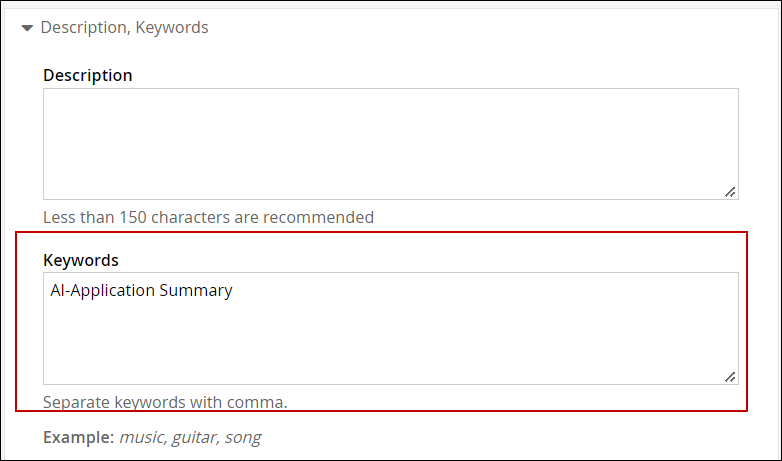
For each portal page, prefix the keywords with AI- in the Keywords box in the Edit a Page page.
-
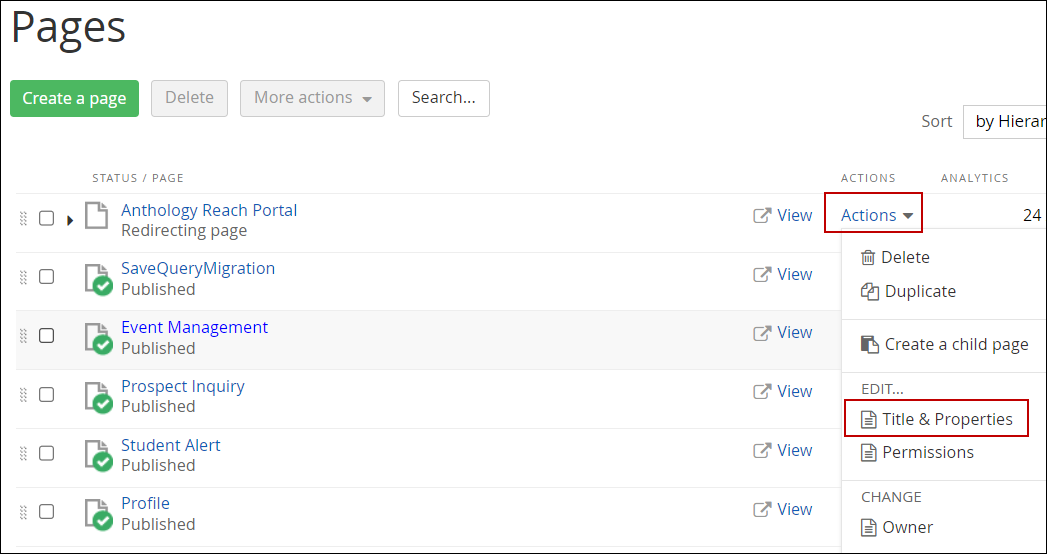
For the required page, click Actions > Title & Properties.
-
In the Edit a Page page, click the Description, Keywords option.
-
In the Keywords field, prefix the keyword(s) with AI-.
Enabling auto instrumentation is a two step process:
Enable the Auto Instrumentation Setting
-
Open the Sitefinity URL and go to the Advanced Settings page (under Administrations > Settings > Advanced).
-
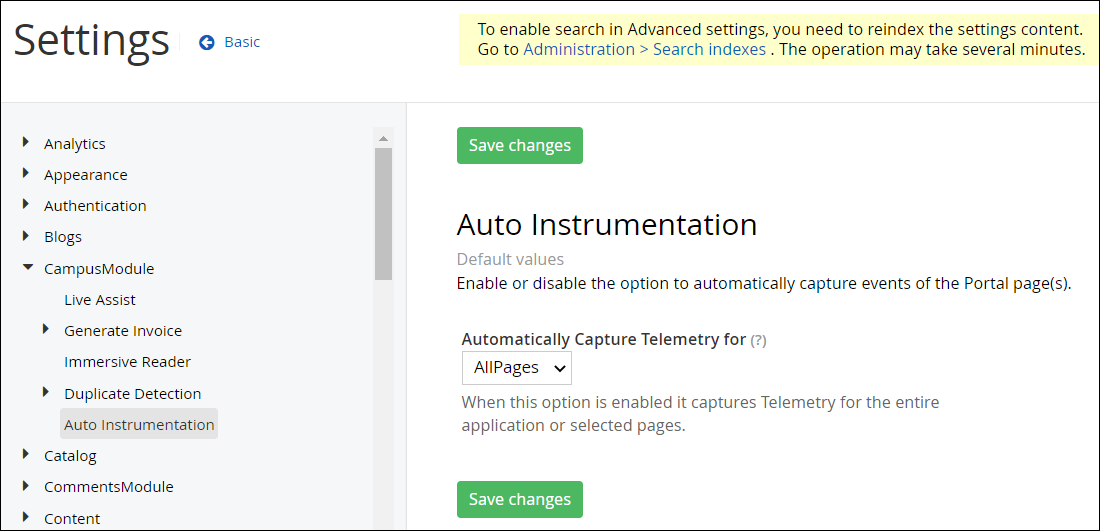
Navigate to CampusModule > Auto Instrumentation.
-
In the Automatically Capture Telemetry for option, select one of the following values:
-
AllPages - It is the default value. Indicates application insights will be captured for all pages in the portal.
-
Page - Indicates application insights will be captured for selected page(s) where the script to enable auto instrumentation is added.
-
Disabled - Indicates the auto instrumentation feature is disabled.
-
-
Click the Save changes button.
Add Scripts to Templates/Pages for Auto Instrumentation
By default, the script for auto instrumentation is added in the CampusNexusEngageMainTemplate and CampusNexusEngageBaseTemplate template pages that are shipped with the CampusNexusEngage resource page.
The configurations in the following section provide the steps to enable auto instrumentation for custom master templates and individual pages on the portal.
Steps to Add the Scripts for Auto Instrumentation for Custom Portal Master Templates
-
Launch the Sitefinity URL and navigate to Administration > File manager.
-
Access the master page templates in the Layouts folder (under ResourcePackages \<Custom Portal Package>\MVC\Views\Layouts).
-
Edit the template pages and add the following script after replacing CampusNexusEngage with the actual customer portal package name:
@Html.Script(Url.WidgetContent("/ResourcePackages/CampusNexusEngage/assets/dist/Scripts/Helpers/aiAutoInstrumentation.js"), "top")
Steps to Enable Auto Instrumentation at Page Level
When the Page option is selected in the Auto Instrumentation setting, the meta tag to enable auto instrumentation needs to be added to the portal pages. To do so:
-
Launch the Sitefinity URL.
-
Navigate to the Pages page.
-
For the required page, click Actions > Title & Properties.
-
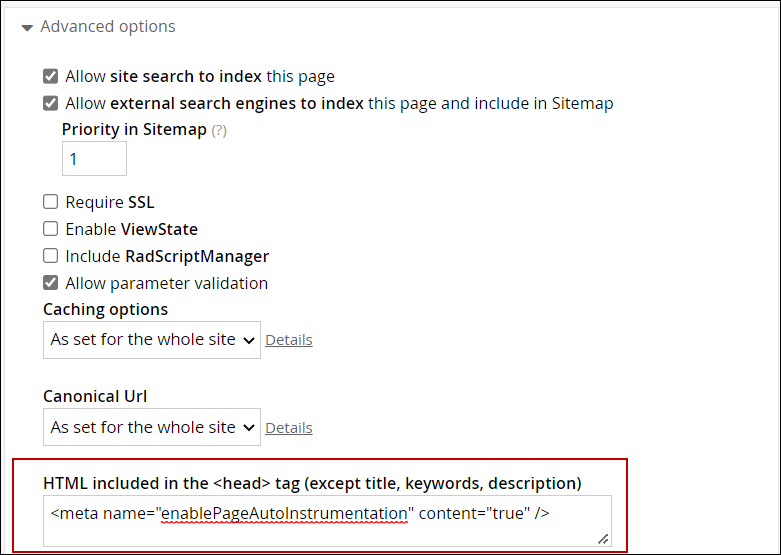
In the Edit a Page page, click the Advanced options.
-
In the HTML included in the <head> tag (except title, keywords, description) field, add the following script:
<meta name="enablePageAutoInstrumentation" content="true" />
Note: In the meta tag, content="true" indicates the auto instrumentation is enabled. To disable the auto instrumentation set content="false".
-
Click the Save changes button.
The Portal Notes widget shipped with the portal can be configured on TPC forms to display notifications to portal users for a desired period based on the configurations in the Portal Notes record for a Contact in Anthology Reach.
To enable displaying the notifications to portal users, administrator must perform the following steps:
Create Portal Notes for Contact Record(s)
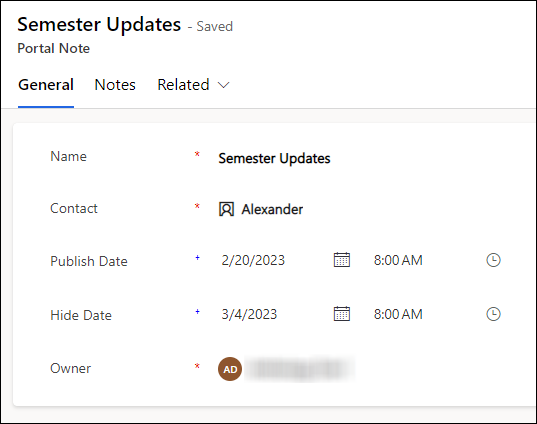
Administrators need to create a Portal Note record for the contact (portal user) in Anthology Reach, which will be displayed to the Portal user.
Portal Notes for a Contact record can be created using one of the following methods.
Method 1 - Using the 'Create Portal Notes' Button on the Contacts Page
-
In Anthology Reach, navigate to the Contacts page (under Reach > Constituent > Contacts).
-
Select the required contact record(s) for which the Portal Notes need to be created.
-
Click the Create Portal Notes button from the ribbon.
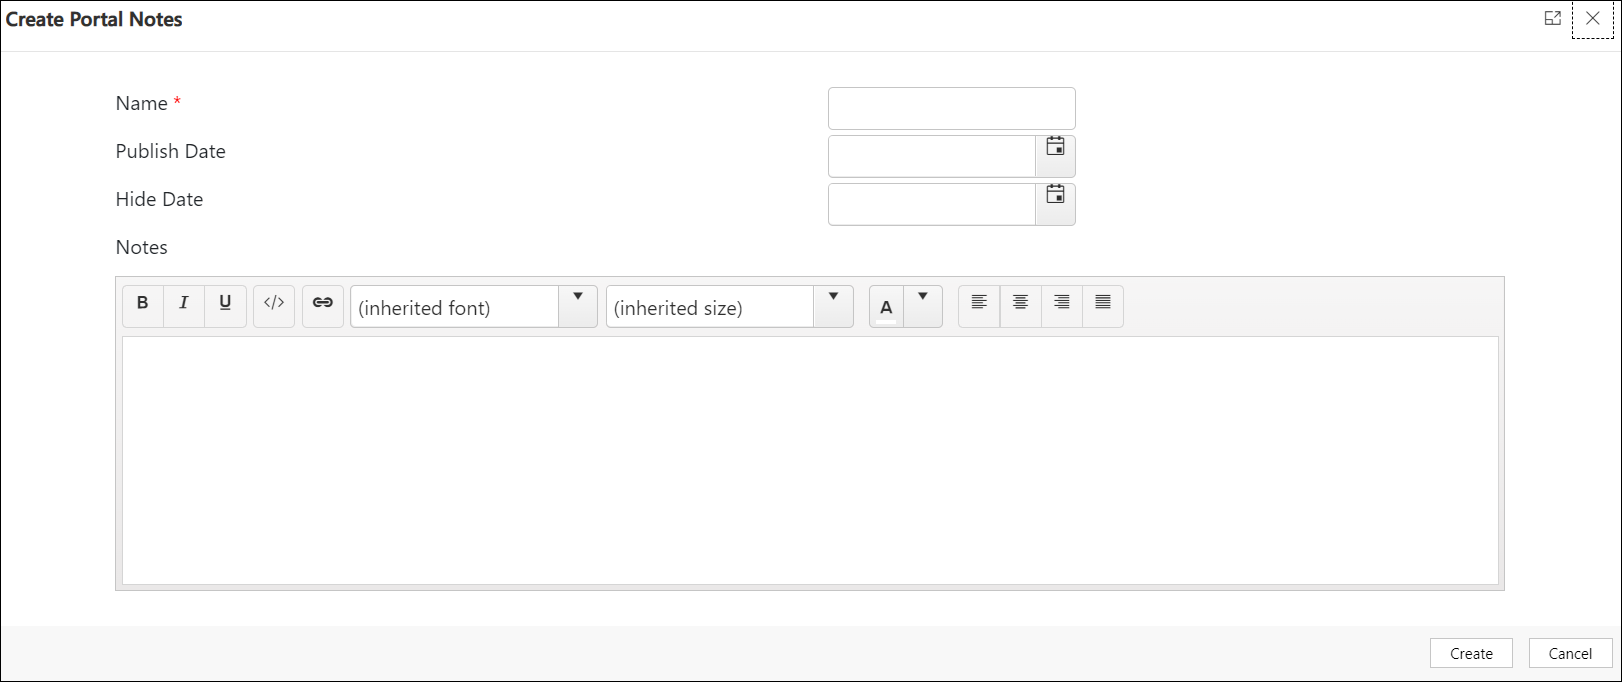
The Create Portal Notes page is displayed.
-
Specify values in the fields for the Portal Notes and click Create.
Note: Images cannot be added in the Notes field.The Portal Notes are created for the selected contact record(s).
Method 2 - Using the 'New Portal Notes' Option in the 'Portal Notes Associated View'
-
In Anthology Reach, navigate to the required Contact record.
-
Select the required view to view the list of Contacts.
-
Select the required contact record(s) for which the Portal Notes need to be created.
-
Click the Create Portal Notes.
The Portal Notes page is displayed.
-
In the General tab, specify the required details.
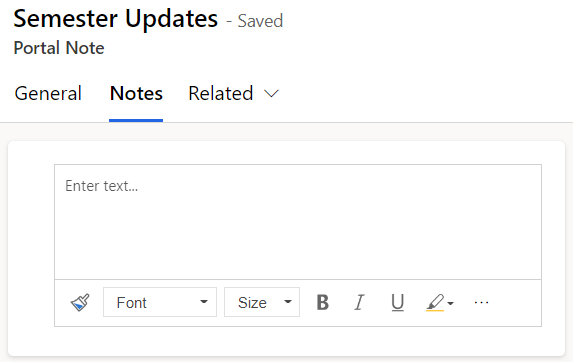
-
Click the Notes tab and add the note that must be displayed to the portal user.
Note: Images cannot be added in the Notes field. -
Click Save.
Add the Portal Notes Widget to the Portal Form
Perform the following steps to add the Portal Notes widget to a TPC form:
-
Launch the Sitefinity URL and navigate to the Form to add the Portal Notes widget.
-
Expand the CampusNexus Engage group and drag the Portal Notes widget from the right pane to the page.
-
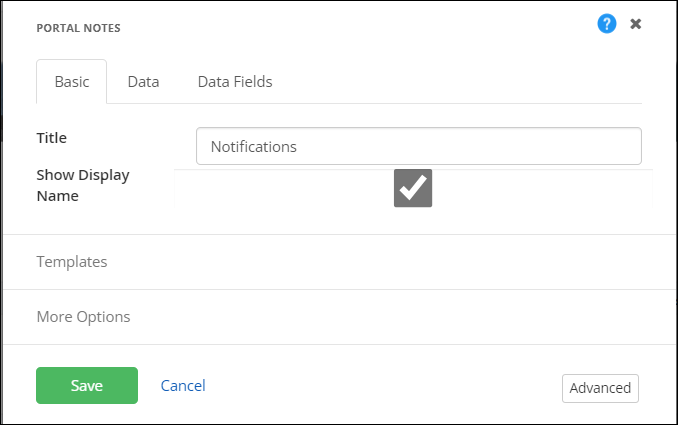
Click Edit. The Portal Notes dialog will be displayed.
-
In the Title field type a title for the notes section on the Portal page.
-
(Optional) Clear the Show Display Name check box to hide the display name of the portal notes record created in Reach.
-
Click Save.
-
Save the Form and click Publish.
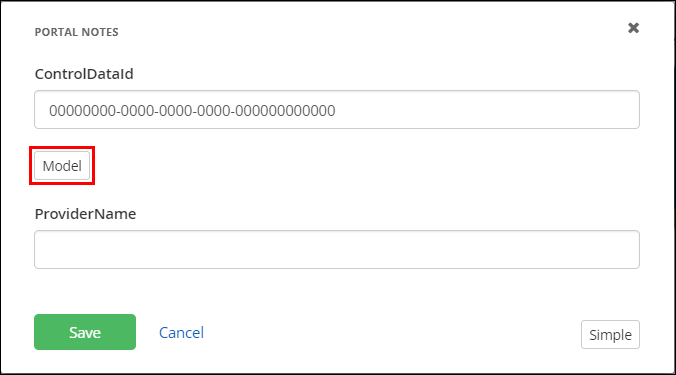
Note: By default, pagination is enabled in the Portal Notes widget. To disable the pagination, perform the following steps in the Portal Notes dialog:
The Registration Widget shipped with the portal can be configured on the registration page, instead of the default Portal Registration widget from TPC, to display additional fields that are configured on the Portal Registration Form Configurations page in Anthology Reach. For information on the Portal Registration Form Configurations, see Configuring Portal Registration Form Fields.
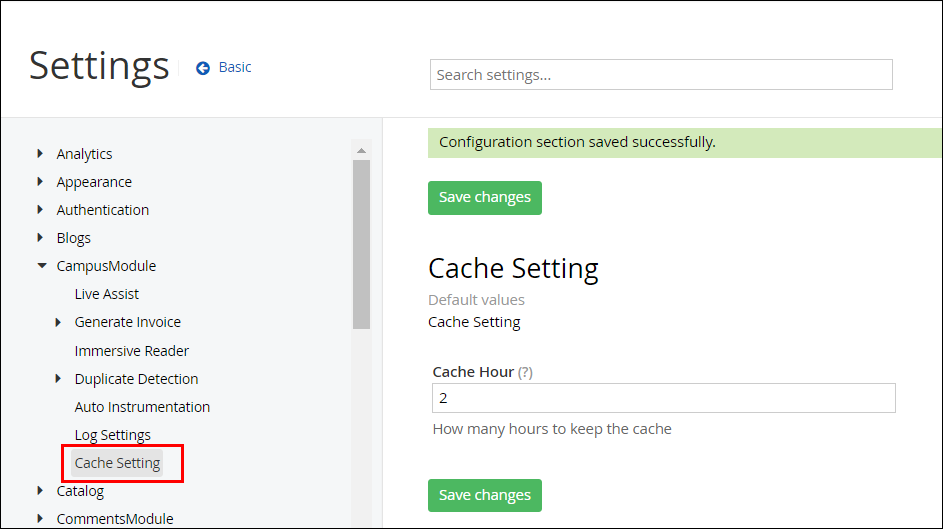
When the Registration Widget is configured on a TPC form, the fields configured on the Portal Registration Form Configurations page in Reach are displayed on the registration form to the portal user. The field data is fetched from Reach at regular intervals, until then the previously fetched data is displayed to the portal user based on the Cache Settings.
Portal administrator can configure the interval to fetch the fields for the Registration form in the Cache Settings. For more information, see Configuring the Cache Settings.
Add the Registration Widget to the Portal Registration Form
Perform the following steps to add the Registration Widget to a registration form on portal:
-
Launch the Sitefinity URL and navigate to the required Registration Form to add the Registration widget.
-
Expand the CampusNexus Engage group and drag the Registration widget from the right pane to the page.
-
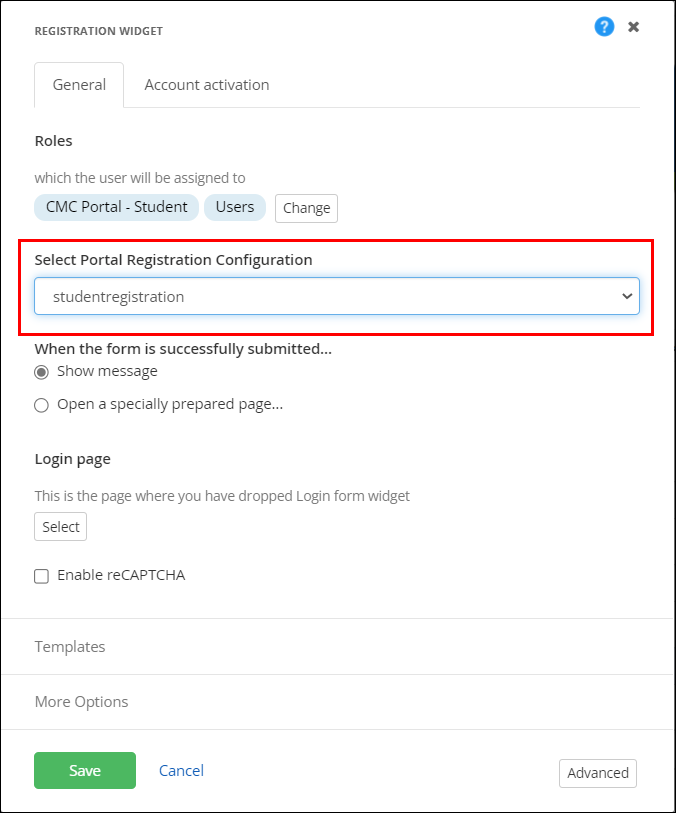
Click Edit. The Registration Widget dialog will be displayed.
-
In the Select Portal Registration Configuration field, select a Portal Registration Form Configurations record configured in Anthology Reach.
The fields on the Registration page are displayed based on the selected Portal Registration Form Configurations record.
-
Click Save.
-
Save the Form and click Publish.
The additional fields on the portal Registration form is auto updated by fetching the details from the Portal Registration Form Configurations in Reach.
Portal administrator can configure the Cache Settings to retain the field data fetched from Reach in the Registration form for a required duration as cache. This helps in reducing the number of calls from Portal to Reach for fetching the data and thus improving the performance on the portal.
To configure the Cache Settings for the Registration form on the portal, perform the following steps:
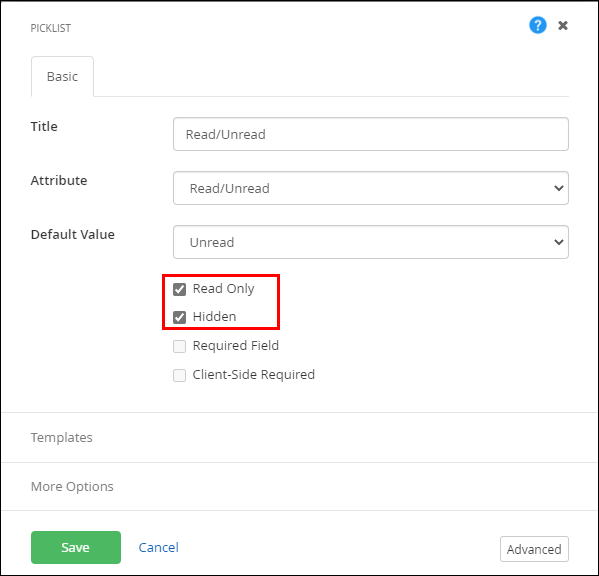
The Read/Unread field in Anthology Reach is automatically updated when theTo Do record is opened by a student from the default To Do form shipped with the portal.
When a custom page is used for displaying To Do records on the portal, the following must be configured on the custom page:
-
Add the Read/Unread field to the custom page and make it Read Only and Hidden.
-
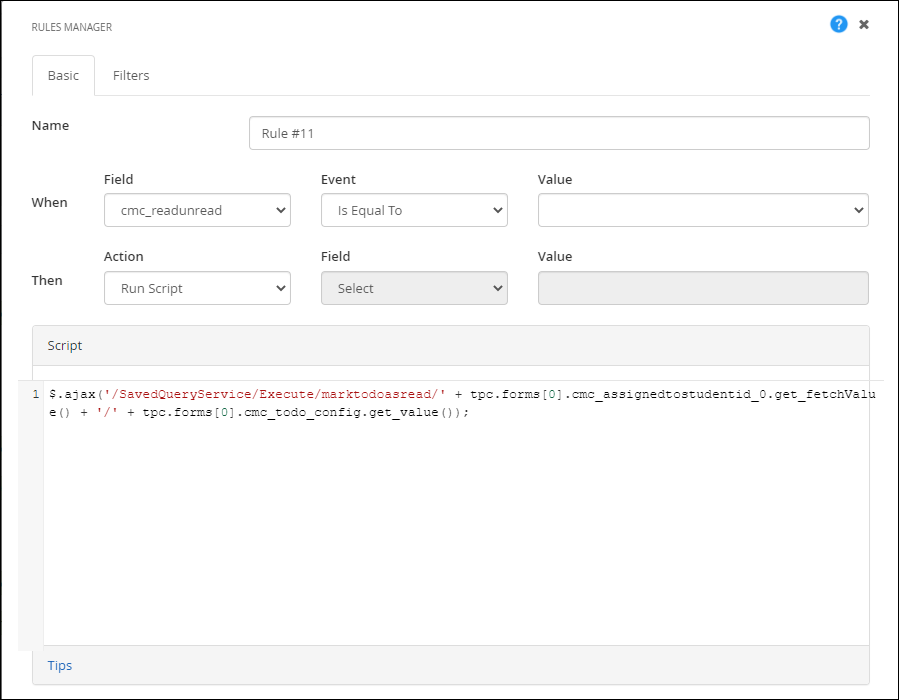
Add a form rule to run a script if Read/Unread field value is Unread. Add the following script to the rule:
$.ajax('/SavedQueryService/Execute/marktodoasread/' + tpc.forms[0].cmc_assignedtostudentid_0.get_fetchValue() + '/' + tpc.forms[0].cmc_todo_config.get_value());
You can configure the Time out / auto-logout settings for a logged in portal user using the following steps:
-
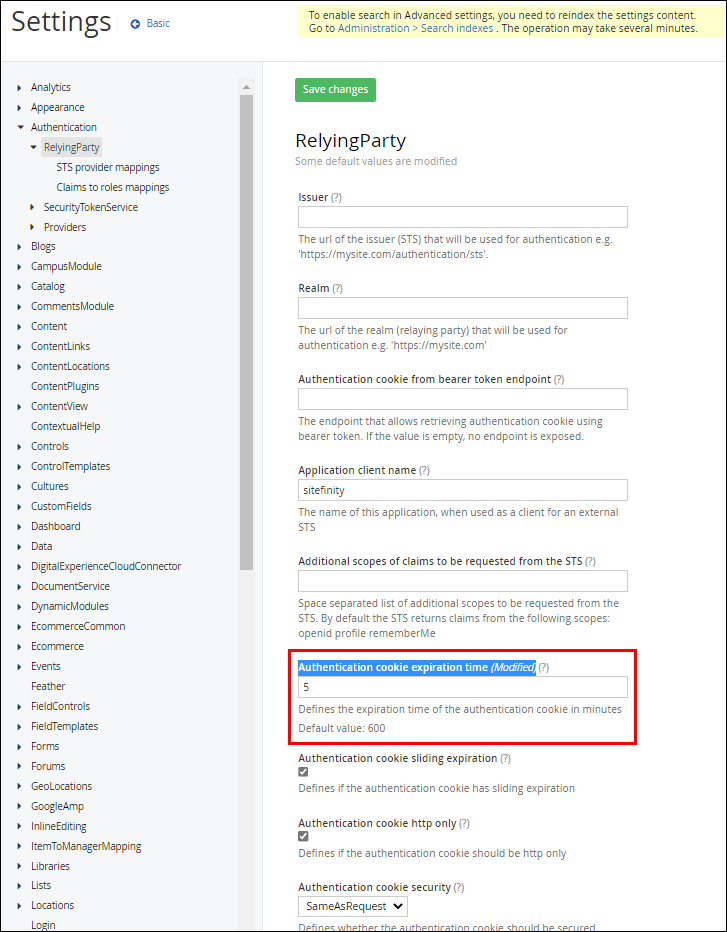
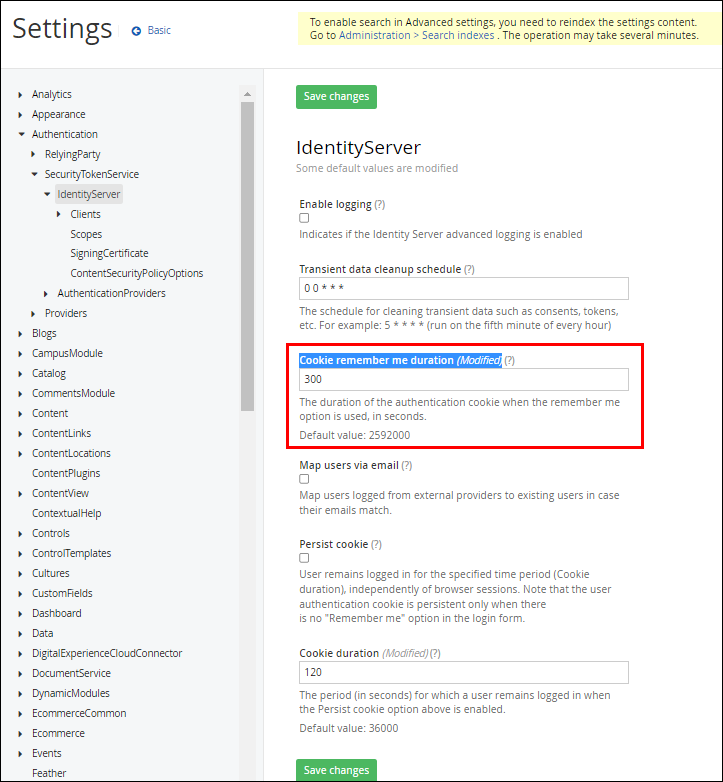
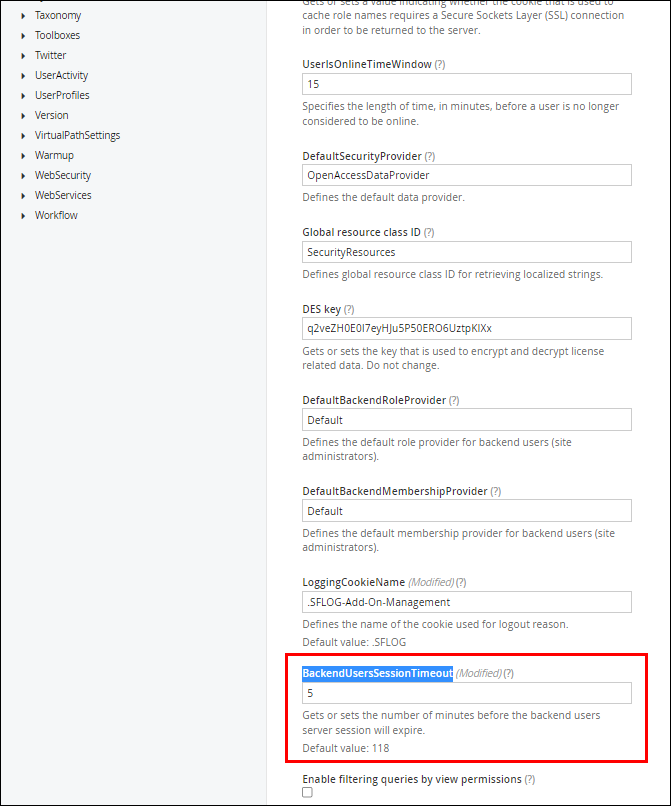
Launch the Sitefinity URL and navigate to the Sitefinity Advanced Settings page (under Administrators > Settings > Advanced) and configure the following fields:
-
Navigate to the Authentication > RelyingParty page, and specify a value in the Authentication cookie expiration field.
Specify the time after which the portal user must be automatically logged out when the user is idle.
-
Navigate to the Authentication > SecurityTokenService > IdentityServer page, and specify a value in the Cookie remember me duration field.
-
Navigate to the Security page and specify a value in the BackendUsersSessionTimeout field.
-
-
Click the Save changes button.
-
Restart the web site.
The Form Navigation widget shipped with the portal provides the flexibility to build/combine multiple forms on a single page and build the application cycle. The forms that are part of form navigation work together to create a student application. It enables the process flow to capture the student application details.
This section provides information on adding and configuring the form navigation widget to a page on the portal.
Add the Form Navigation Widget to a Portal Page
Perform the following steps to add the Form Navigation widget to a portal form:
-
Launch the Sitefinity URL and navigate to the required portal form to add the Form Navigation widget.
-
Expand the CampusNexus Engage group and drag the Form Navigation widget from the right pane to the page.
-
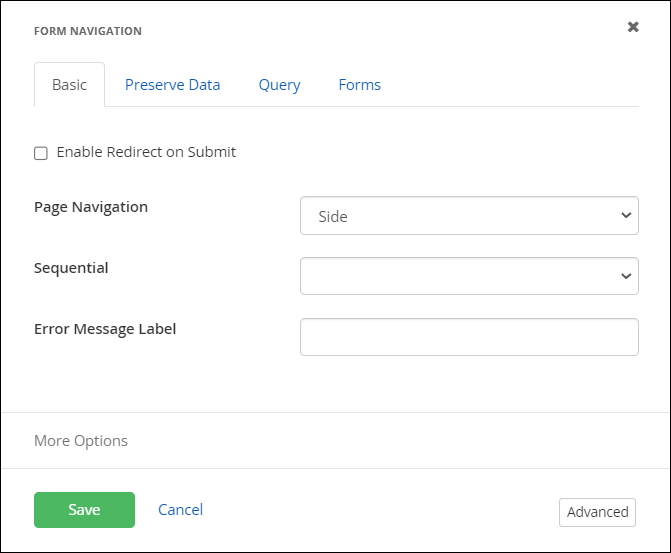
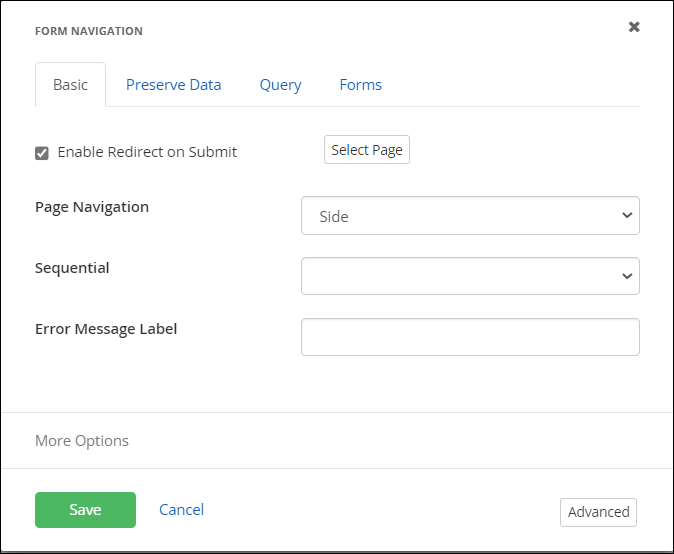
Click Edit. The Form Navigation dialog is displayed.
-
In the Basic tab, perform the following steps:
-
Select the Enable Redirect on Submit check box, click the Select Page button, and select a portal page to which the user will be redirected on submitting the application.
-
In the Page Navigation drop-down, select one of the following values:
-
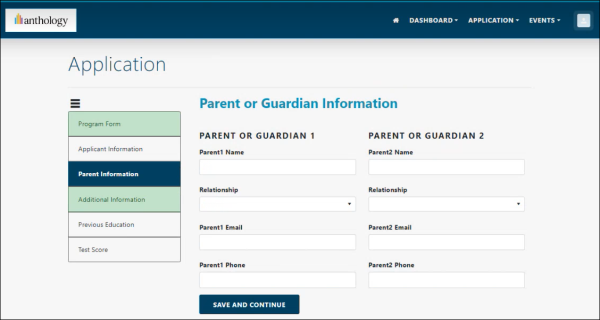
Side - Enables displaying the pages vertically on the side of the page for navigation.
-
Top - Enables displaying the pages horizontally on top of the page for navigation.
-
-
In the Sequential drop-down, select one of the following values:
-
Yes - Indicates the portal user needs to complete the pages in a sequence before navigating to another page.
-
No - Indicates the portal user can randomly navigate to other pages.
-
-
In the Error Message Label field, specify the error message that will be displayed to the user when the user navigates to another page without submitting the current page.
-
-
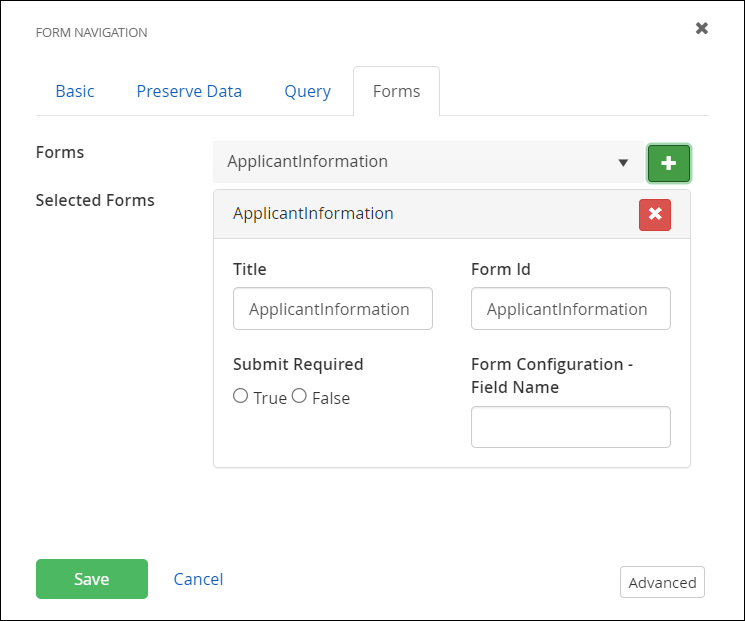
Click the Forms tab, and perform the following steps for form navigation:
-
In the Forms field, select a form and click
 to add a form.
The newly added form will be displayed in the Selected Forms area.
-
In the Form area, update the following field values:
-
Title - Update the page title.
-
Form Id - Specify the Id of the form that was previously configured in the custom form navigation widget. This will enable migration of the form content from the previous form navigation widget to the Form Navigation Widget shipped with the Anthology Reach portal solution When this field is configured, ensure that the SetBackwardCompatibility field in the Advance option is set to True.
Note: Leave Form Id field blank if you are configuring the Form Navigation Widget for a new portal.
-
Submit Required - Set it toYes to prevent portal users from navigating to another page until the current page is submitted.
-
Form Configuration - Field Name - Specify the Field Name value configured in the Form Configuration dialog of the form. This value will be used to perform validation on the fields available on the selected page.
-
-
Click the Advance button > Model button to view Form Navigation advance options, and configure the following fields based on your requirement:
-
AlwaysLoadFirstPage - Set this field to True so that the portal user is always redirected to the first page configured in the page navigation widget every time they log in to the portal. The default value is True.
-
ShowIndicator - The value in this field indicates the display format of the page navigation menu. It can have one of the following values:
-
True - Displays a number next to the page name indicating the page sequence in the page navigation menu.
-
False - Displays the page names in a single column format based on the css styles available in the cm-custom.css file available in the css folder (under the ResourcePackages > CampusNexusEngage > assets folder) on the Sitefinity Files page (under Administration > File manager).
Institutions can download the cm-custom.css file, customize it, and then upload the customized css file in the same location on Sitefinity to view the changes.

-
-
-
-
Click the Preserve Data tab and configure the fields for preserving the progress information of the submitted forms on the form navigation as follows:
-
Select the Preserve Progress Information check box.
Note: If the Preserve Progress Information check box is not selected then session storage from the browser will be used to preserve the steps for the logged in portal user session. -
In the Entity field, select an entity present on the first form in the form navigation, for retaining the information.
-
In the Attribute field, select the custom attribute created for the entity in Reach to store the progress information.
Note
-
The custom attribute selected in the Attribute field must be of type Multiline with 8000 character length.
-
When the form navigation widget is configured for Application lifecycle, in the Attribute field, it is recommended to select the Application Navigation Progress field.
-
-
In the Attribute Instance, specify the query string key name of the field that stores the instance ID of the selected entity record.
Example: In the following query string, the red text is the key name:
-
In the Access All Pages field, select one of the following values:
-
Yes - Enables the portal user to view and access all the pages added in the form navigation widget.
-
No - Portal users will be able to view only the first page and based on the form configurations in the Basic and Forms tab can view other pages.
Note: Set this field to No when the Sequential field in the Basics tab is set to Yes.
-
-
-
Click Save on the Form Navigation widget.
An Example Configuration of the Form Navigation Widget
The following image shows an example configuration of the Form Navigation widget on a portal page for an Application life cycle.
This section provides configurations that must be performed for the Ad hoc Feedback form that has been customized from the out-of-the-box (OOTB) Ad hoc feedback form that is shipped with the Anthology Reach solution.
-
Launch the Sitefinity URL and navigate to the customized Ad hoc Feedback form (under the Content > Forms menu option).
-
In the Actions column, click the ellipsis and click Content.
-
On the right side, under the Content pane, expand the The Portal Connector drop-down and drag and drop the Yes/No Field control on the form.
-
On the Yes/No Field control, click the Edit button.
-
In the Yes/No Field control configuration page, specify the following field values:
- In the Title field, specify a title, eg. Ad hoc Feedback.
- In the Attribute field, select Ad hoc Feedback.
- In the Default field, select Yes and Hidden.
- Click the Save button on the Yes/No Field control configuration page.
-
Locate the TPC Submit Button control added on the form for the Proceed button, and click Edit.
The TPC Submit Button control configuration page is displayed.
-
Click the Query and Fields tab, and in the Form Fields to Add to the Query String field, add the following fields:
-
cmc_anytimefeedbacksurvey
-
cmc_staffsurveytemplateid
-
- Click the Save button on the TPC Submit Button control configuration page.
- Click Publish on the Ad hoc Feedback form.
The portal user can click the Export File button available on the Application Summary page to generate a PDF format of the portal page, which will be saved on the portal user's local drive.
To generate a PDF format of a portal page, the portal administrator must ensure that the https://stackpath.bootstrapcdn.com link is added as the Trusted source in the Sitefinity settings. To do so:
-
Open the Sitefinity URL and go to the required portal form to add the Form Navigation widget.
-
Select Administration > Settings.
-
On the Basic Settings page, select Web security > Trusted sources > Edit.
-
In the Trusted sources dialog, expand Forms, frames, child sources, connect sources, plugins and add https://stackpath.bootstrapcdn.com to the Connect sources area.
-
Click Done to save the changes.
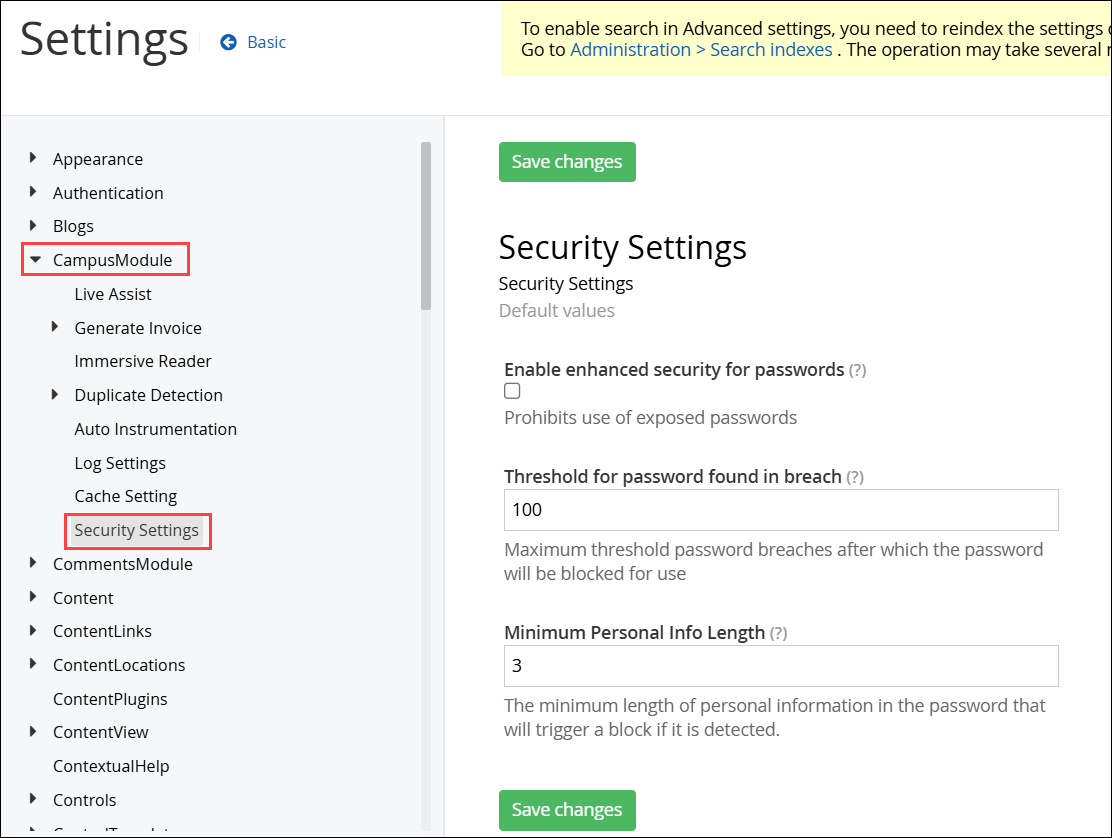
To help users create secure passwords on the portal, administrators can set advanced security options. These options prevent the use of exposed passwords and personal information in passwords.
Steps to Configure Enhanced Password Security
-
Open the Sitefinity URL and go to the Advanced Settings page (under Administrations > Settings > Advanced).
-
Navigate to CampusModule > Security Settings.
-
In the Security Settings page, configure the following fields:
-
Select the Enable enhanced security for passwords check box.
-
In the Threshold for password found in breach field, type the maximum number of breaches allowed before the password can be blocked. The default value is 100.
-
In the Minimum Personal Info Length field, type the number of characters of personal information allowed in the password to block the password from being used.
-
-
Click the Save changes button.
