FERPA Form
In this exercise, we will create a form for the student to complete for the Release of Information (FERPA). This is a simplified form that will insert the person information in the Address folder as type FERPA so the student’s FERPA Directory Information can be further updated allowing the person access.
|
|
The screen captures in this topic show an earlier Forms Builder version. While the UI has been updated, the basic functionality is unchanged. |
Build the Form
-
Open your browser and point to the Forms Builder URL.
-
Sign in using your user name and password.
-
On the Forms Builder home page, click the Form Designer tile. Products (if applicable), Entities and Forms are loaded into Forms Builder.
-
In the Select Provider drop-down list, select Student.
Note: This step is applicable only if your Forms Builder installation uses the databases of both CampusNexus CRM and Anthology Student.
-
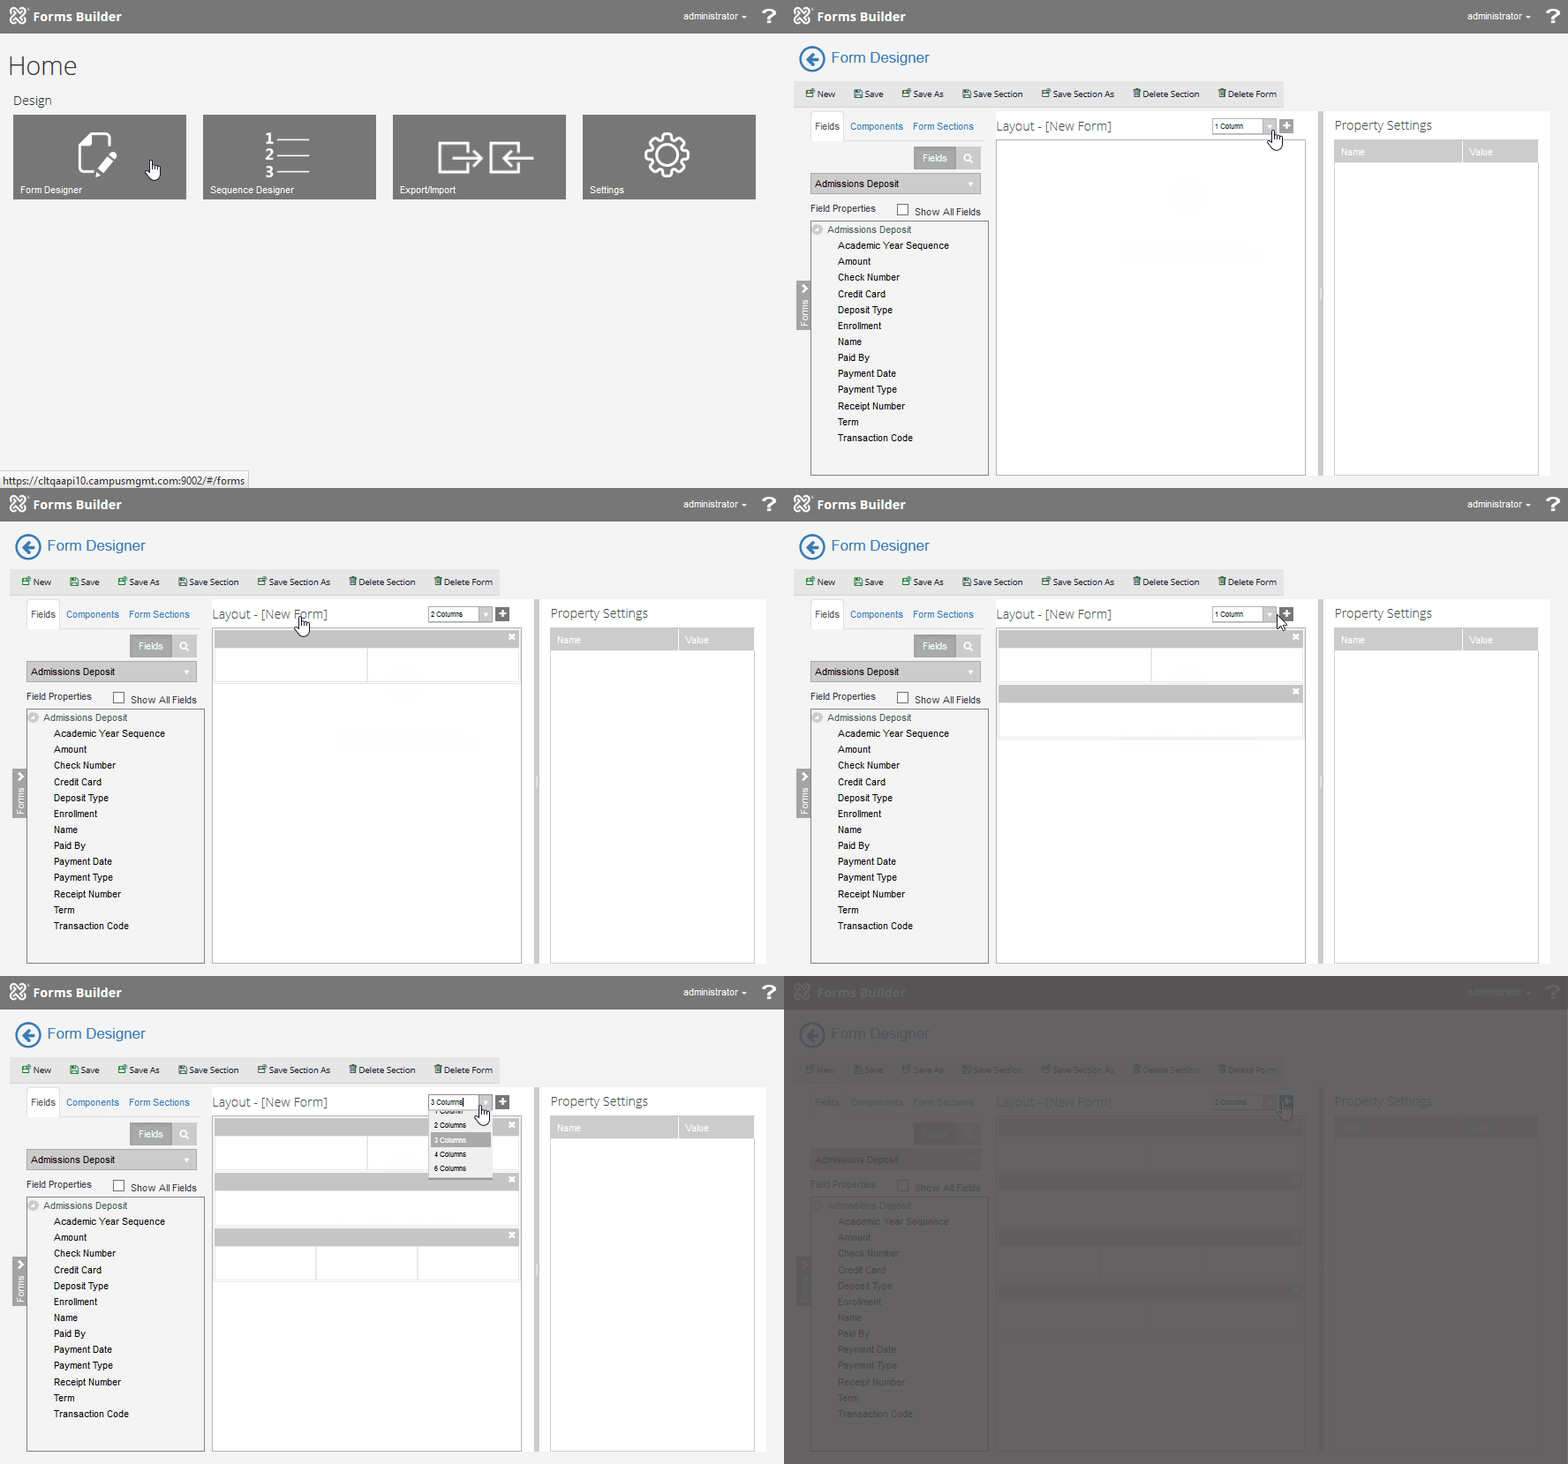
Set up the column layout for the form:
-
In the Column drop-down list, select 2 Columns and click New. A 2-column panel is added to the Layout pane.
-
In the Column drop-down list, select 1 Column and click
 to add a new panel to the form layout.
 -
In the Column drop-down list, select 3 Columns and click
 to add a new panel to the form layout.
 -
In the Column drop-down list, select 2 Columns and click
 to add a new panel to the form layout.
You should have a total of 4 panels in the Layout pane.
-
![]() (Click the Show button to view the preceding steps in a looping animated gif.)
(Click the Show button to view the preceding steps in a looping animated gif.)
-
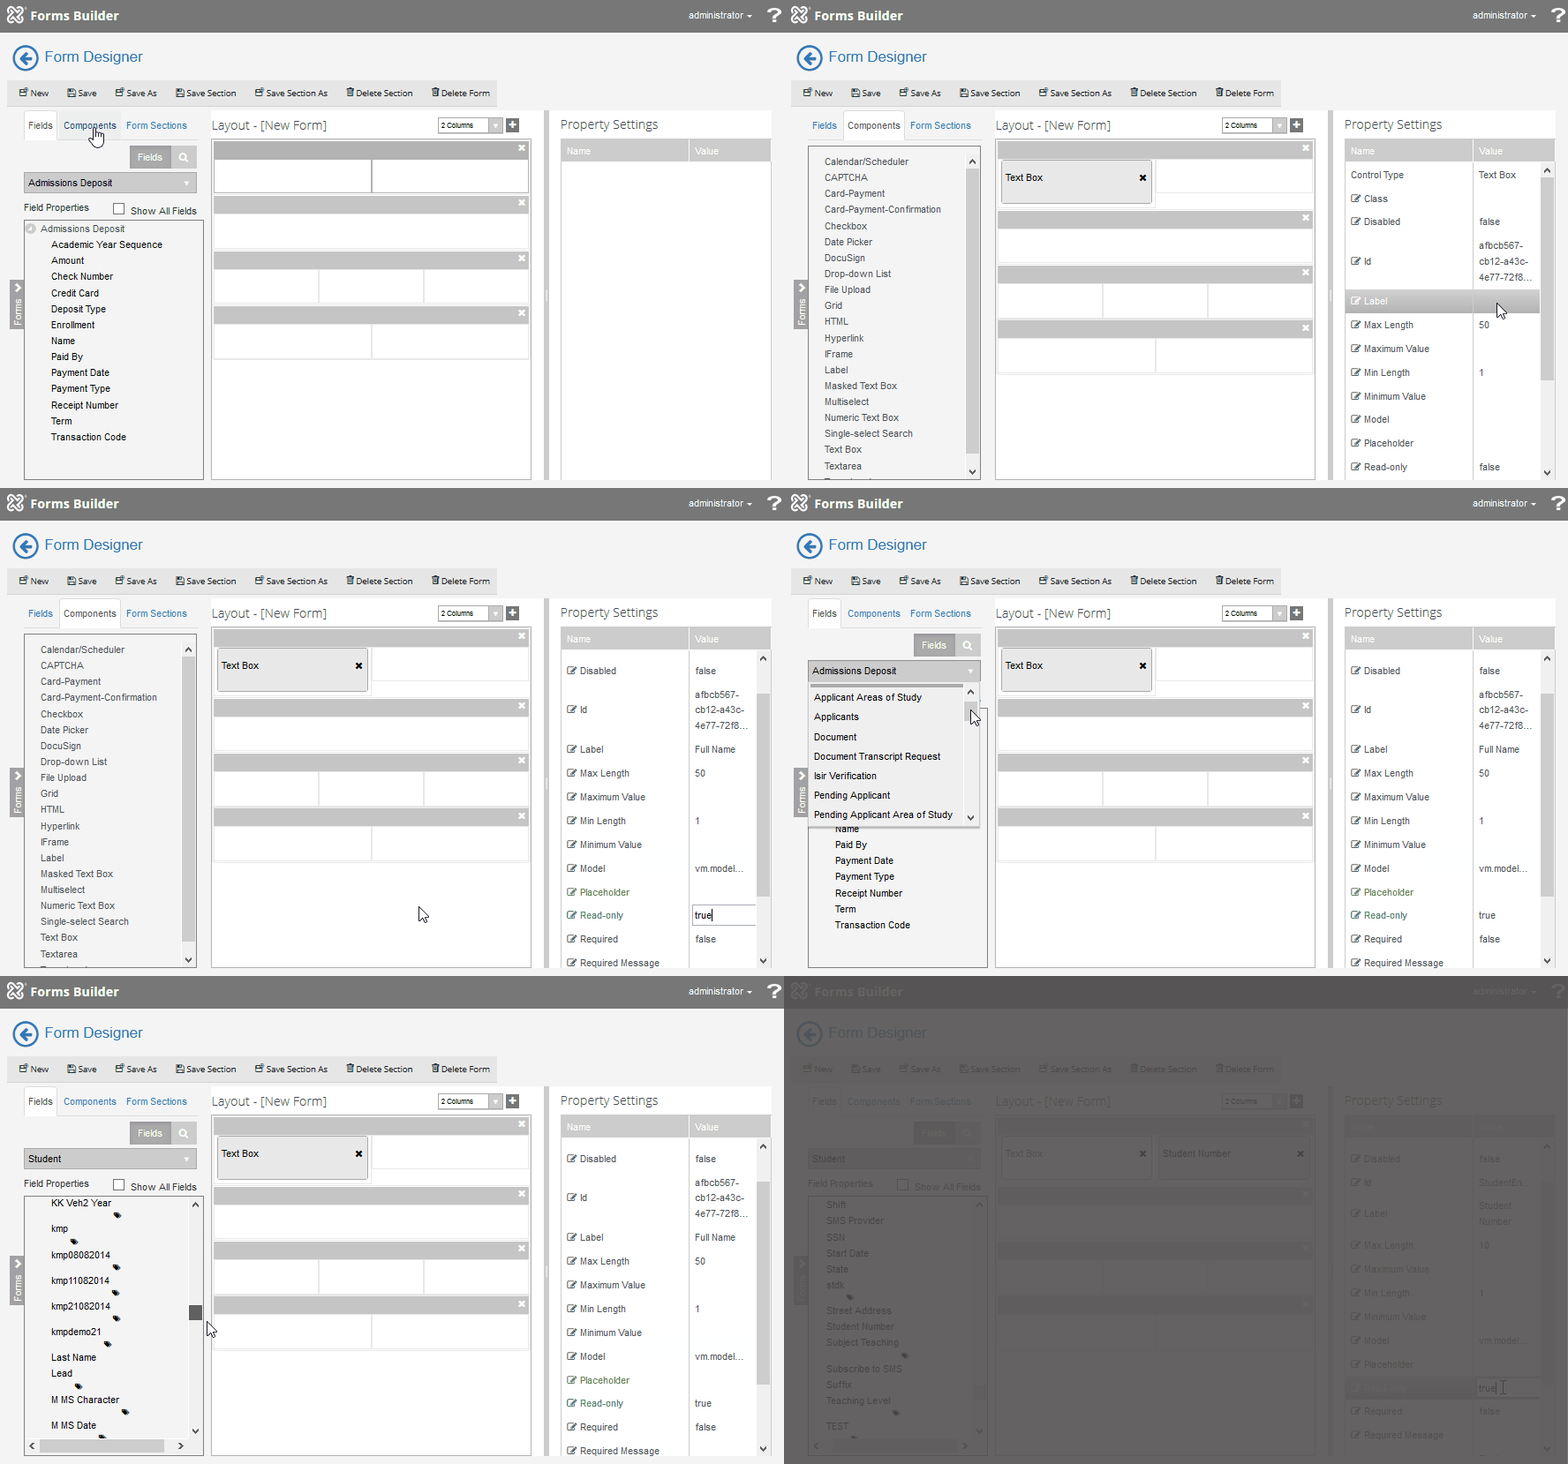
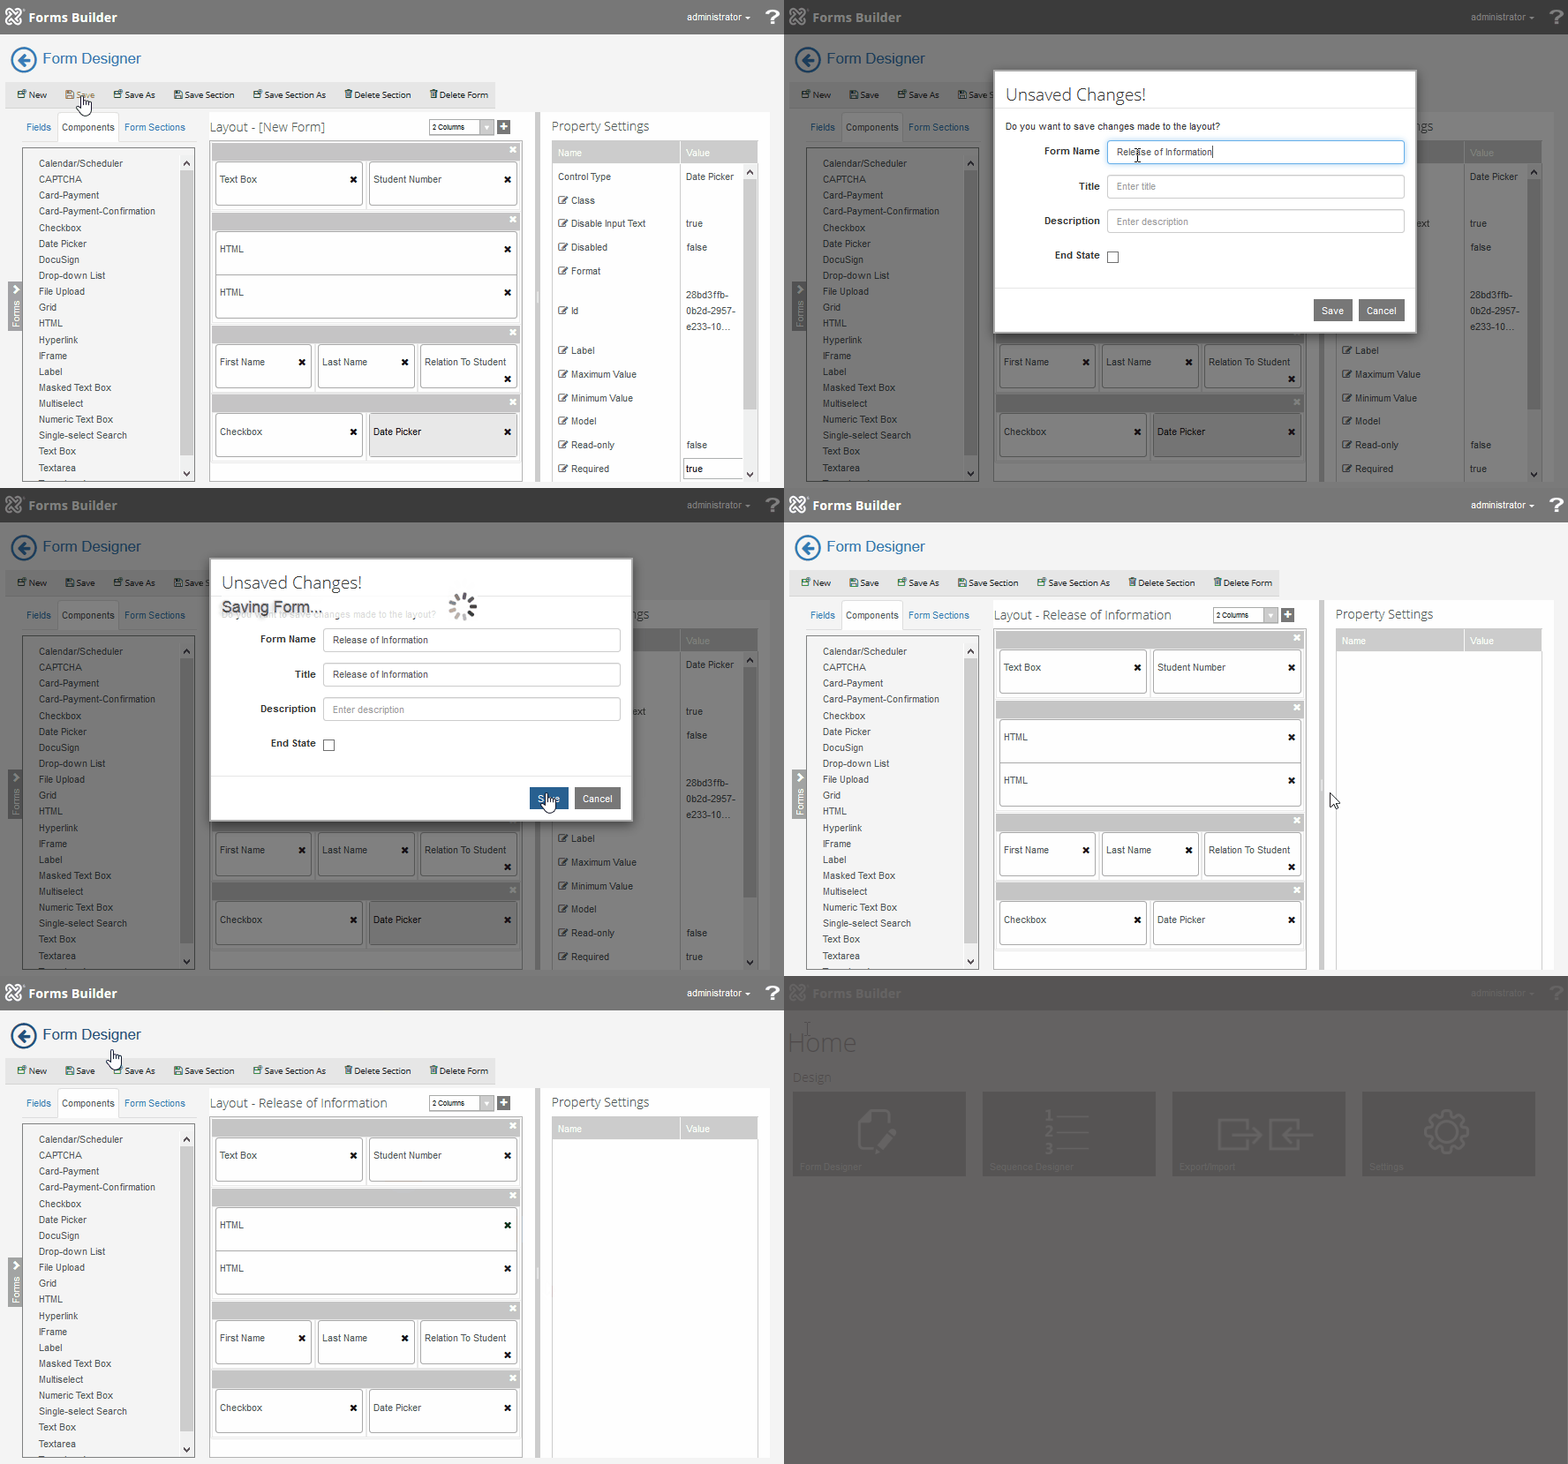
From the Components tab, drag a Text Box into the first column of the first panel. Specify the following properties:
-
Label: Full Name
-
Model: vm.models.FullName
-
Read-Only: true
We are going to bind this field to the studentEntity in workflow using an In/Out argument and populate the text box with the First Name and Last Name on the studentEntity.
-
-
On the Fields tab, select the select the Student entity.
-
Drag the Student Number into the second column of the first panel. The Read-Only property should be set to true.
![]() (Click the Show button to view the preceding steps in a looping animated gif.)
(Click the Show button to view the preceding steps in a looping animated gif.)
-
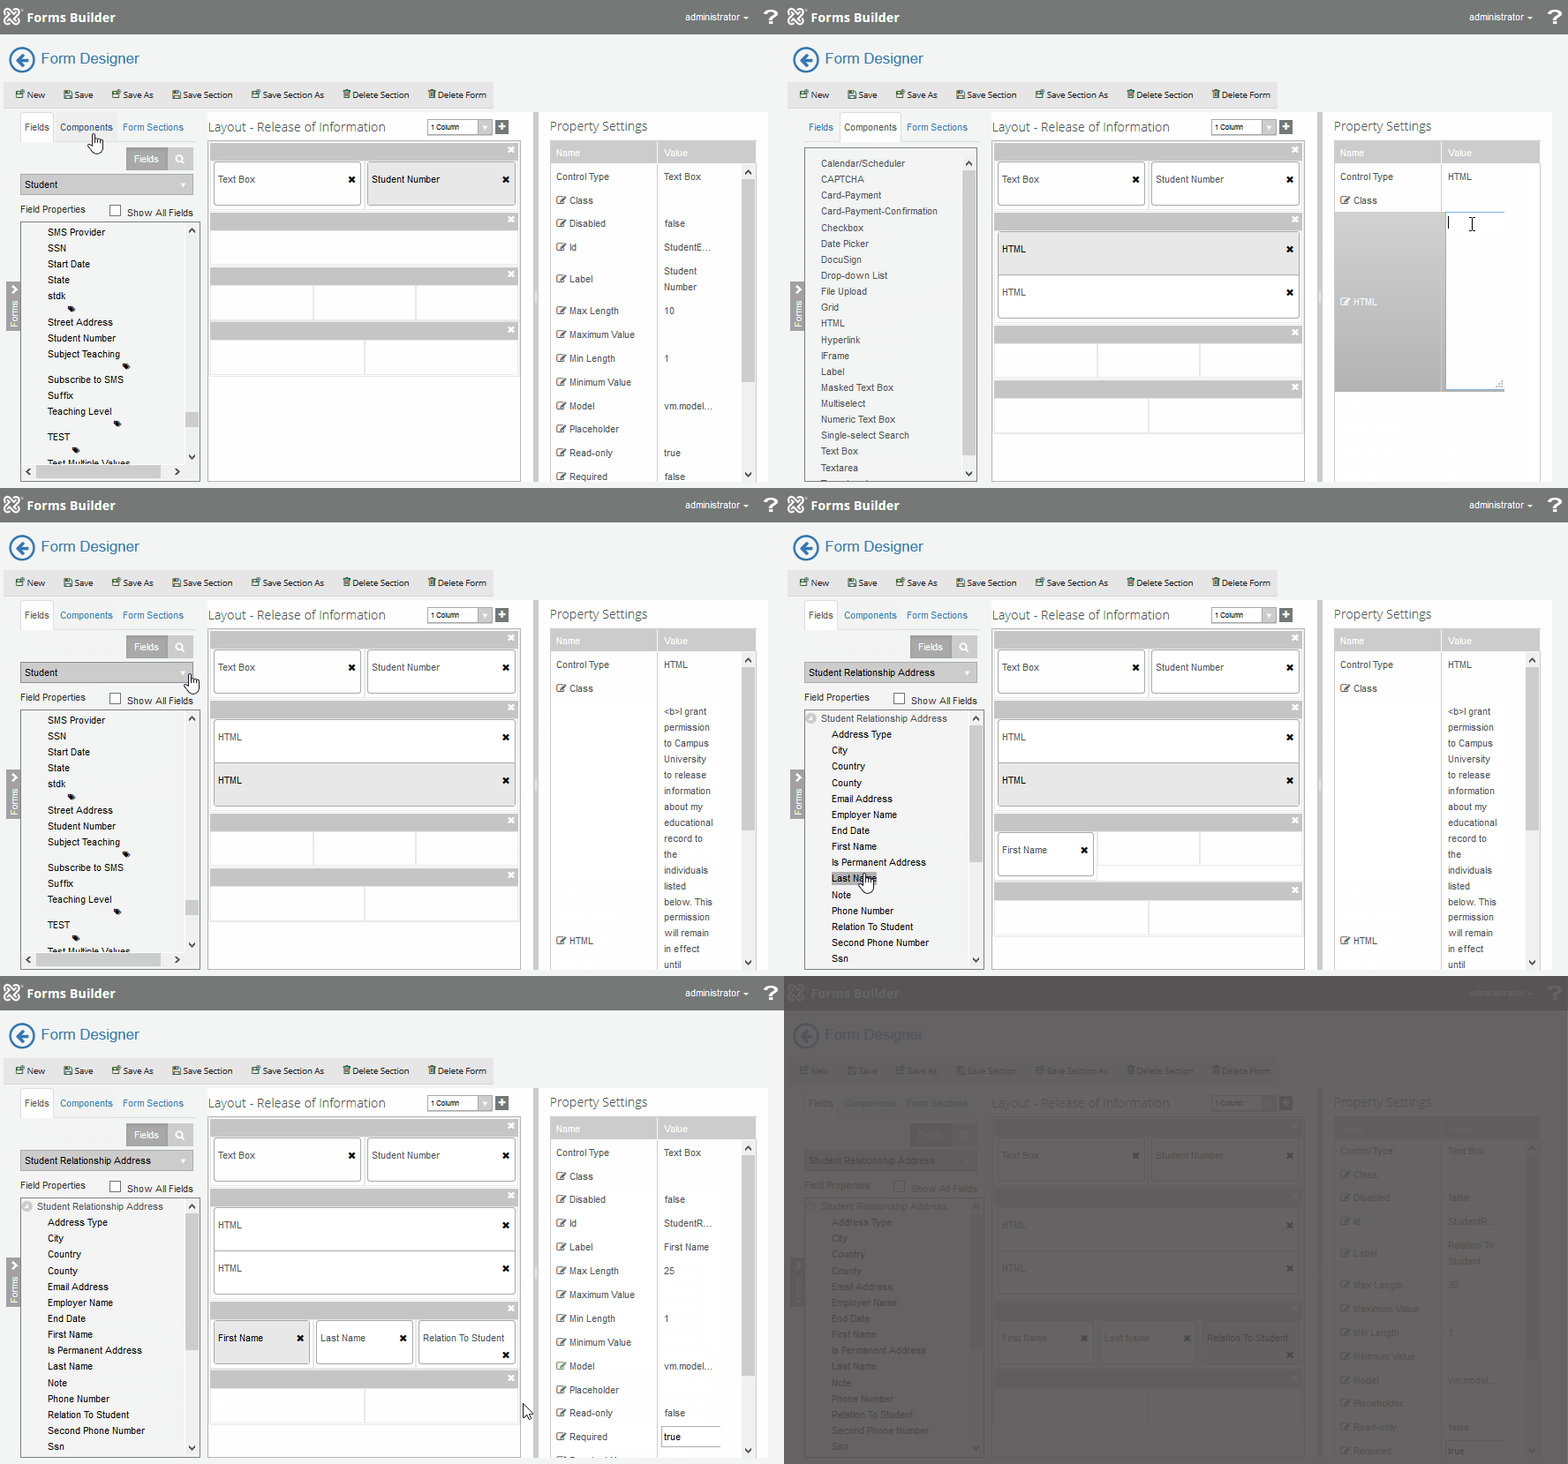
From the Components tab, drag two HTML components into the second panel. Specify the following properties:
-
First HTML component, HTML property:
<b><i>In compliance with the Department of Education’s “Family Educational Rights and Privacy Act” (FERPA), information in your student record may not be released to a third-party (parents, guardians, spouse, sponsor, etc.) without your written permission except as provided by law (See EC 76243, EC 76244).</i></b>
-
Second HTML component, HTML property:
<b>I grant permission to Campus University to release information about my educational record to the individuals listed below. This permission will remain in effect until revoked in writing. This permission does NOT cover financial records maintained in the Financial Aid Department.</b>
-
-
On the Fields tab, select the select the Student Relationship Address entity.
-
Drag the First Name, Last Name, and Relation to Student fields into the third panel.
-
Change the Required property for all three fields to true.
![]() (Click the Show button to view the preceding steps in a looping animated gif.)
(Click the Show button to view the preceding steps in a looping animated gif.)
-
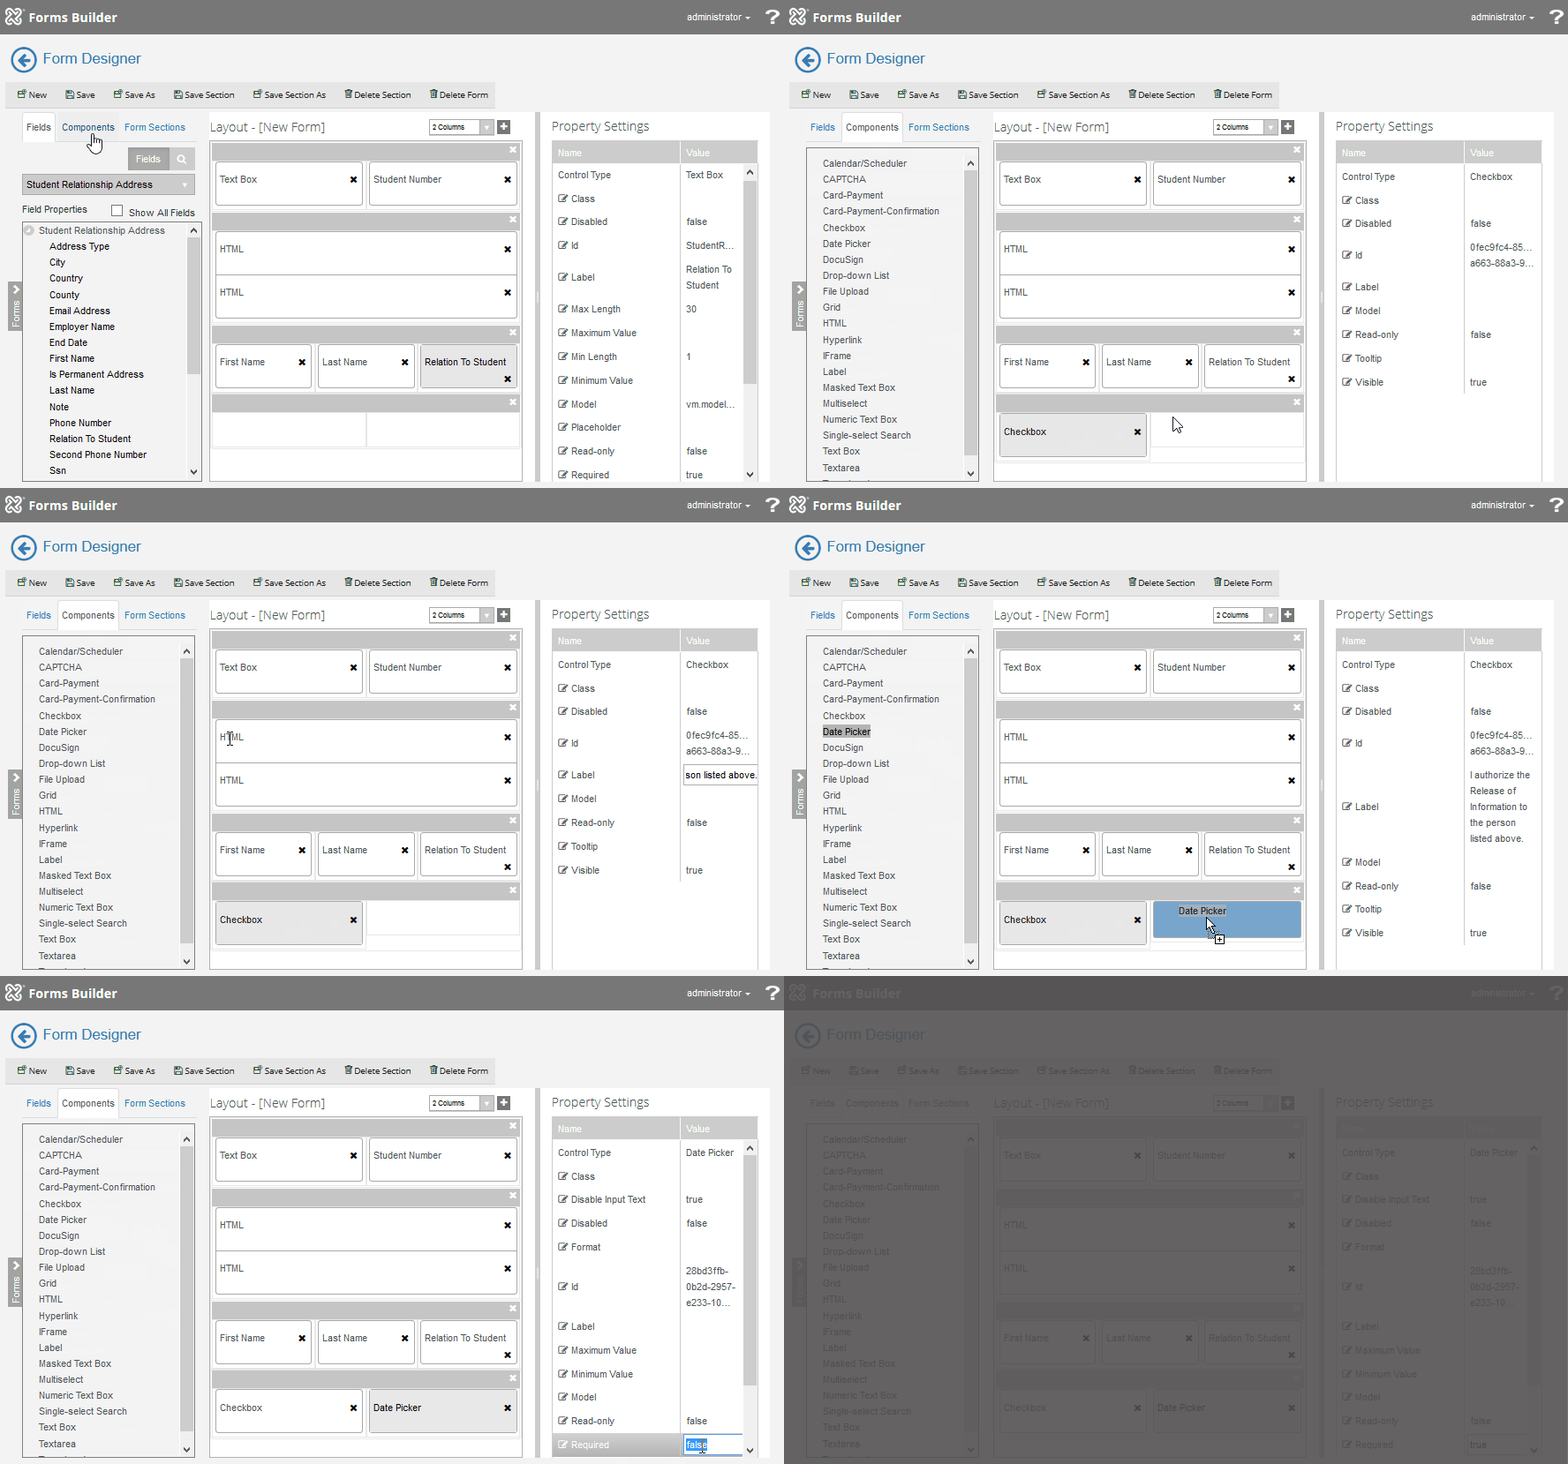
From the Components tab, drag a Checkbox into the first column of the fourth panel. Specify the following properties:
- Label: I authorize the Release of Information to the person listed above.
-
Drag the Date Picker component into the second column of the fourth panel. Specify the following properties:
- Required: true
![]() (Click the Show button to view the preceding steps in a looping animated gif.)
(Click the Show button to view the preceding steps in a looping animated gif.)
-
Click Save to save what you have done so far on your form. Specify the following properties:
-
Form Name: Release of Information
-
Title: Release of Information
Note: The title is optional. When a title is specified, it is displayed on the rendered form.
-
- Click
 to return to the Forms Builder home page.
![]() (Click the Show button to view the preceding steps in a looping animated gif.)
(Click the Show button to view the preceding steps in a looping animated gif.)
Create a Sequence
-
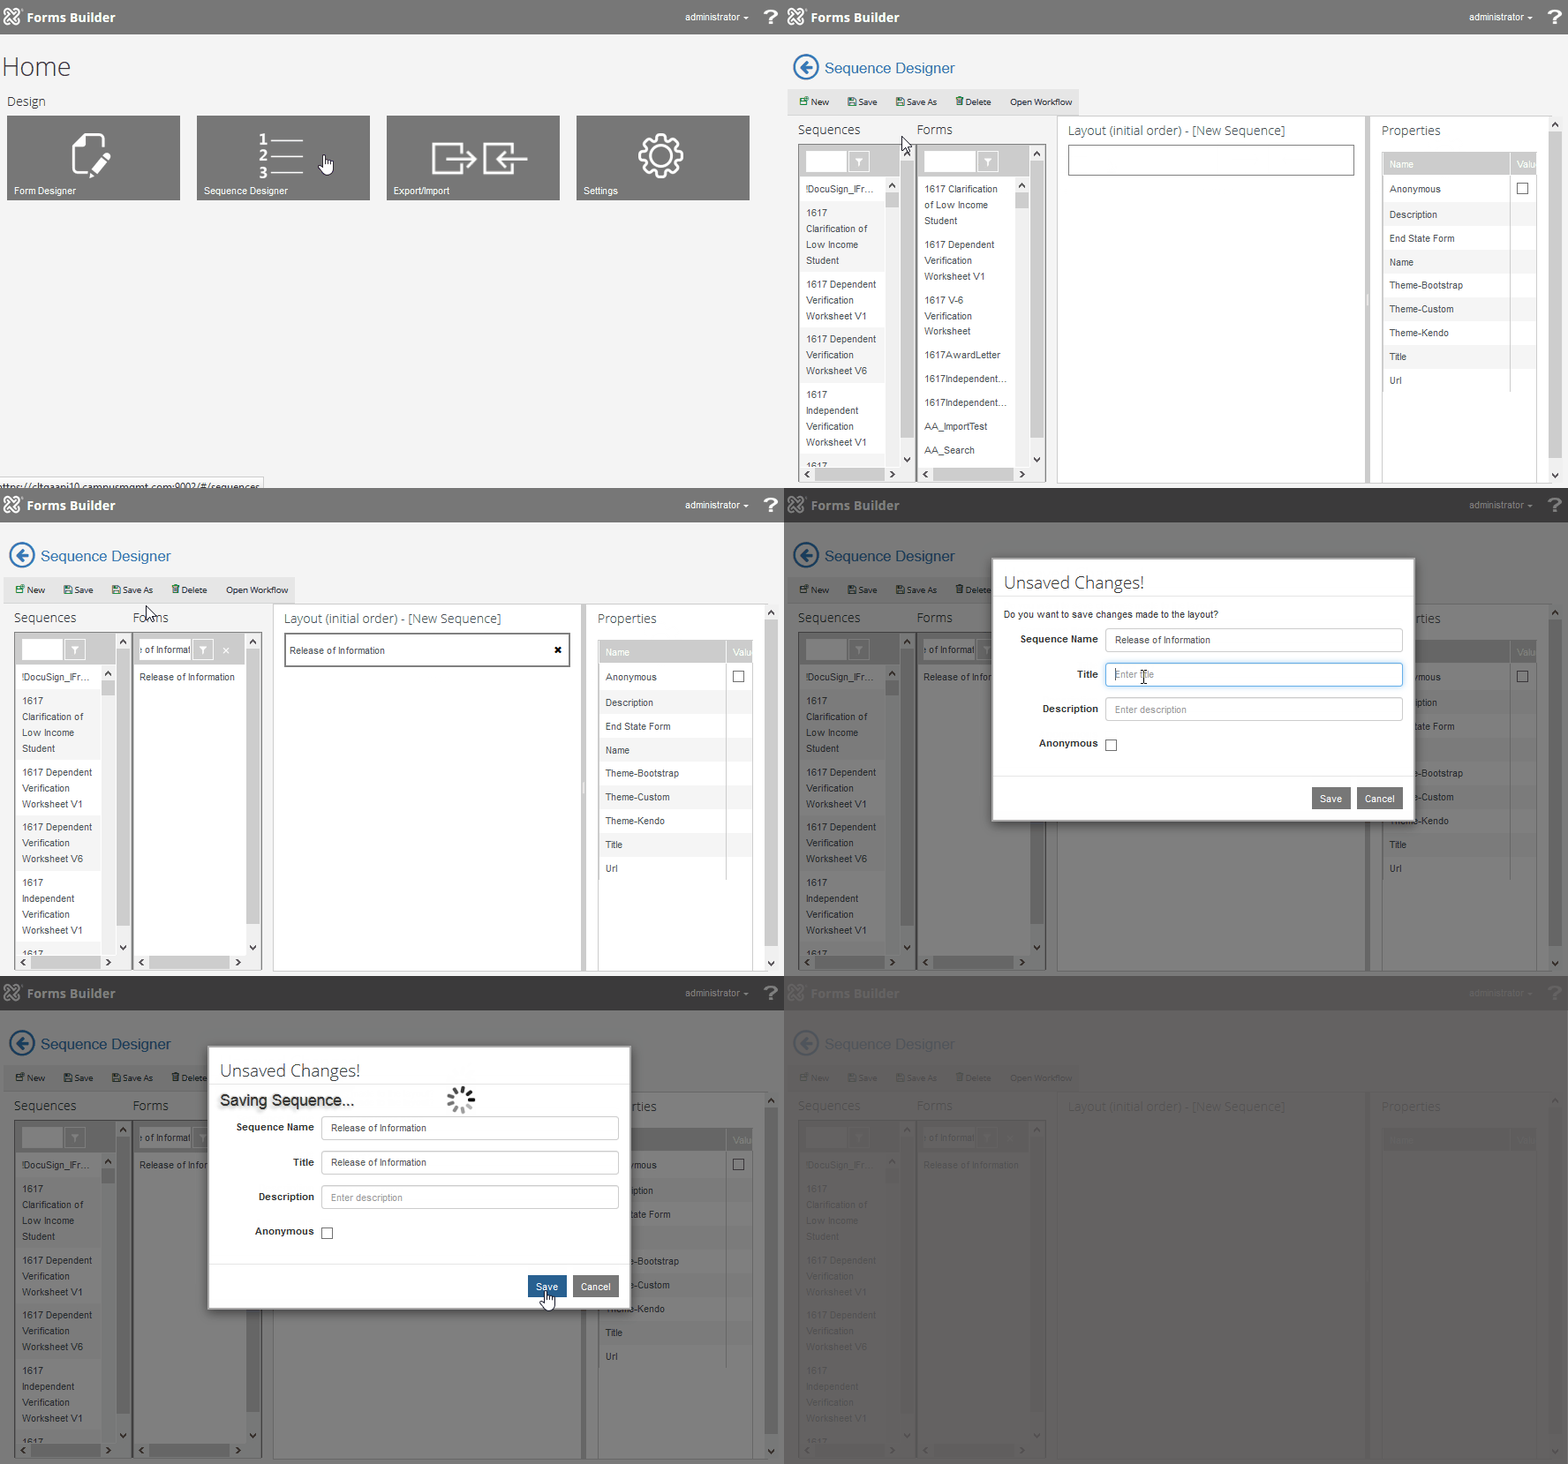
On the home page of Forms Builder, select the Sequence Designer tile.
-
Click New. A new panel is added to the Layout pane.
-
In the search bar of the Forms pane, search for the Release of Information form and drag it into the Layout pane.
-
Save the sequence. Specify the following properties:
-
Sequence Name: Release of Information
-
Title: Release of Information
-
![]() (Click the Show button to view the preceding steps in a looping animated gif.)
(Click the Show button to view the preceding steps in a looping animated gif.)
Edit the Workflow
-
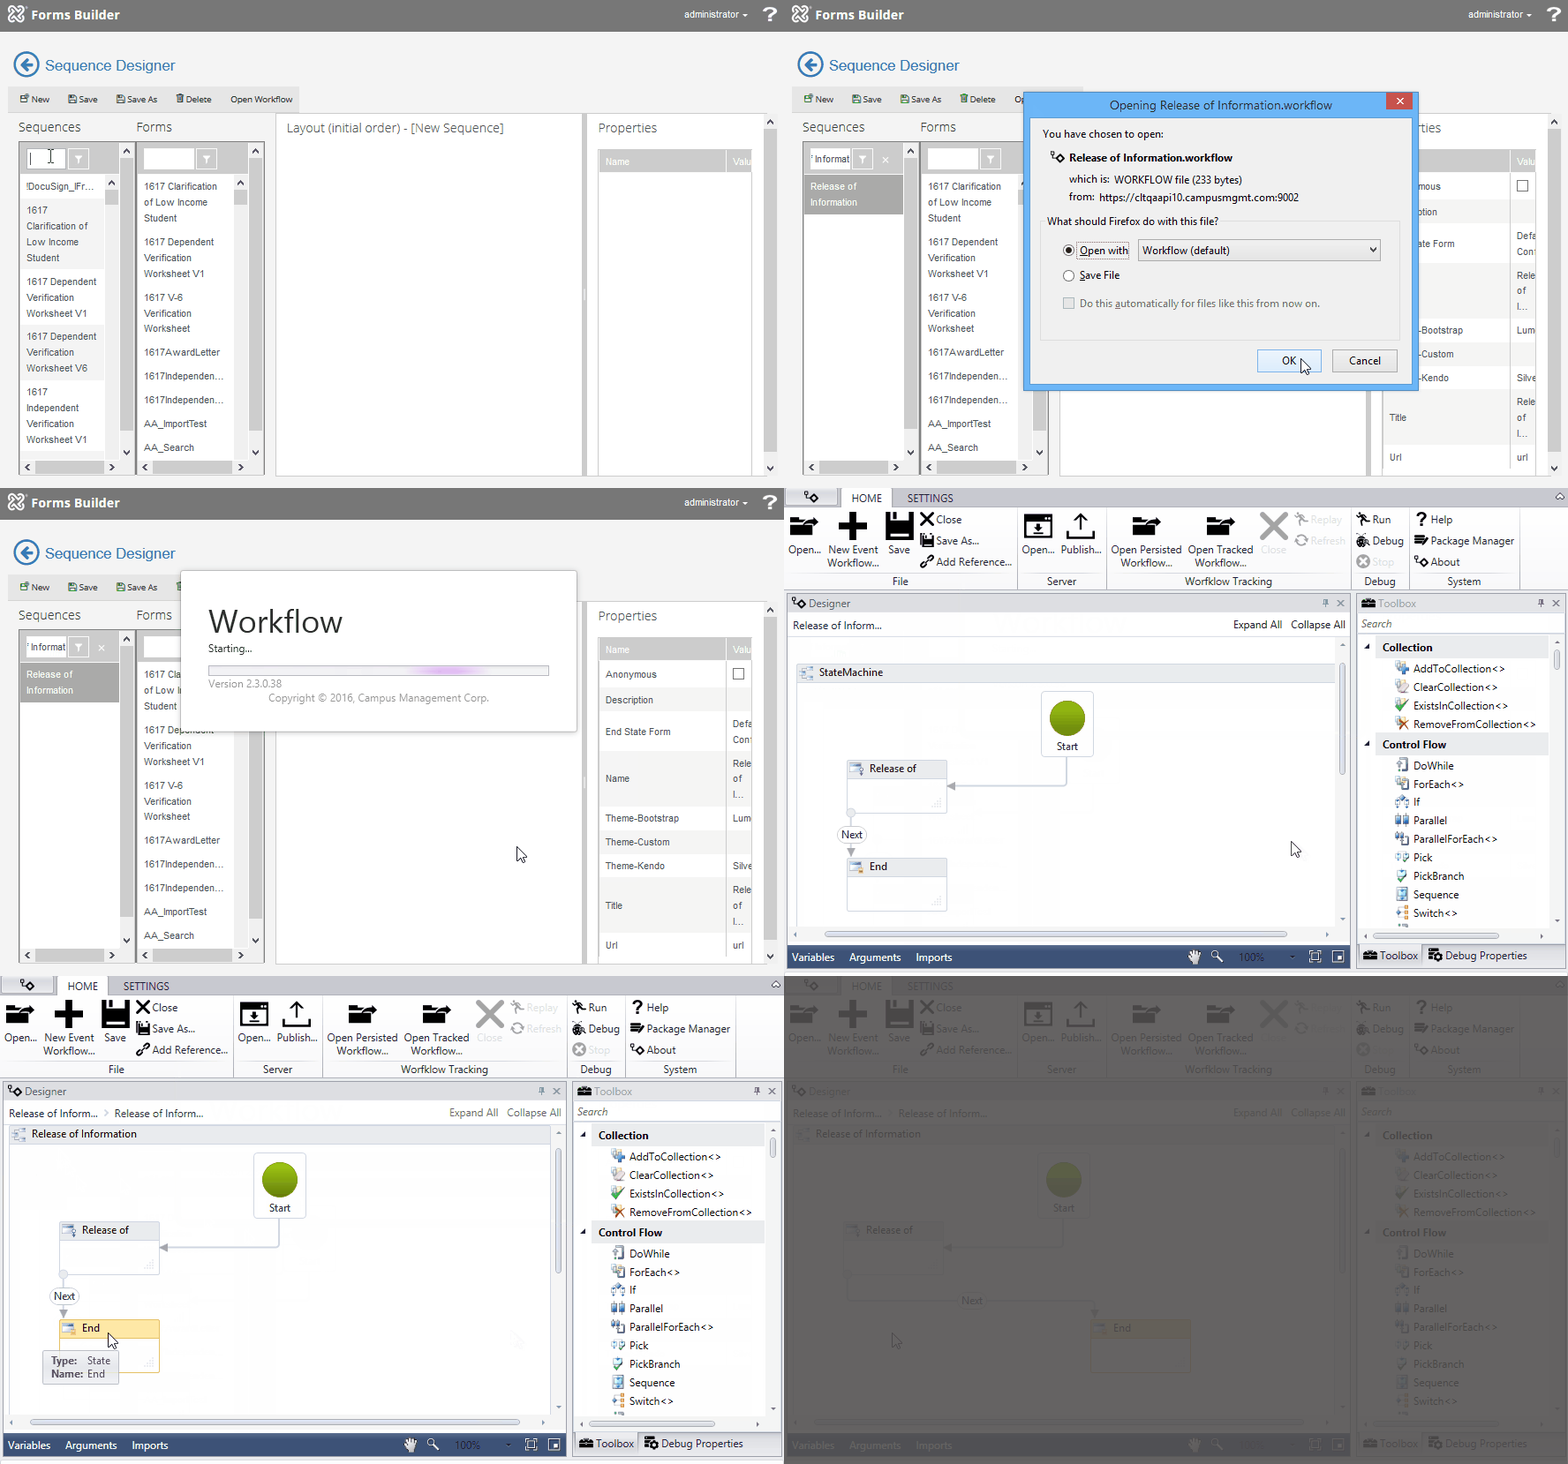
In Sequence Designer, in the Sequences pane, locate and select the Release of Information sequence.
-
Launch Workflow Composer and open the workflow. See Open the Workflow for a Sequence.
-
Double-click the StateMachine label and rename it to Release of Information.
-
Select the icon of the last state to give it the focus and press the right arrow key a few times to move the state to the right. This helps to organize the icons in the workflow to better navigate.
![]() (Click the Show button to view the preceding steps in a looping animated gif.)
(Click the Show button to view the preceding steps in a looping animated gif.)
-
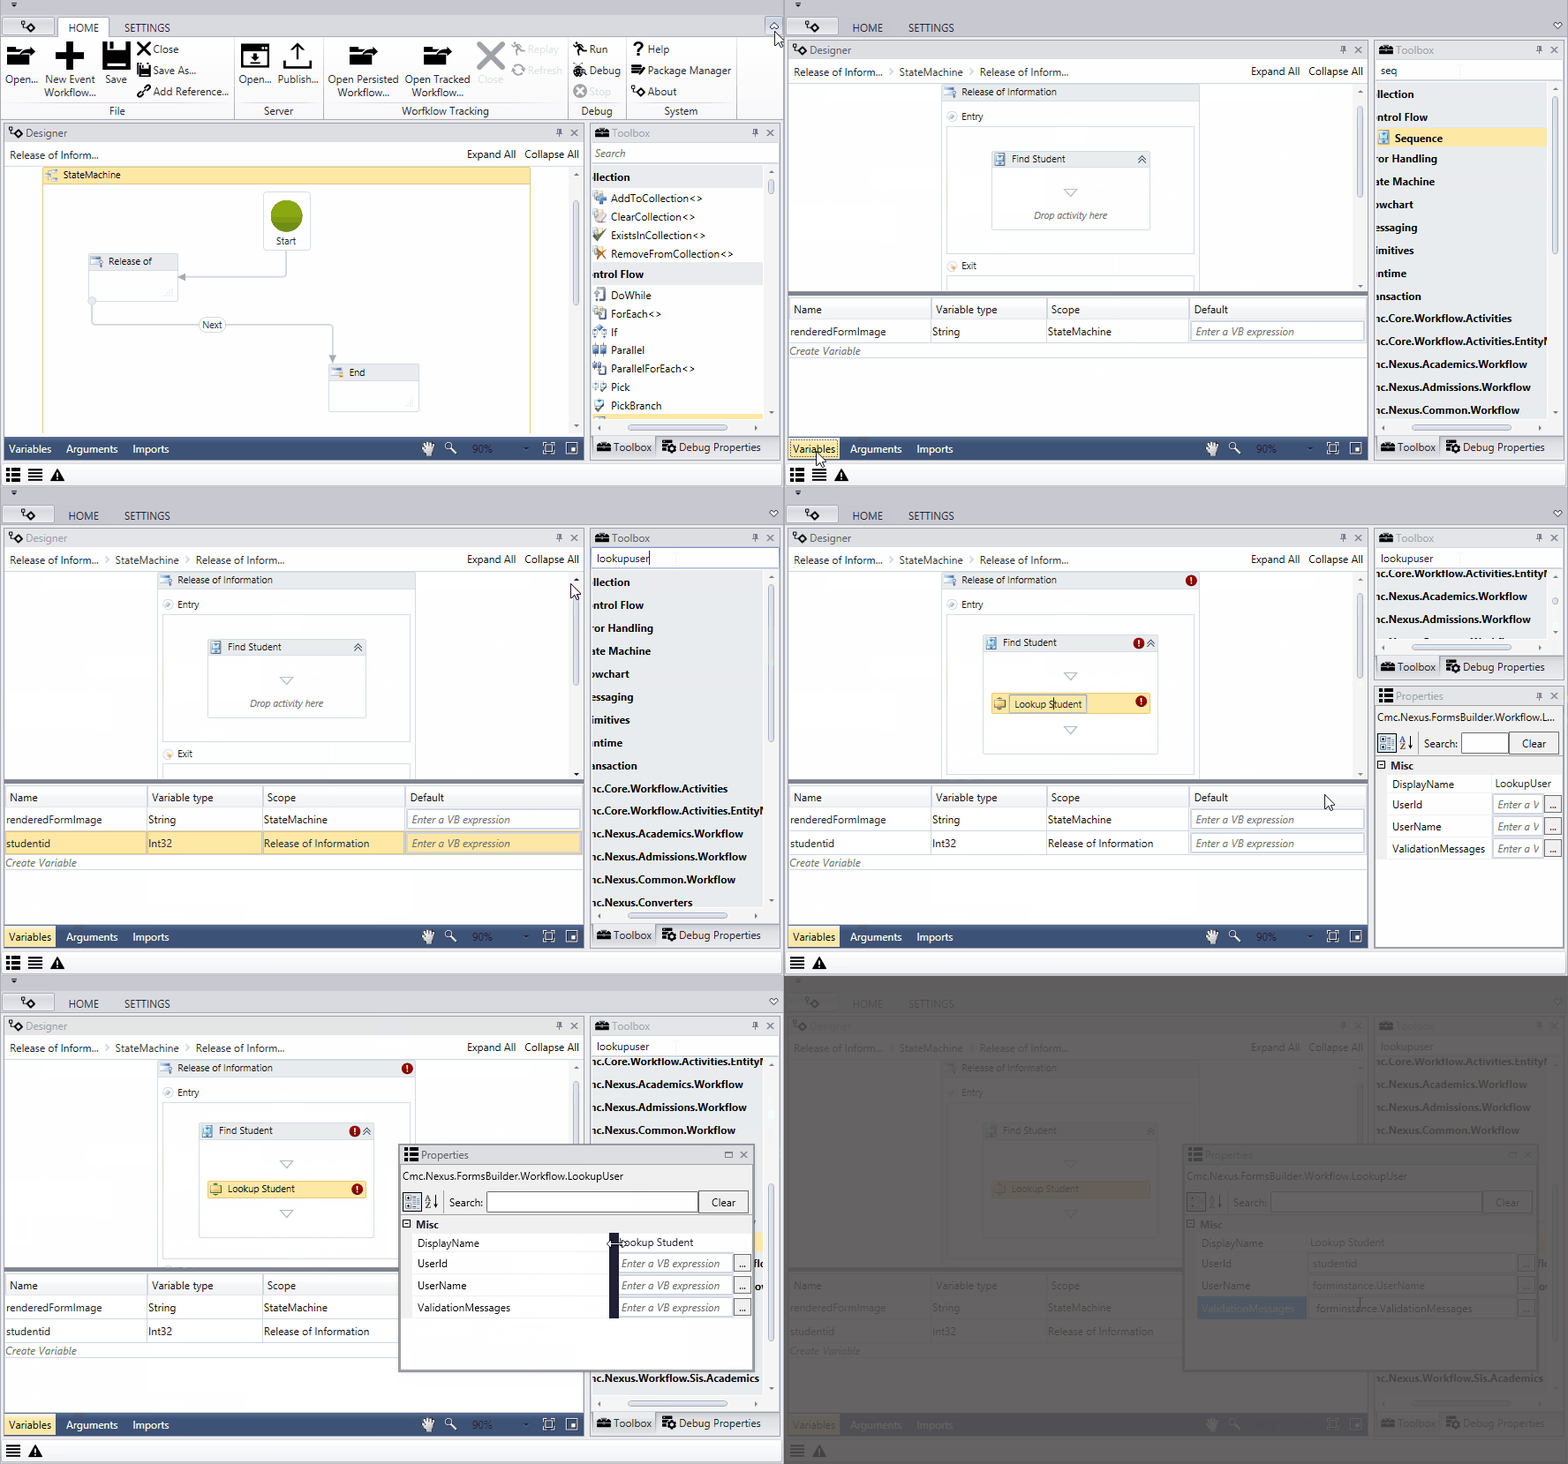
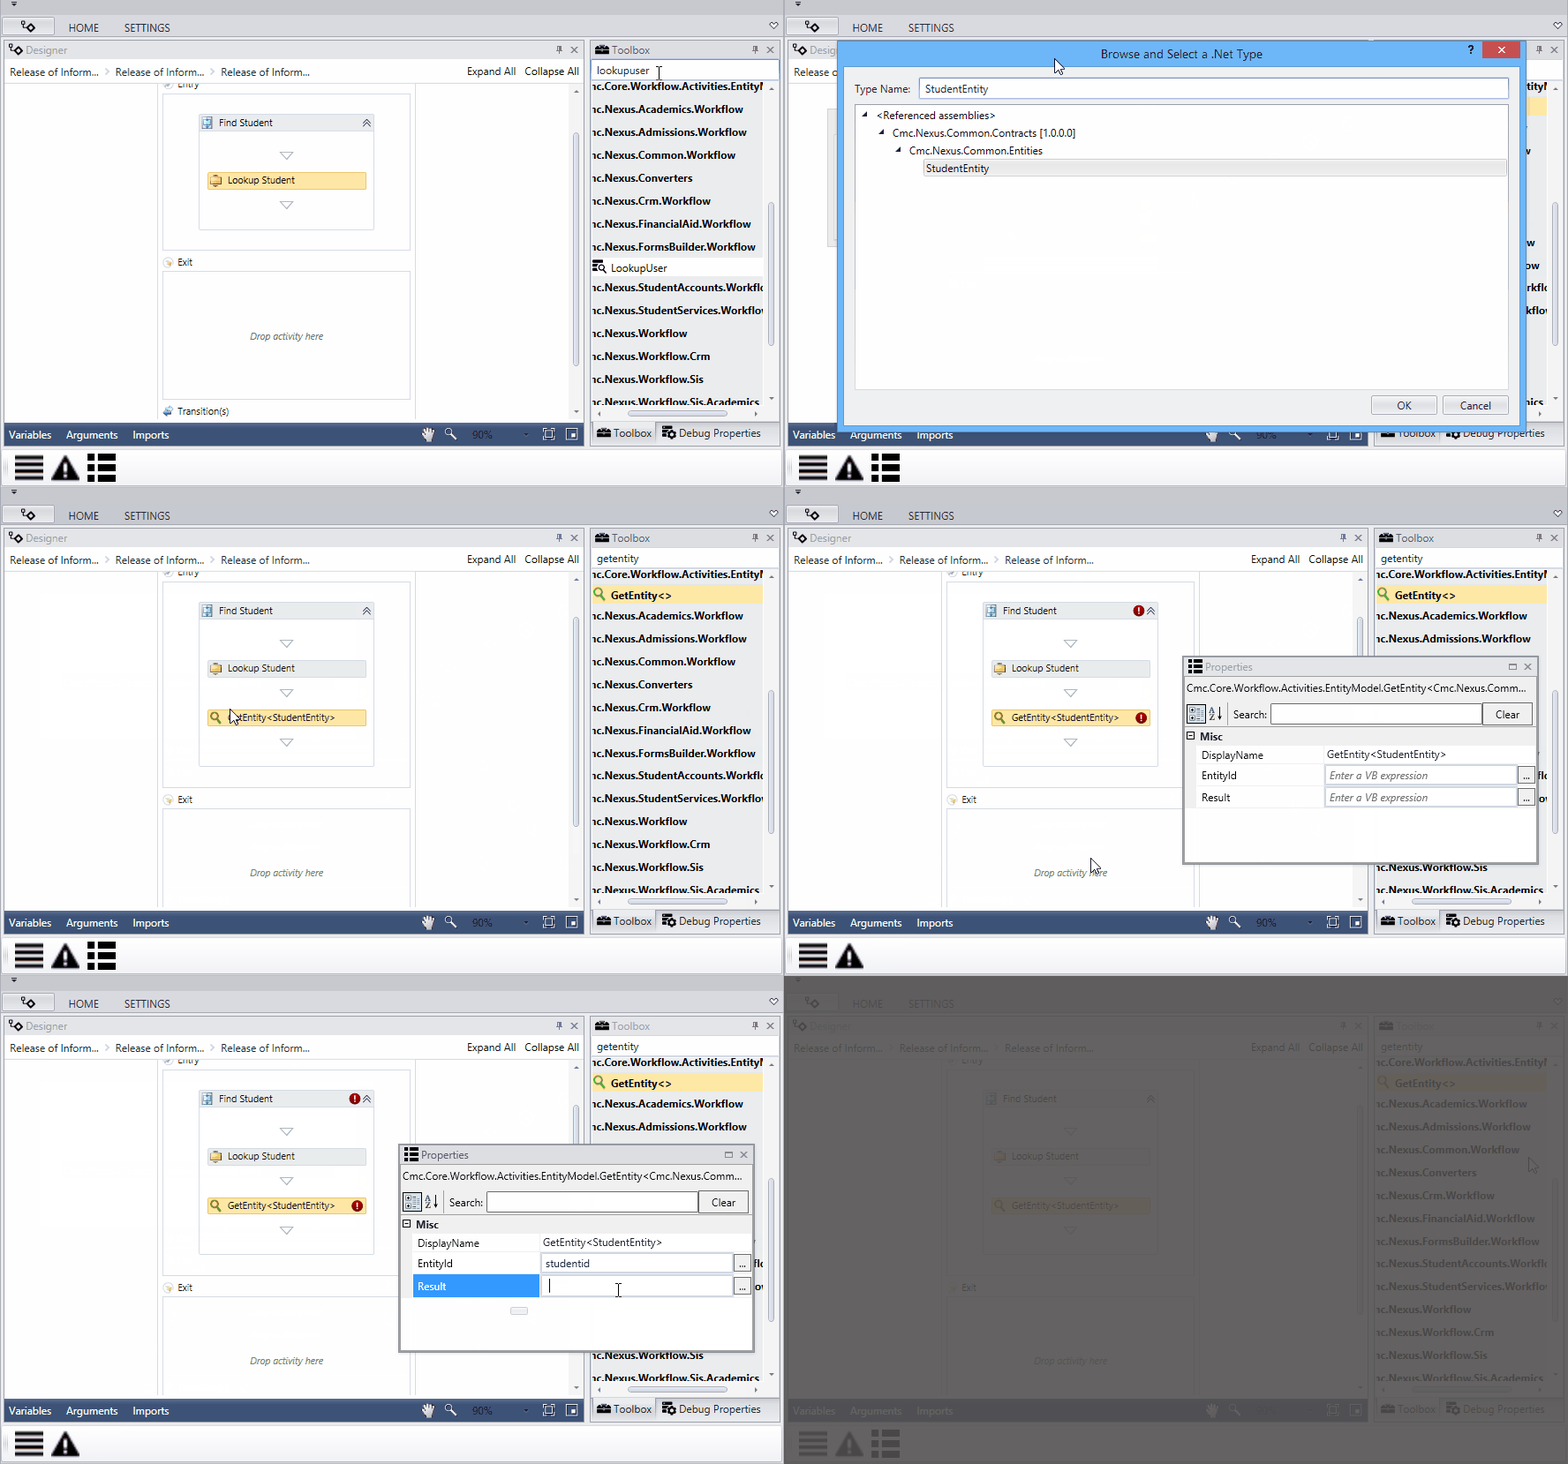
Hide the ribbon in Workflow Composer to maximize the Designer pane and double-click the icon on the first state in the workflow.
-
Drag a Sequence activity into the Entry section of the state. Rename the Sequence to Find Student.
-
Create a Variable. We want to find the student who is completing the form to display values back to our Release of Information form. Specify the following properties:
-
Name: studentid
-
Variable type: Int32
-
Scope: Release of Information
-
-
Drag the LookupUser activity from the Toolbox into the Sequence. We use this activity to find the student completing the form. Specify the following properties:
-
DisplayName: Lookup Student
-
UserId: studentid
-
UserName: formInstance.UserName
-
ValidationMessages: formInstance.ValidationMessages
-
![]() (Click the Show button to view the preceding steps in a looping animated gif.)
(Click the Show button to view the preceding steps in a looping animated gif.)
-
We want to get data from the studentEntity so we can populate some fields on our form. The GetEntity activity will accomplish this.
-
Drag the GetEntity activity from the Toolbox into the Action section below the LookupUser activity. The "Select Types" dialog for the GetEntity activity is displayed.
-
Click the drop-down list in the Select Type window and select Browse for Types. The "Browse and Select a .Net Type" window is displayed.
-
In the Type Name field, paste StudentEntity (or navigate to Cmc.Nexus.Common.Contracts > Cmc.Nexus.Common.Entities > StudentEntity) and click OK.
-
Click OK in the "Select Types" dialog.
-
Open the Properties pane for the GetEntity activity. Specify the following properties:
-
EntityId: studentid (This is the variable created above.)
-
Result: studentEntity
-
-
![]() (Click the Show button to view the preceding steps in a looping animated gif.)
(Click the Show button to view the preceding steps in a looping animated gif.)
-
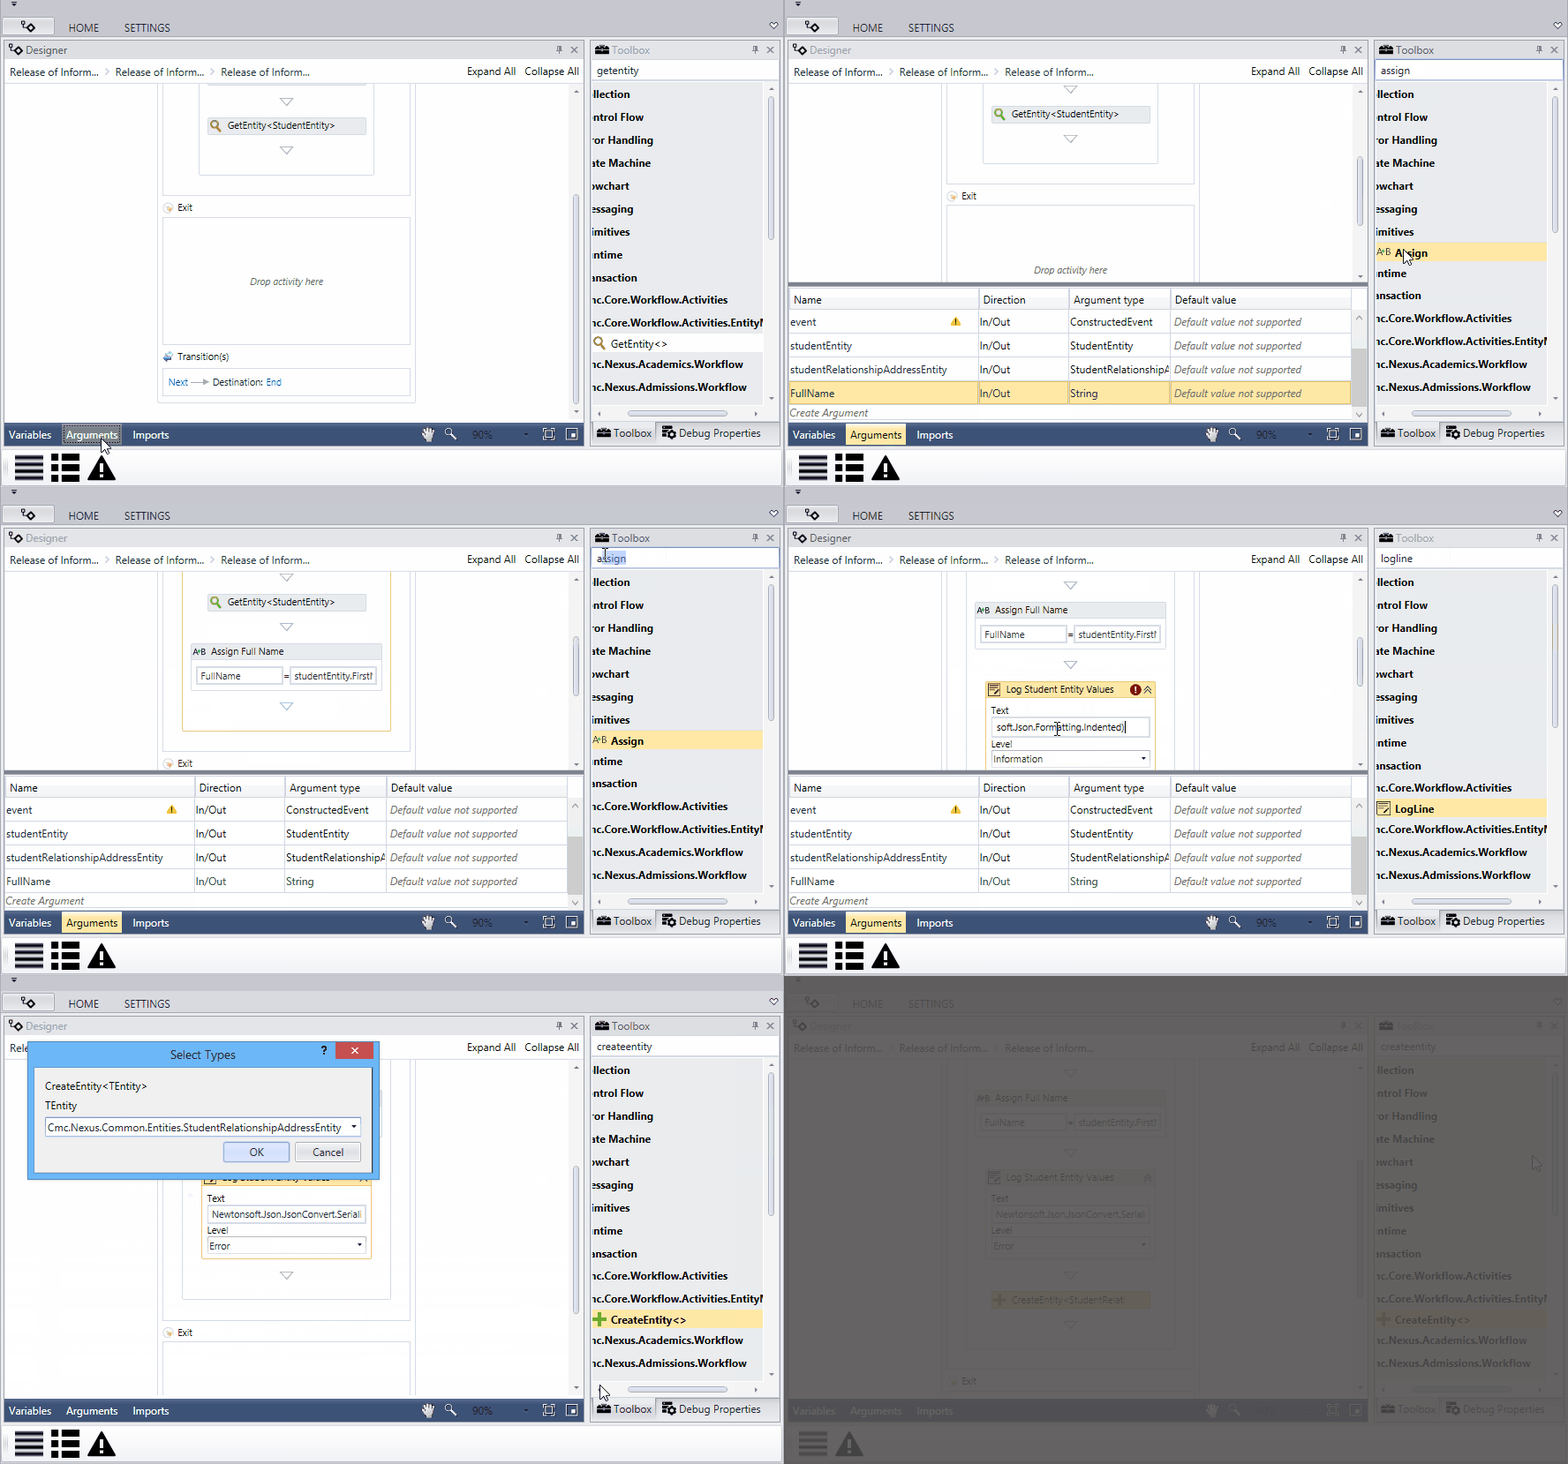
Create an Argument to bind the "Full Name" text box to the workflow. Specify the following properties:
-
Name: FullName
-
Direction: In/Out
-
Argument type: String
-
-
Drag an Assign activity below the GetEntity activity. Specify the following properties:
-
Display Name: Assign Full Name
-
To field: FullName
-
Value: studentEntity.FirstName + " " + studentEntity.LastName
Note: This will push the first and last name of the student to the "Full Name" text box on our form.
-
-
Drag a LogLine activity below the Assign activity. This LogLine activity writes the assigned student entity values to the log. Specify the following properties:
-
Display Name: Log Student Entity Values
-
Text: Newtonsoft.Json.JsonConvert.SerializeObject(studentEntity, Newtonsoft.Json.Formatting.Indented)
-
Level: Information
You may need to import a reference to the Newtonsoft.Json if the LogLine activity shows an error after completing the steps above.
-
-
Drag the CreateEntity activity from the Toolbox below the LogLine activity. The "Select Types" dialog for the CreateEntity activity is displayed.
-
Click the drop-down list in the Select Type window and select Browse for Types. The "Browse and Select a .Net Type" window is displayed.
-
In the Type Name field, paste StudentRelationshipAddressEntity (or navigate to Cmc.Nexus.Common.Contracts > Cmc.Nexus.Common.Entities > StudentRelationshipAddressEntity) and click OK.
-
Click OK in the "Select Types" dialog. The CreateEntity activity is added below the LogLine activity.
-
Select the CreateEntity activity to give it the focus. Open the Properties pane and in the Result field, specify studentRelationshipAddressEntity.
-
![]() (Click the Show button to view the preceding steps in a looping animated gif.)
(Click the Show button to view the preceding steps in a looping animated gif.)
-
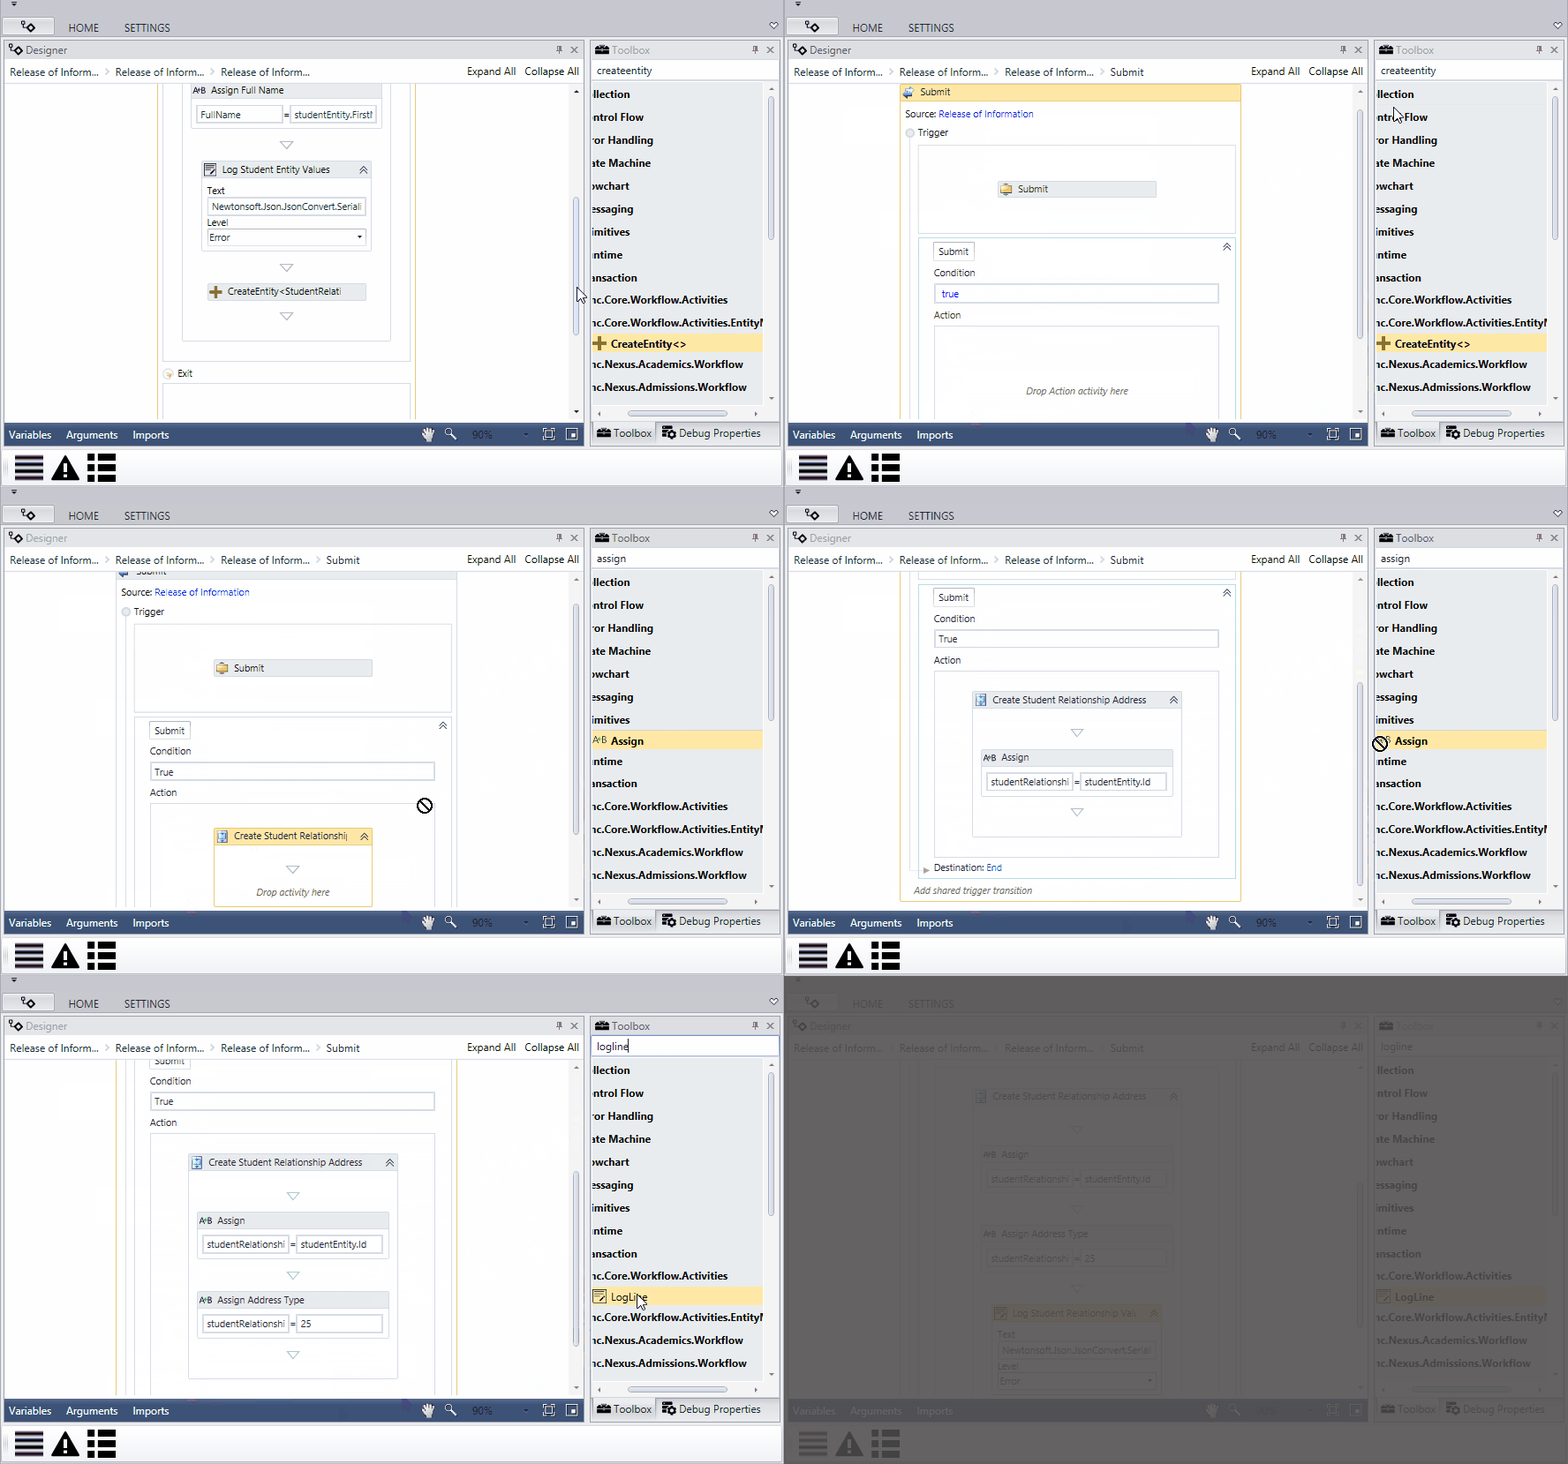
Select the Next transition at the bottom of the sequence to transition to the form.
-
We want to change label on the transition in the workflow and the wording on the button on the form.
-
Change the label of the transition to Submit.
-
Change the label of the WaitForFormBookmark activity in the Trigger section of the transition to Submit. The Display Name of the WaitForFormBookmark activity will be the label of the button on the form.
-
Set the Condition to True.
-
-
Drag a Sequence activity in the Action section of the transition. Rename the sequence to Create Student Relationship Address.
-
Drag an Assign activity into the sequence. Specify the following properties:
-
To field: studentRelationshipAddressEntity.StudentId
-
Value: studentEntity.Id
-
-
Drag another Assign activity into the sequence. Specify the following properties:
-
Display Name: Assign Address Type
-
To field: studentRelationshipAddressEntity.AddressTypeId
-
Value: 25
-
-
Drag a LogLine activity below the Assign activity. Specify the following properties:
-
Display Name: Log Student Relationship Values
-
Text: Newtonsoft.Json.JsonConvert.SerializeObject(studentRelationshipAddressEntity, Newtonsoft.Json.Formatting.Indented)
-
Level: Information
-
![]() (Click the Show button to view the preceding steps in a looping animated gif.)
(Click the Show button to view the preceding steps in a looping animated gif.)
-
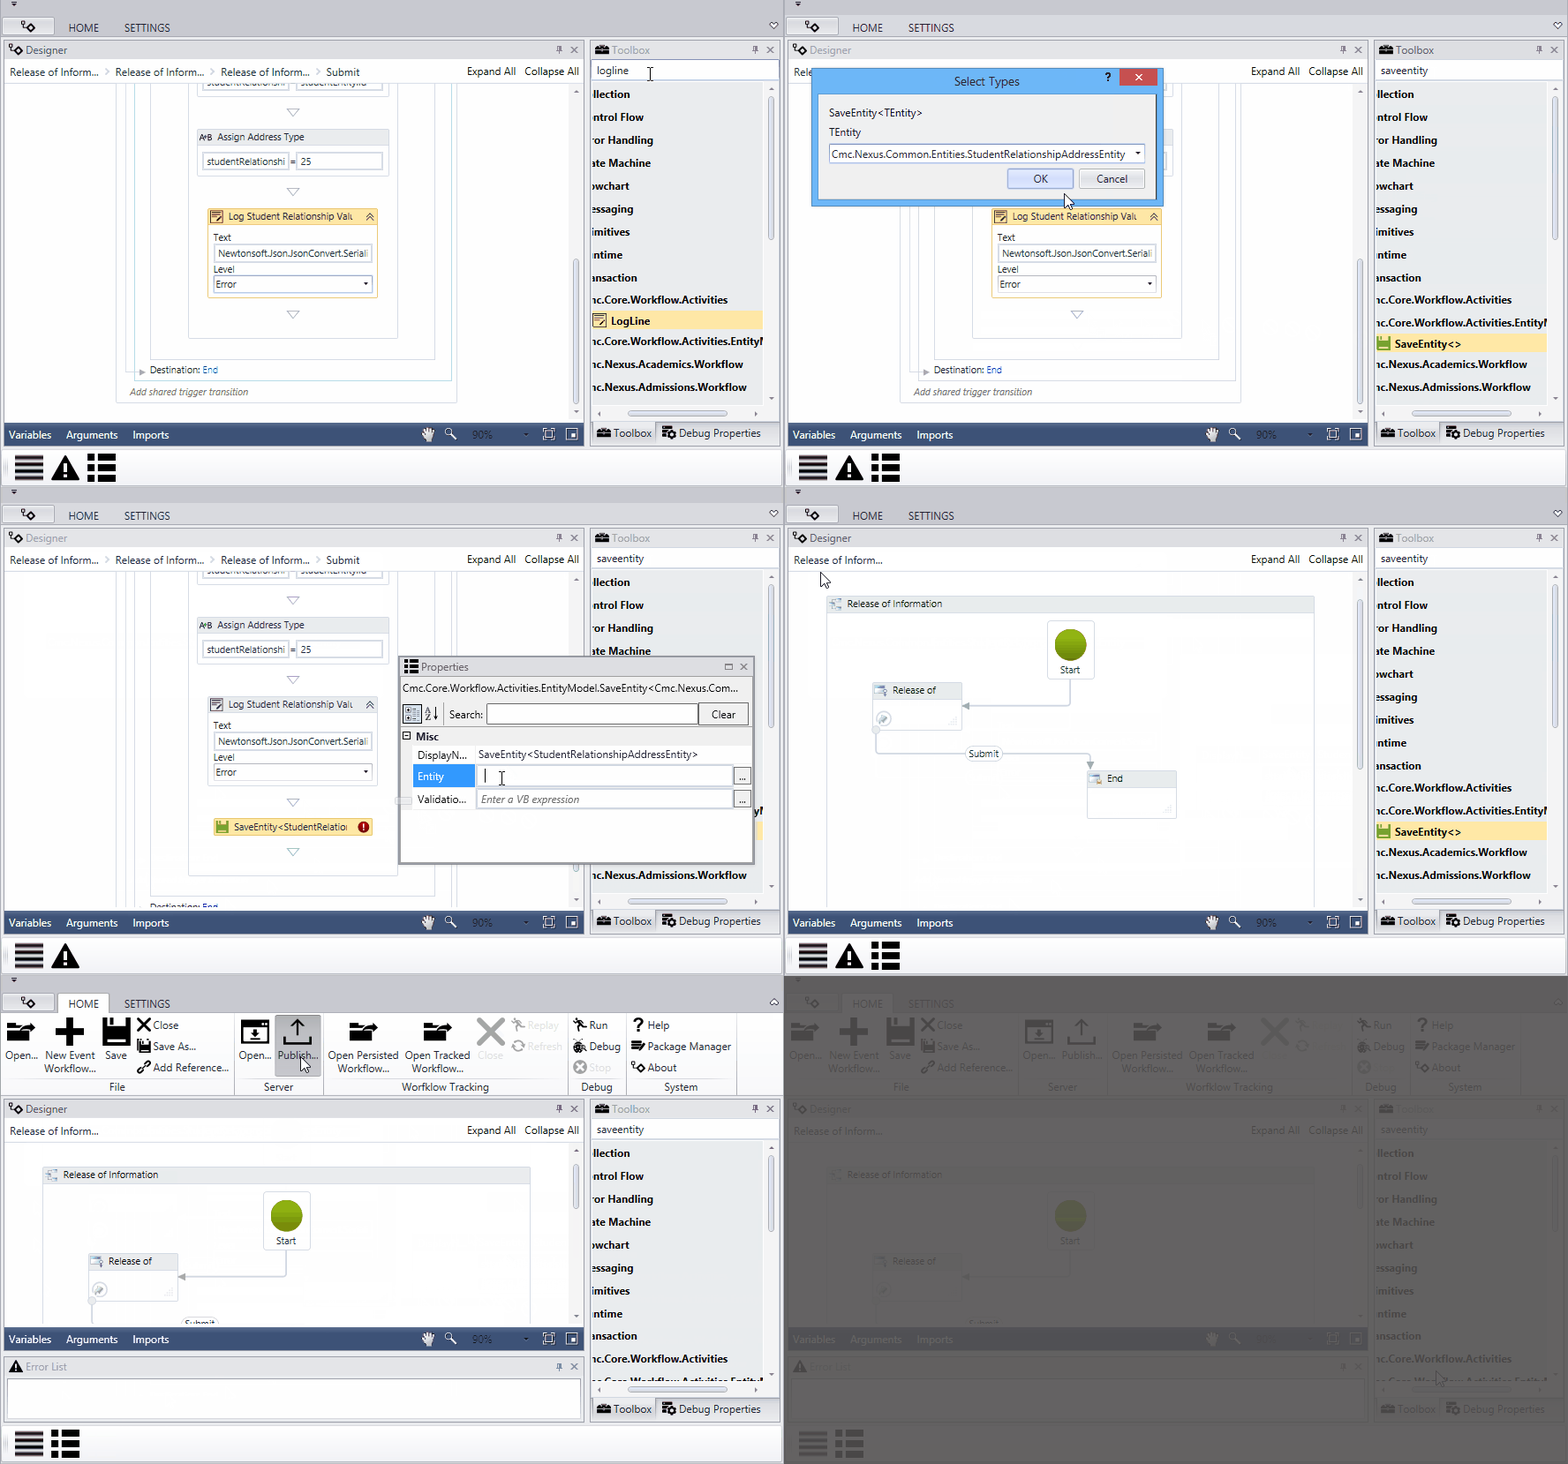
Drag the SaveEntity activity below the LogLine activity.
In the dialog box, select Browse for Types, select Cmc.Nexus.Common.Entities.StudentRelationshipAddressEntity, and click OK.
In the Properties pane for the SaveEntity activity, Specify the following properties:
-
Entity: studentRelationshipAddressEntity
-
ValidationMessage: formInstance.ValidationMessages
-
-
Click the cookie trail at the top left of the Designer pane to return to the top level of the workflow flowchart.
-
Confirm there are no errors in the Error panel.
-
Restore the ribbon of Workflow Composer.
-
Click Publish and select Enable This Workflow Version? Click OK to confirm.
![]() (Click the Show button to view the preceding steps in a looping animated gif.)
(Click the Show button to view the preceding steps in a looping animated gif.)
Validate the Data in the Web Client
-
Open the Web Client for Anthology Student in another browser.
-
Sign in with your user name and password.
-
Click the Students tile.
-
Search for a student. Select the student by clicking on the name link.
-
Expand Contact Manager and click the Related Addresses tile.
![]() (Click the Show button to view the preceding steps in a looping animated gif.)
(Click the Show button to view the preceding steps in a looping animated gif.)
Submit the Release of Information Form
-
Open a different browser and point to the URL for the Sequence List.
(
http://<server>:<port>/#/sequencelistorhttps://<server>:<port>/#/sequencelist) -
Use the search box above the Sequence Name column to find the Release of Information sequence.
-
Scroll to the right and click
 to view the sequence.
 -
Login as the student:
Username: April.McKeel
Password: nexus123
-
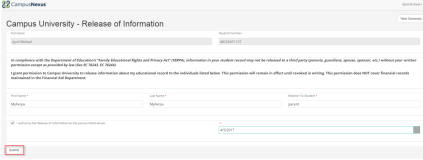
Complete the form as shown below and click Submit.
-
Confirm that you received a Confirmation Message.
![]() (Click the Show button to view the preceding steps in a looping animated gif.)
(Click the Show button to view the preceding steps in a looping animated gif.)
Confirm the Updates in the Web Client
-
Open the Web Client for Anthology Student in another browser.
-
Sign in with your user name and password.
-
Click the Students tile.
-
Search for a student. Select the student by clicking on the name link.
-
Expand Contact Manager and click the Related Addresses tile.
-
Confirm the Related Addresses was updated.
-
Confirm that if you try to add FERPA access information for a person that your person can be selected in the drop-down list.
Check the Renderer Log
-
Navigate to: \\<server>\c$\logs and open the FormsBuilderRenderer file that has today's date.
-
Navigate to the bottom of the file (Ctrl + End) and then scroll up until you see the log lines from your workflow.
