Customer Portal enables you to provide your customers a web-based environment that they can use to access to their accounts. Portal users can view and update data, personalize the Portal to suit their preferences, and perform a host of other activities.
Prerequisites
Identify and install the prerequisite software. See Software Requirements by Component — Customer Portal.
-
The following CampusNexus CRM components must be installed:
- Main Server
- Web Components
- iServices
-
The following CampusNexus CRM iServices must be available:
- Account iService
- Contact iService
- COF iService
- Utils iService
- Interaction iService
- Portal iService
-
Ensure that the replication of Database Server is complete.
-
Stop the SQL Server Agent service on the computer on which the Main database is installed.
Note: In the license information page in Business Administrator or Database Administrator, check the following:
- Customer Portal is specified as Yes.
- Number of Portal Licenses
Set Up the Customer Portal
-
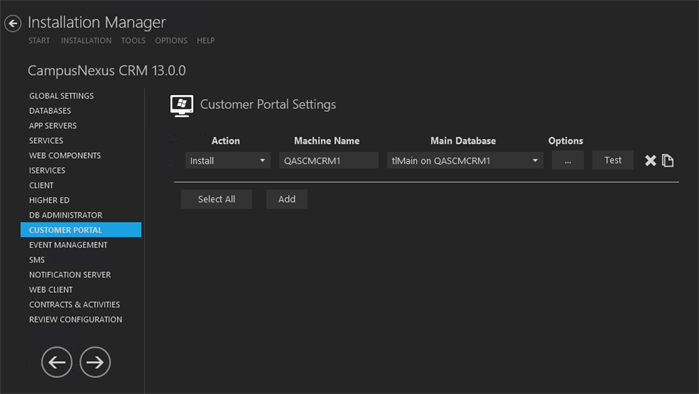
In the Installation menu, click Customer Portal. The Customer Portal Settings screen is displayed.

-
Click Add to add a line to the Settings screen.
-
Select an appropriate Action. The following Action values are available:
-
None – Performs no action.
-
Install – Performs a fresh installation or upgrade of a component. You can install or upgrade multiple components at same time.
-
Uninstall – Removes all subcomponents on that machine and uninstalls the component from Programs and Features.
-
Reinstall – Retries to install a subcomponent.
-
Add – Installs an additional component on the computer where one or more components already exist. You can add only one component at a time.
-
Remove – Uninstalls a single component. You can remove only one component at a time.
Optional: Click Select All to set the Action field to Install for all components listed on this screen. Click Unselect All to set the Action field to None.
-
-
Enter the Machine Name for the component to be installed.
-
Select a Database from the Database list.
-
Click
 to copy a line. Edit the copied line as needed.
 -
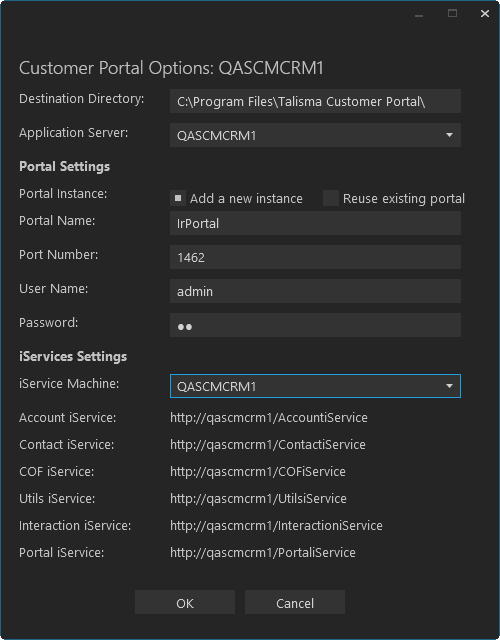
In the Options form, accept the default Destination Directory (
C:\Program Files\Talisma Customer Portal) for the Customer Portal or specify a different directory. -
Select an Application Server. The drop-down list contains all Application Servers configured in the Application Server Settings.
-
Specify the following Portal Settings:
- Portal Name
- Port Number (at least 4 digits)
- User Name
- Password (at least 4 characters)
A Portal Administrator User is created using the user name and password. These credentials are used to log on to CampusNexus CRM to perform operations internally.
-
Select an iService Machine. All iServices associated with that application server need to be populated in the read-only fields on the Customer Portal Options form. If the iService Machine is changed to another value, the iServices settings labels should reflect that value.
The iService read-only fields are populated with the respective iServices configured in the iServices Settings screen
The iService URL is of the format:
http://<Server Name>/<iService Name>, where <Server Name> is the name of the computer where iService is installed, and <iService Name> is the name of the iService.If a user changes the virtual root name for an iService in the iServices Settings, that value is reflected in the iServices label on Customer Portal Options form when the user changes the Application Server in the drop-down list.
-
Click OK to save changes on the Options form. The form is closed.
-
Click
 to delete a selected line.
 -
Click Test to ensure the setup for the corresponding line is correct. If a test on a particular line fails, check all associated fields and click Test again.
-
If all tests pass, click
 .
.
Postinstallation Tasks
After installing Customer Portal, perform the following tasks:
-
In the IIS Manager, expand the Web Sites node in the left pane, and right-click the Customer Portal virtual root, and select Start.
-
Configure the following settings for the DefaultAppPool Application Pool. To do so:
-
Open the IIS Manager.
-
Navigate to the <Server Name>, Application Pool node. The Application Pools screen is displayed.
-
In the Application Pools screen, right-click the DefaultAppPool Application Pool, and select Basic Settings from the Actions pane. The Edit Application Pool dialog box is displayed.
-
Set the value of the fields in the Edit Application Pool dialog box as follows:
-
Set the value of the .Net Framework Version field to .Net Framework v4.0.30319.
-
Set the value of the Managed Pipeline Mode field to Classic.
-
-
In the Application Pools screen, right-click the DefaultAppPool Application Pool, and select Advanced Settings from the Actions pane. The Advanced Settings dialog box is displayed.
-
In the Process Model section, set the value of the Identity field as Local System, or set the domain Admin user account as the Custom account.
-
In the right pane of IIS Manager, double-click ISAPI and CGI Restrictions and ensure that the Allowed option is enabled for all the Web Service Extensions.
-

