Configurations for the Old Staff Calendar Framework
Following are the prerequisite configurations to work with the old Staff Calendar framework.
Configure User Location
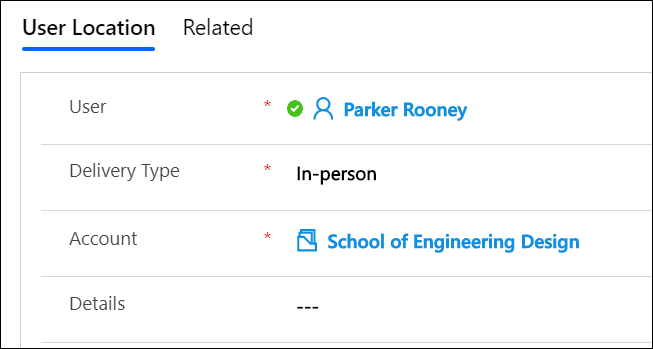
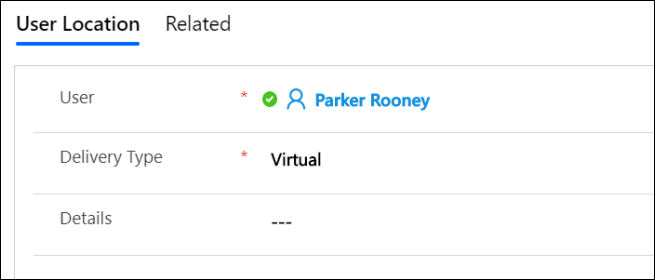
The User Location record determines whether the user's appointments will be In-Person or Virtual.
Note: While multiple user location records of type In-person can be created for a user, only a single user location record of type Virtual can be created per user.
Steps to Create a User Location Record
-
In the Reach environment, navigate to the User Location record.
-
In the Delivery Type field, select one of the following values:
-
In-Person
When this option is selected, an account record (i.e., a venue) of type Campus must be set in the Account field. Appointments will happen (in person) with the user at this venue.
Note: The time zone displayed in the Schedule Appointment page will be inherited from the primary address record associated with the account set in the user location record.After using a User location in an Active Office Hours, if you change the timezone of the Primary Address associated with the Account, recheck the timezone in the related office hours record and if required recreate the office hours to avoid impacting the already published availability of the staff member. -
Virtual - When this option is selected, it implies that appointments with the user will be conducted remotely, i.e., through online meetings or on the phone. Hence, the Account field will not be displayed in the user location record.
Note: For a Virtual User location, the timezone displayed in the Office Hours record defaults to the timezone of the selected staff member in the Anthology Reach application.
-
Configure Office Hours Record
Office Hour records determine the user's availability for the Appointment types at the associated user location. In a record, the Office Hours Type field determines when a user will be:
- Available - The duration in the workday when the advisor is available at the location.
- Unavailable - The duration in the workday when the advisor is unavailable at the location.
Steps to Create an Office Hour Record
-
Select a user location that will be associated with the Office Hour record.
-
In the Office Hours Type field, select Available or Unavailable.
-
In the Appointment Types field, select the required appointment type(s).
Note
-
To create office hours for specific appointment types, select the desired type(s) in the Appointment Types field. For example, if you are available from 8:00 a.m. to 10:00 a.m. for Career Planning sessions, select Career Planning in the Appointment Type field. You can choose one or more appointment types as needed. If an advisor should be available for all appointment types during the specified office hours, it is recommended to leave the Appointment Types field blank.
-
The ability to create and use office hours with specific appointment types is available only in TPC portal version 6.1 or later.
-
-
In the Start / End Date section, configure the date, time, days of the week and the timezone when the advisor will be available.
Notes:
-
In the Office Hours record:
-
When the User Location is Virtual, the Time Zone field defaults to the selected Staff Member’s Time Zone from the Reach application. The Start Time and End Time of the Office hours are displayed in this Time Zone.
-
When the User Location is In-Person, the Time Zone field defaults to the selected Account’s Primary Address Time Zone. The Start Time and End Time of the Office hours are displayed in this Time Zone.
-
-
Staff members publish their office hours in their respective time zones. However, the system automatically converts and displays the available slots based on the type of Office Hours as follows:
-
For In Person Office Hours - The selected location’s time zone.
-
For Virtual Office Hours - The logged-in portal user's time zone.
This ensures that students can view and book appointments on the portal conveniently.
-
-
If the timezone is changed for the Primary Address associated with the Account, recheck the timezone in the related Office Hours record. If necessary, recreate the Office Hours to ensure your previously published availability is not affected.
-
Currently, the Time Zone field in the Office Hours record is read-only. However, if the Search Available Slots - Book Appointment page is being used on the portal, Reach administrator can configure the Time Zone field on the Office Hours page as editable for scheduling virtual meetings. To configure the Time Zone field as editable for virtual meetings, see Configure the Time Zone Field as Editable for Virtual Meetings.
This will enable staff members to publish their availability according to their current time zone, which may differ from their system time zone.
If you are using the old Search Advisor - Book Appointment page, do not adjust the time zone at the office hours level. In this case, system uses the Advisor’s time zone from the Reach (Dynamics) CRM application.
-
Example to explain the logic for the Unavailable Office Hours:
-
The Available time settings in the Office Hour record is 11 AM - 5 PM
-
The Unavailable time settings in the Office Hour record is 1 PM - 2 PM
The setting marked as Unavailable takes precedence over the Available time settings. Therefore, appointments cannot be booked during the Unavailable period, even if it falls within the Available time range.
-
- Multiple Office Hour records that are marked as Unavailable can be created with overlapping values.
Example
The following Office Hour records are associated with the same User Location:
- Office Hour 1 - Marked as unavailable from 9:30 AM – 11 AM.
- Office Hour 2 - Marked as unavailable from 9:00 AM – 10 AM.
The location will be unavailable for a duration that’s a combination of both time slots, i.e., 9 AM – 11 AM.
Configure User's Working Hours
To configure the User's working hours perform the following steps:
-
In the Reach environment, click the Settings icon > Personalization Settings.
The Set Personal Options dialog box is displayed.
-
Click the Activities tab and in the Set your default work hours section, set the Start Time and End Time values.
This will be displayed on the Schedule Appointment page.
For example, if the working hours are set from 8 AM - 5 PM, this time range will be displayed in the Schedule Appointment page.
Additionally, the start and end time settings can be narrowed down further in the Office Hour records. For more information, see the Configure Office Hours section.
Important-
It is recommended to avoid publishing the Office hours beyond the designated working hours for Users/Staff Members. Failure to do so may result in available slots being displayed for Students for booking outside of the intended time frame of the staff member. Please ensure that the published availability aligns with the official working hours to avoid scheduling conflicts.
-
Configuring a User's working hours is not applicable for the new Staff calendar framework.
-
Associate a Department with the User
To publish availability in the Staff Calendar, ensure that a department is assigned to the user in the Organization Information section of the user record.
Configure the Staff Calendar Settings in the Default Configuration Page
In the Default Configuration page, configure the following fields in the Staff Calendar tab:
-
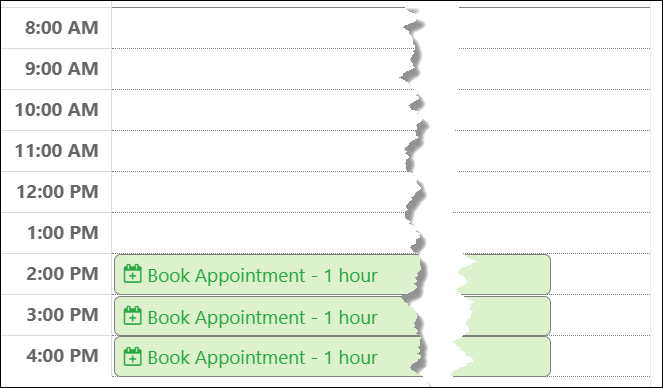
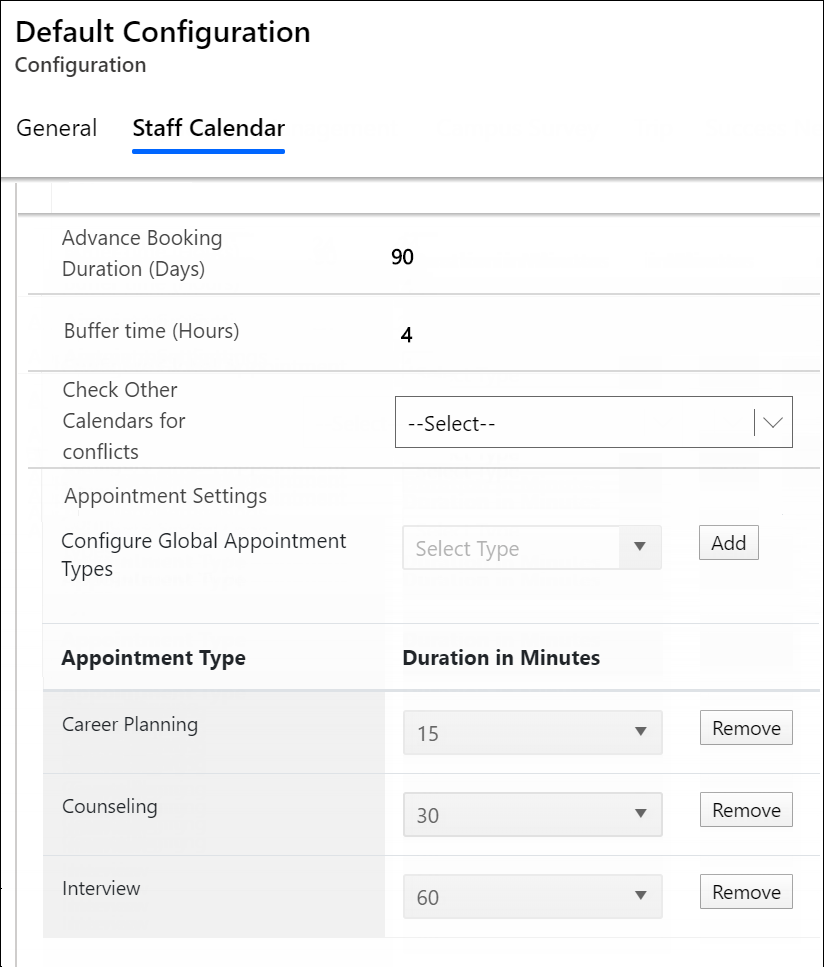
Advance Booking Duration (Days) - From the current date, available booking slots will be displayed for a count of days that is configured in the Advance Booking Duration (Days) field. The Book Appointment link will not be displayed in Anthology Reach and on the portal beyond the count of selected days.
-
Booking Restriction Duration (Hours) - It is t he minimum number of hours required before a new appointment can be scheduled. The typed value will prevent students from booking appointments on the portal if the slot occurs within the number of hours from the current time. For example, it's 9 AM now, and a student want to book an appointment for 2 PM. Even though the slot is available, the student will not be able to book the appointment because the value 8 is typed in the Booking Restriction Duration field, which means the earliest appointment can be booked at 5 PM.
-
Default Delivery Mode - The value selected in this field will be populated as the default value in the Delivery Mode field while creating an appointment record in Reach and on Portal. The Default Delivery Mode field has the following values:
-
In-person
-
Virtual
On the portal, when a student creates an appointment through the Success Network page, the default value in the Delivery Mode field will be set based on the user location(s) configured for the Student Advisor as follows:
-
When both Virtual and In-person user locations are configured for the Student Advisor associated with the student in the Success Network, the Delivery Mode field will populate the value selected in the Default Delivery Mode field in the Default Configuration page.
-
When only one user location is configured for the Student Advisor associated with the student in the Success Network, the Delivery Mode will populate the user location configured for the Student Advisor.
The following table illustrates the above scenario.
Advisors in Reach User Locations for the Advisors Default Delivery Mode Configuration Default Value in the Delivery Mode Field Advisor 1 Virtual, In-person In-person In-person Advisor 2 Virtual In-person Virtual Note: While a student is creating an appointment on the portal, if the Reach administrator changes the value for the Default Delivery Mode field, the updated value for the Default Delivery Mode field will appear only after the portal user clears the browser cache or logs in to the portal from a new browser window.
-
-
Check Other Calendars for Conflicts - Based on the external calendar that an institution is synced with, appointments from Google or Microsoft Outlook will be considered for hiding the advisor’s Book Appointment slots. One of the following synced calendars can be selected:
-
Google Calendar: For more information, see Google Calendar Integration.
OR
Outlook Calendar: For more information, see Microsoft Outlook Busy Sync Settings.
Note: For information about troubleshooting staff calendar sync issues, see Troubleshooting Staff Calendar Sync Issues.
-
-
New Staff Calendar Framework - Set this field to No.
-
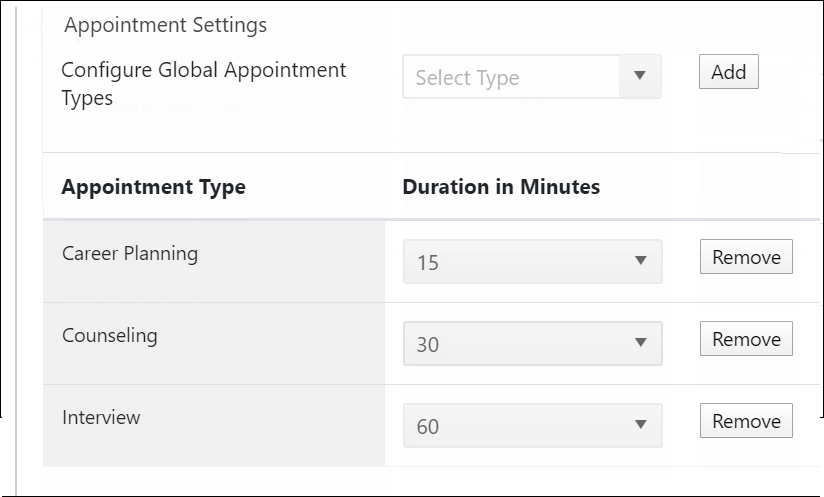
Appointment Types - Determine the duration an institution allots for specific kinds of appointments. For instance, the following time can be set in the indicated appointment types:
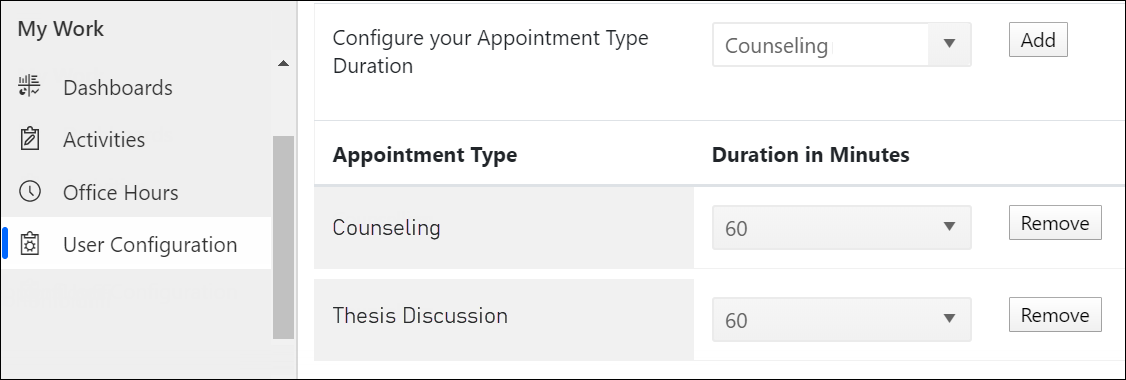
The above settings are global, and can be overridden by user specific settings (My Work > User Configuration) if the user determines that a specific appointment type needs more or less time.
In the above scenario, a user's appointment slot will be displayed with the following durations:
- Career Planning - 15 minutes
- Counseling - 60 minutes (The user's setting will override the global setting)
- Interview - 60 minutes
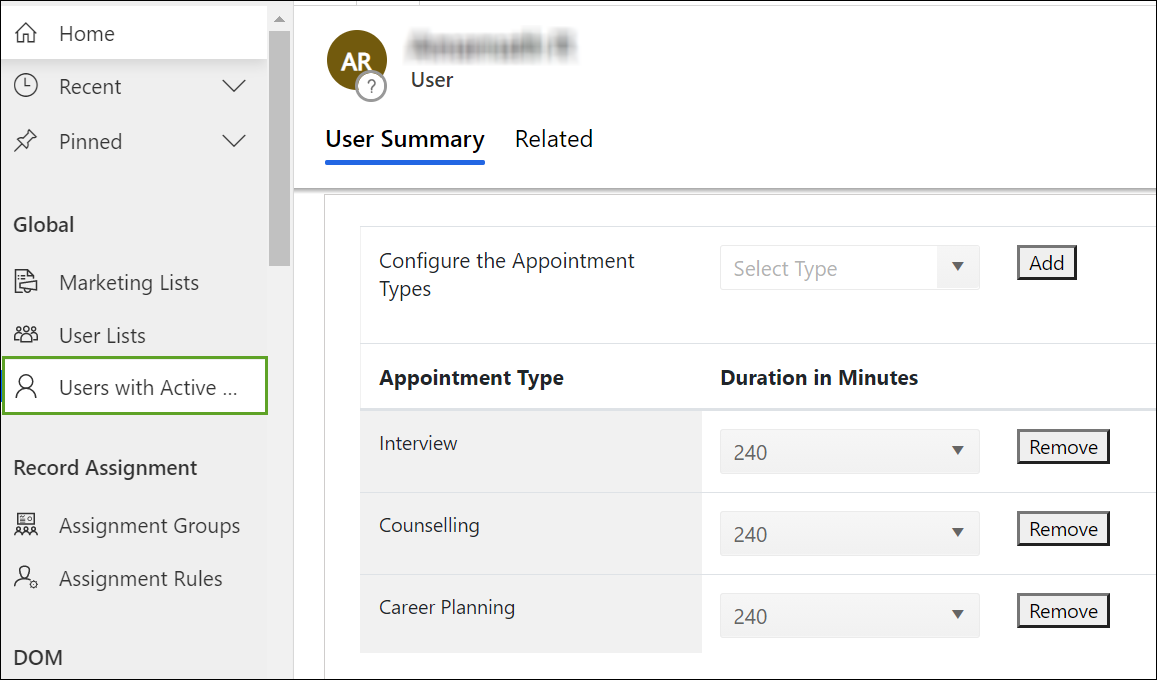
Scenarios can also occur where only user-specific values are set for some appointment types. Notice in the above images that the Appointment Type is set only at the user level, and is not set globally.
Administrators can create appointment types by adding values in the Appointment Type field of the Appointment entity.
Note: For more information about these settings, see Default Configurations.
Configure the Appointment Types Duration
The duration for an appointment type that must be allotted for a user can be configured in the following areas in Anthology Reach:
-
Default Configuration page (under Settings > Customization > Configurations) - In the Default Configuration page > Staff Calendar tab, the duration of the appointment types can be configured in the Appointment Settings section.
The Appointment Types configured in this section is applicable to all users in Anthology Reach. This configuration can be over-ridden by user-specific configurations in the User Configuration page or User with Active User Location page.
-
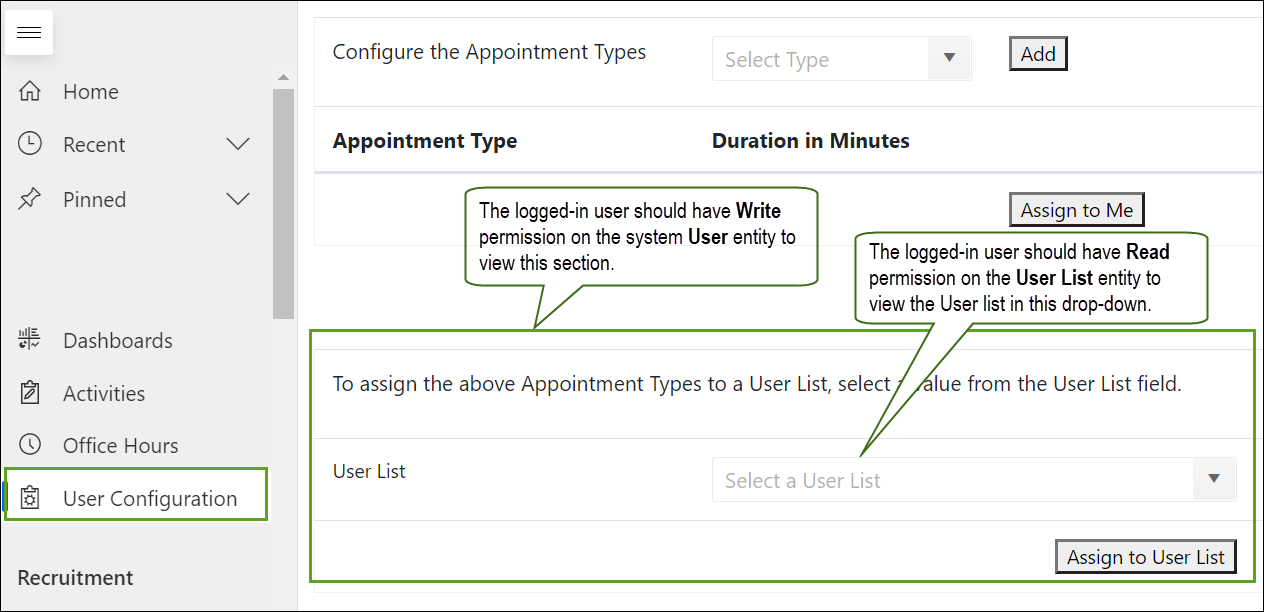
User Configurationpage (under Reach > My Work) - In the User Configuration page, the logged-in user can configure the duration of the Appointment Types. Further, if the logged-in user has Write permission on the system User entity, the user will also be able to configure the duration of the Appointment types for User lists.
Note:
- Dynamic User List cannot be used for assigning user level appointment type in bulk. It can be performed only using Static User List.
-
When the Book Appointment > Search Available Slots page is configured on the portal, a student can view the availability of multiple staff members at a glance. In this scenario, the Appointment Type duration must be consistent at both the user level (in the User Configuration page) and the global level (in the Default Configuration page). For example, if the"Career Planning appointment type has a duration of 30 minutes at the global level, it must have the same duration at the user level. This consistency is crucial for configuring and checking the availability of multiple staff members on the same page.
-
User with Active User Location page (under Process Config > Global) - The User with Active User Location page can be viewed only by users who have Write permission on the system User entity. The user will be able to select a user from the list and configure the duration of the appointment types.
Configure the Auto-accept Appointment Option
The User record includes the Auto-accept Appointment option.
By default, the Auto-accept Appointment field value is set to Yes. Institutions will be required to write their own workflows to enable appointments to be automatically accepted on behalf of student counselors, staff and/or advisors.
