This screen enables you to select the actions to be taken by Installation Manager (e.g., install, uninstall) and to specify the machine name, database server, and port to be used by the Web Services (APIs) for Anthology Student.
|
|
The APIs for Anthology Student 19.0 and later require .NET 4.6.2 or higher. The prerequisites check will fail for lower versions. |
Set Up the APIs
-
In the Installation menu, click API. The API screen for Anthology Student is displayed.

-
Click Add to add a line to the Settings screen.
-
Select an appropriate Action. The following Action values are available:
-
None – Performs no action.
-
Install – Performs a fresh installation or upgrade of a component. You can install or upgrade multiple components at the same time.
-
Uninstall – Removes all subcomponents on that machine and uninstalls the component from Programs and Features.
Optional: Click Select All to set the Action field to Install for all components listed on this screen. Click Unselect All to set the Action field to None.
-
-
Enter the Machine Name for the component to be installed. This is the machine where the APIs for Anthology Student will be installed.
-
In the Database field, select a database for Anthology Student. The drop-down contains a list of databases configured in the Database settings screen.
-
In the Port field, enter the name of the port where all the Web Services will be installed.
-
Click
 to view and edit the Options form.
 Depending on the licenses, the Options form can have following tabs:
-
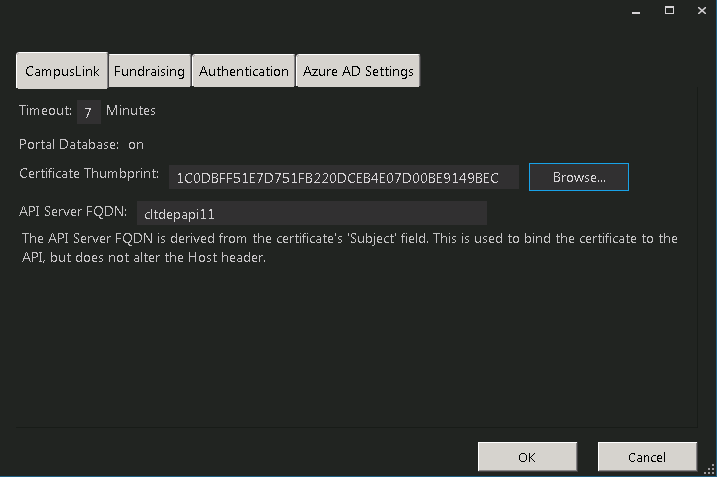
CampusLink Tab
This tab contains a timeout value, the Portal database name, the certificate thumbprint, and the API Server FQDN.
-
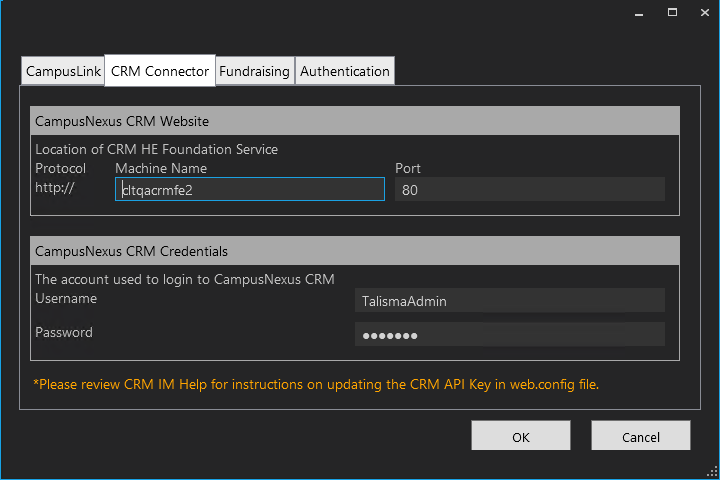
CRM Connector Tab
This tab is enabled only if the database is licensed with CampusNexus CRM. On this tab, specify the machine name and port for the CampusNexus CRM Higher Education (HE) Foundation Service and the TalismaAdmin credentials used to log in to CampusNexus CRM.
-
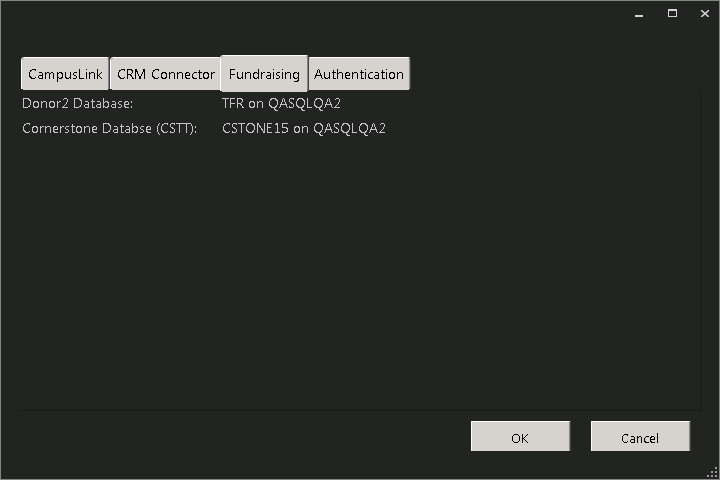
Fundraising Tab
Based on the Talisma Fundraising license, the Donor2 and Cornerstone database names associated with Anthology Student database are populated with read-only values from the Database Options.
-
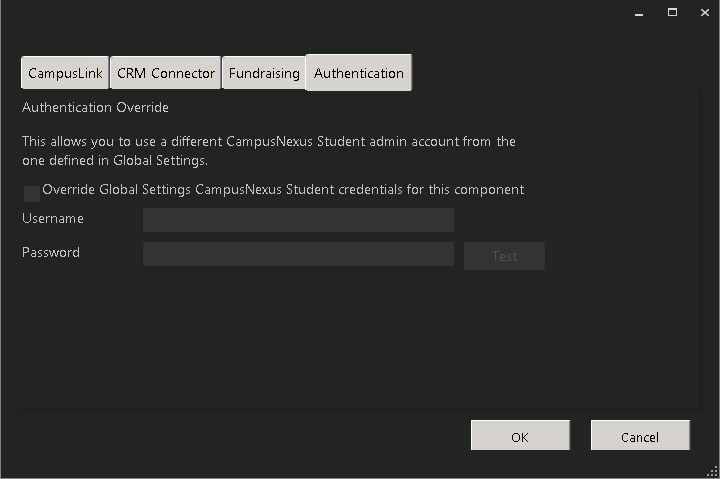
Authentication Tab
The Authentication tab allows you to specify an Anthology Student administrator account that is different from the account defined in the Global Settings.
-
-
Click OK to save changes on the Options form. The form is closed.
-
Click
 to copy a line. Edit the copied line as needed.
 -
Click
 to delete a selected line.
 -
If multiple API servers are installed in a server farm (one-to-many NAT), enter the farm's virtual IP address or DNS name in the Machine Name field and specify the Port number. Installation Manager will display the resulting API Farm URL.
-
Click Test to ensure the setup for the corresponding line is correct. If a test on a particular line fails, check all associated fields and click Test again.
Notes:
-
The Test button checks if the port number is in use; if so, the user is prompted to enter a different port number.
-
If an upgrade is performed, Installation Manager first checks if the port number is in use by the same Web Service that’s being installed.
-
-
If all tests pass, click
 .
.