Click  to view and edit the Options form. The Portal Options form contains the following tabs:
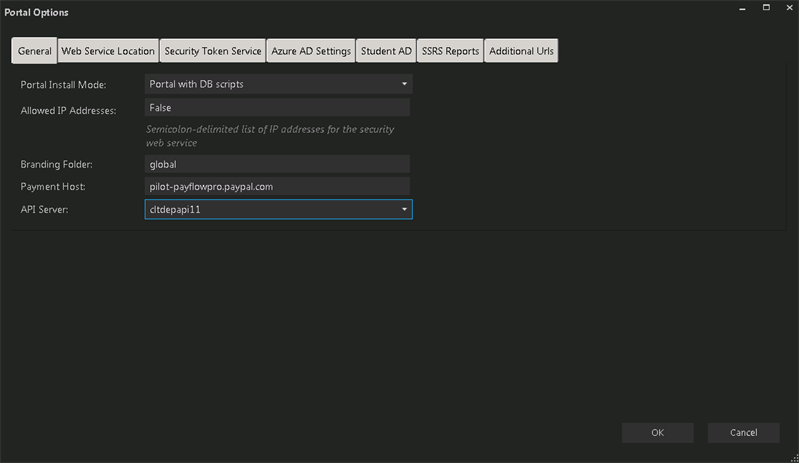
General Tab
Use this tab to specify the Portal installation mode, allowed IP addresses, branding folder, payment host, and API server. 
General Tab Fields
| Portal Install Mode |
Select the Portal Install Mode. The options are:- Portal with DB scripts — This option installs Portal and runs the DB scripts at the same time (default).
- Portal without DB scripts — This option installs the Portal websites without running DB scripts.
- Portal DB scripts only — This option runs the DB scripts for Portal without installing or reinstalling the Portal websites.
|
| Allowed IP Addresses |
List of IP addresses from the Anthology Student database including the IP address of the Portal server. Enter up to 15 IP addresses separated by semicolons. Any additional IP addresses entered by the user will be inserted into the Anthology Student database. |
| Branding Folder |
Specify the folder for the campus-level branding files or accept the default (global). |
| Payment Host |
Specify the URL of the Payment Host. |
| API Server |
Select the API Server from the drop-down list. |
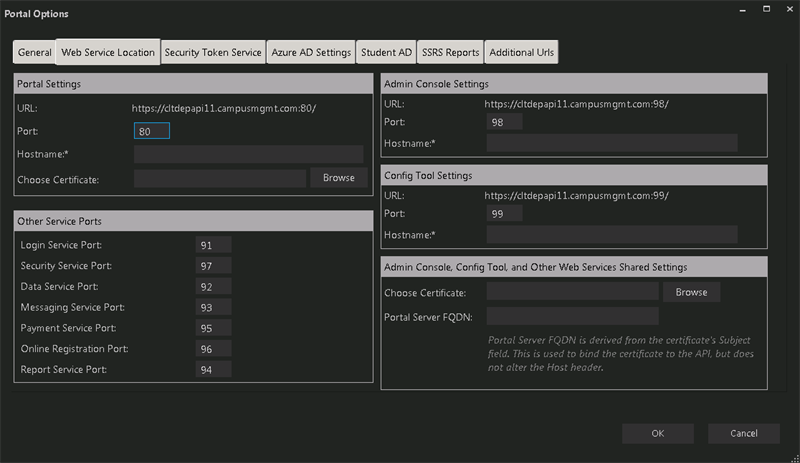
Web Service Location Tab
Use this tab to specify the ports, hostnames, and, if applicable, certificates for the Portal web services.
Web Service Location Tab Fields
| Portal Settings
|
| URL |
URL of the Portal |
| Port |
Specify the port number for the Portal or accept the default (80). |
| Hostname |
This is an optional field. When selected, the web.config file of the Portal will be updated with the custom host URL. If this field is left blank, the URL in the config files will be
http(s)://machinename.domain.com:port |
| Use HTTPS |
Select this check box if you want Portal to be accessed through HTTPS. When this option is selected, the Choose Certificate field is enabled. |
| Choose Certificate |
Certificate thumbprint from IIS. This certificate is required only when HTTPS is selected and is not added to the web.config file. This certificate is used only for Portal. Click Browse to navigate to the IIS Server Certificates to select the thumbprint. To extract a .CER file from IIS: Open Internet Information Services (IIS) Manager and choose the certificate to be used from Server Certificates. 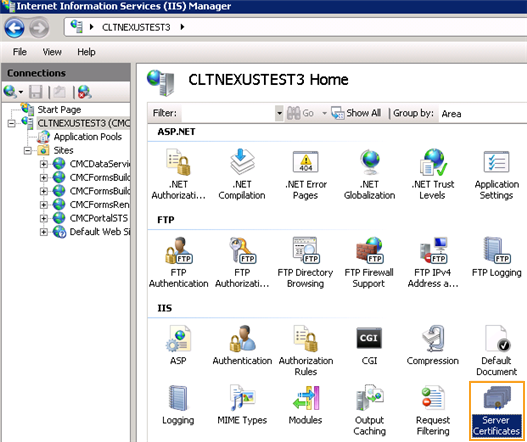
Double-click to open the certificate properties. 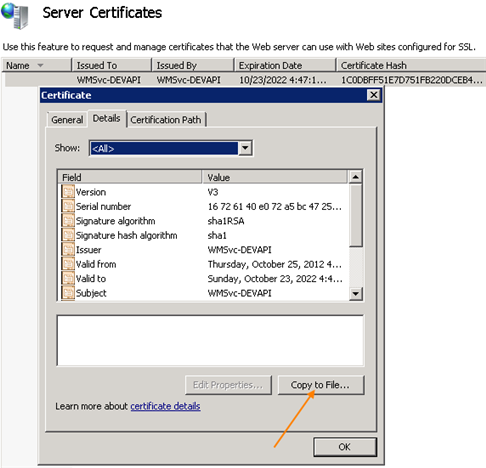
Select Root level and in the Details tab, click the Copy to File… button. Click Next. Select No, do not export the private key, and click Next. Select DER encoded binary X.509 (.CER) and click Next. Specify a file path and name (root) to export to and click Next. Click Finish
|
| Other Service Ports
|
| Login Service Port |
Specify the port number of the Login Service or accept the default (91). |
| Security Service Port |
Specify the port number of the Security Service or accept the default (97). |
| Data Service Port |
Specify the port number of the Data Service or accept the default (92). |
| Messaging Service Port |
Specify the port number of the Messaging Service or accept the default (93). |
| Payment Service Port |
Specify the port number of the Payment Service or accept the default (95). |
| Online Registration Port |
Specify the port number of the Online Registration Service or accept the default (96). |
| Report Service Port |
Specify the port number of the Report Service or accept the default (94). |
| Admin Console Settings
|
| URL |
URL of the Admin Console |
| Port |
Specify the port number for the Admin Console or accept the default (98). |
| Hostname |
This is an optional field. When selected, the web.config file of the Admin Console will be updated with the custom host URL. If this field is left blank, the URL in the config files will be
http(s)://machinename.domain.com:port |
| Config Tool Settings
|
| URL |
URL of the Config Tool |
| Port |
Specify the port number for the Config Tool or accept the default (99). |
| Hostname |
This is an optional field. When selected, the web.config file of the Config Tool will be updated with the custom host URL. If this field is left blank, the URL in the config files will be
http(s)://machinename.domain.com:port |
| Admin Console & Config Tool Shared Settings
|
| Choose Certificate |
Click Browse to navigate to the IIS Server Certificates to select the thumbprint. To extract a .CER file from IIS: Open Internet Information Services (IIS) Manager and choose the certificate to be used from Server Certificates.
Double-click to open the certificate properties.
Select Root level and in the Details tab, click the Copy to File… button. Click Next. Select No, do not export the private key, and click Next. Select DER encoded binary X.509 (.CER) and click Next. Specify a file path and name (root) to export to and click Next. Click Finish
|
| Portal Server FQDN |
The Portal Server Fully Qualified Domain Name (FQDN) is derived from the certificate's "Subject" field. It is used to bind the certificate to the API but does not alter the Host header. |
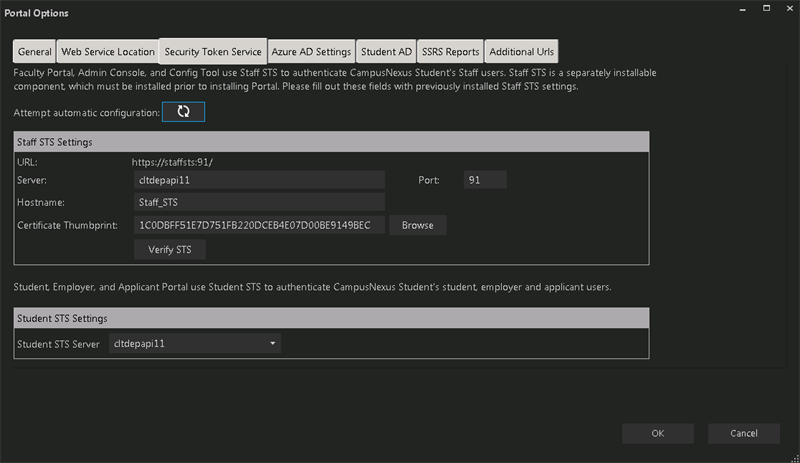
Security Token Service Tab
Use this tab to specify the settings for the Staff STS and Student STS.
Security Token Service Tab Fields
| Update Settings |
Click  to attempt an automatic configuration of the Security Token Services. You must be in the same domain as the STS and must have the SQL server permissions for automatic configuration to be successful. to attempt an automatic configuration of the Security Token Services. You must be in the same domain as the STS and must have the SQL server permissions for automatic configuration to be successful. |
| Staff STS Settings
|
| URL |
URL of the Staff STS |
| Server |
Specify the name of the Staff STS server. |
| Port |
Specify the port number for the Staff STS or accept the default (91). |
| Hostname |
Hostname of the Staff STS in the format http://<ServerName>.<certificateName>For example: http://prtl.campusmgmt.com
|
| Certificate Thumbprint |
Certificate thumbprint from IIS. This certificate is required only when HTTPS is selected and is not added to the web.config file. This certificate is used only for Staff STS. Click Browse to navigate to the IIS Server Certificates to select the thumbprint. To extract a .CER file from IIS: Open Internet Information Services (IIS) Manager and choose the certificate to be used from Server Certificates.
Double-click to open the certificate properties.
Select Root level and in the Details tab, click the Copy to File… button. Click Next. Select No, do not export the private key, and click Next. Select DER encoded binary X.509 (.CER) and click Next. Specify a file path and name (root) to export to and click Next. Click Finish
|
| Verify STS |
Click Verify STS to check that the Staff STS Server is active and that login is successful. |
| Student STS Settings
|
| Student STS Server |
Select the installed Student STS Server. |
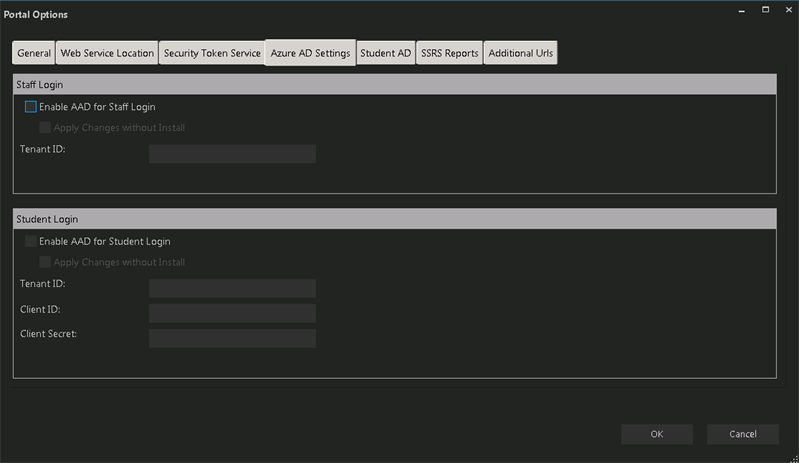
Azure AD Settings Tab
Use this tab to specify the Azure Active Directory (AAD) settings for staff and student users logging in to Portal.
Azure AD Settings Tab Fields
| Staff Login
|
| Enable AAD for Staff Login |
Select this check box to enable the Staff Login fields. |
| Apply Changes without Install |
Select this check box if AAD is used without installing Portal. |
| Tenant ID |
Specify the Azure tenant identifier. |
| Student Login
|
| Enable AAD for Student Login |
Select this check box to enable the Student Login fields. |
| Apply Changes without Install |
Select this check box if AAD is used without installing Portalt. |
| Tenant ID |
Specify the Azure tenant identifier. |
| Client ID |
Specify the Azure client identifier. |
| Client Secret |
Specify the Azure client secret. |
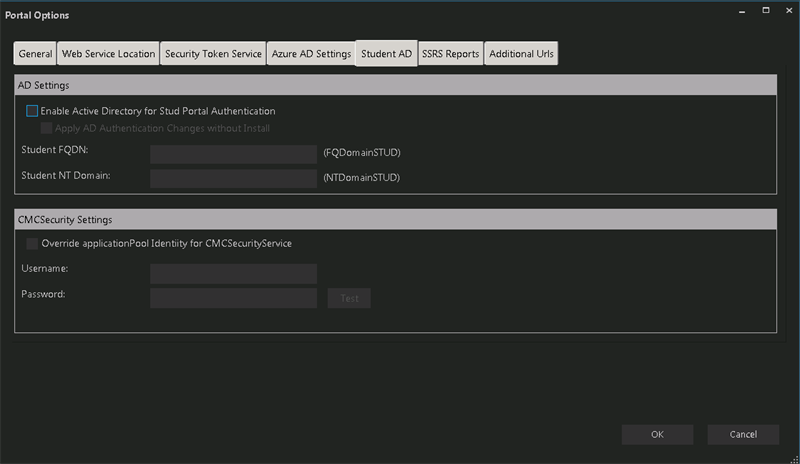
Student AD Tab
Use this tab to specify the Active Directory (AD) and Security settings for the Student Portal.
Student AD Tab Fields
| AD Settings
|
| Enable Active Directory for Student Portal Authentication |
Select this check box to enable the AD Settings fields. |
| Apply AD Authentication Changes without Install |
Select this check box if AD is used without installing Portal |
| Student FQDN |
Specify the fully qualified domain name (FQDN) for Student Portal. |
| Student NT Domain |
Specify the Windows NT Domain for Student Portal. |
| CMC Security Settings
|
| Override Application Pool Identity for CMC Security Service |
Select this check box to enable the CMC Security Settings fields. |
| Username |
Specify the user name for the application pool identity override. |
| Password |
Specify the password for the application pool identity override. |
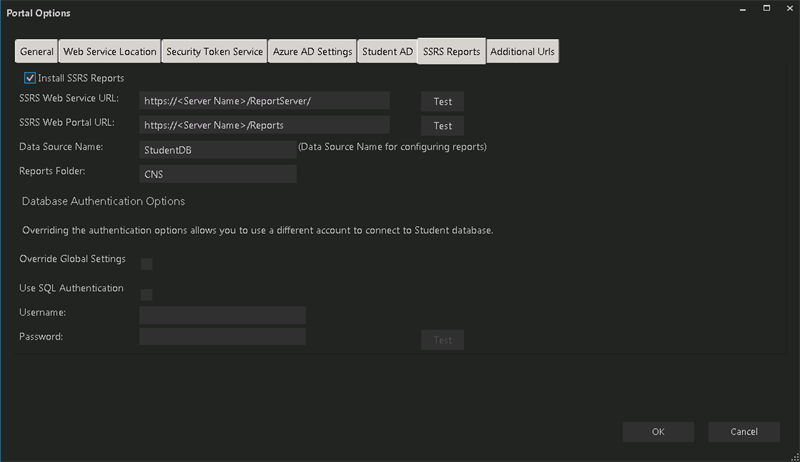
SSRS Reports Tab
Use this tab to integrate SQL Server Reporting Services (SSRS) 2016, the server-based report generating software system, into the Portal. Settings on this tab are required if Portal uses SSRS reports (instead of Crystal reports).
Examples of SSRS reports are unofficial transcripts (rpt_adTranscriptUnofficial.rpt and rpt_adTranscript_StudentBased.rpt). The unofficial transcripts can be accessed in Portal by students and staff.
SSRS Reports Tab Fields
| Install SSRS Reports |
Select this check box to enable the fields on this tab. |
| SSRS Web Service URL |
Specify the Web Service URL configured to access the Report Server. The specified URL will be stored in the web.config file. This URL is set while configuring the reporting service and can be found in Reporting Services Configuration Manager. 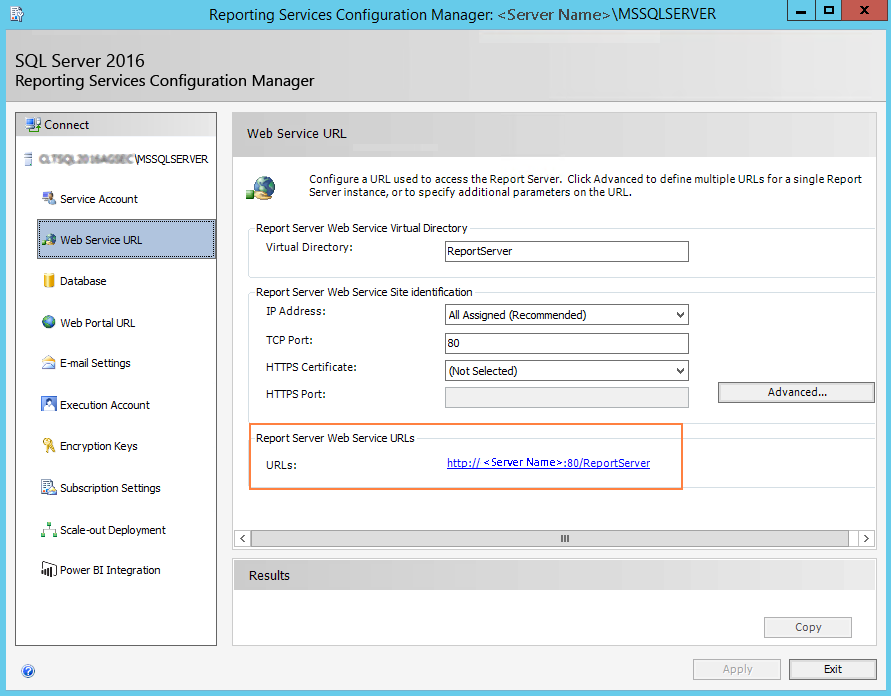
|
| SSRS Web Portal URL |
Specify the Web Portal URL configured to access the Web Portal. The specified URL will be stored in the web.config file. This URL is set while configuring the reporting service and can be found in Reporting Services Configuration Manager page. 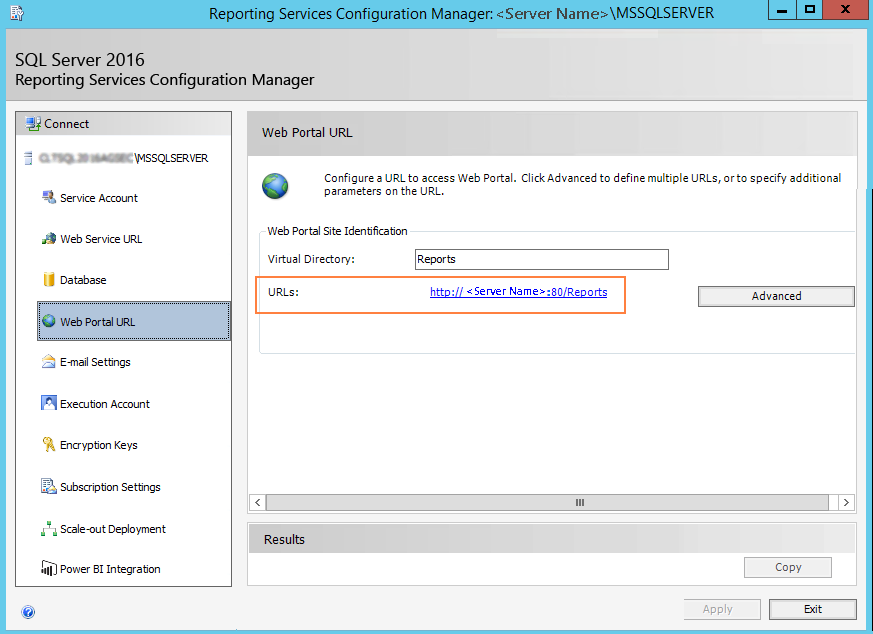
|
| Data Source Name |
Specify the name of the Anthology Student database that is the source for the reports. |
| Reports Folder |
Specify the path for the reports folder on the Report Server. A folder will be created if one does not exist. The folder name can be unique to the environment. The reports folder root path will be stored in the web.config file. Example QA/CNS where QA is one folder and Student_Test is a folder under QA.
|
| Database Authentication Options
|
| Override Global Settings |
Optional: Select this check box to enable the database authentication options.
|
| Use SQL Authentication |
Optional: Select this check box if SQL authentication is applied. |
| Username |
Enter the user name of the account that is given override permissions for the SSRS reports database. |
| Password |
Enter the password of the account that is given override permissions for the SSRS reports database. |
| Test |
Click Test to ensure the user authentication settings are correct. A confirmation message is displayed. |
In addition to the settings on the SSRS Reports tab in Installation Manager, the setup of reporting services requires configurations in the SQL Server Reporting Services Configuration Manager (see Configure Access to Reports).
You also need to create folders in the Anthology Student and assign permissions using the Security Console. Refer to the Administration and Configuration Help for Anthology Student at the Product Information site.
Configure Access to Reports
To enable access to the “Reports” menu item in Anthology Student, perform the following steps in the Reporting Services Configuration Manager on the report server:
-
Navigate to the /Reports folder path.
In the example below the reports folder path is http://cltnexustest2/Reports_RP1/browse/qa.

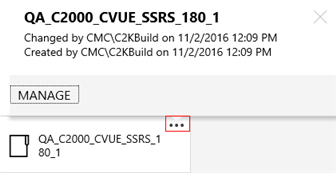
-
Right-click on the ellipsis of the reports folder root and select Manage.
-
Select the Security tab, click Customize security, and click Add group or user.
-
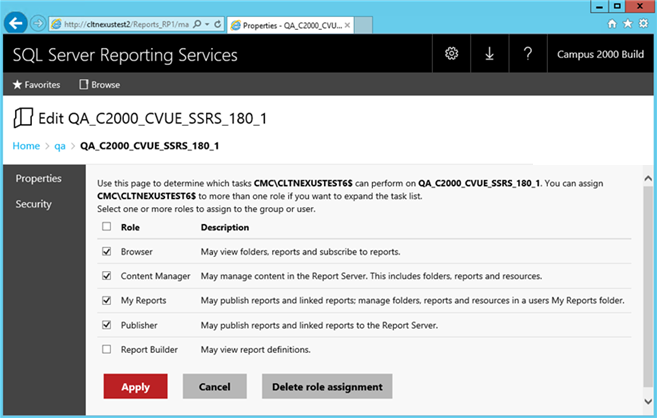
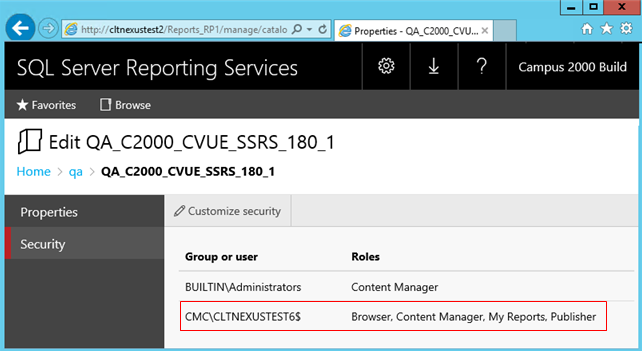
Add the domain\<machine name$> of Anthology Student and select the following Roles:
- Browser
- Content Manager
- My Reports
- Publisher
-
Click Apply.
Security for the Reporting Service should be set up as shown below, where CMC\CLTNEXUSTEST6 is the domain\machine name of Anthology Student from which the reports are accessed.
Configure SSRS for HTTPS
Once the reporting services are installed and configured, test access to the reports in Anthology Student. Select the Reports tile and navigate to any report listed in the menu.
If Anthology Student displays only the title of the report (without any data selection fields), use the browser developer tools (F12) and check the Console tab. If an error similar to the following is displayed, configure SSRS for secure access with an SSL certificate. For detailed instructions, see https://docs.microsoft.com/en-us/sql/reporting-services/security/configure-ssl-connections-on-a-native-mode-report-server

Additional Urls Tab
Settings on this tab are required only if the Portal instance is accessed from additional URLs associated with individual campuses. These campuses are served forms from the main Portal instance.

Additional Urls Tab Fields
| Add |
Click the Add button to add a line to the form. |
| Protocol |
Select HTTP or HTTPS protocol. If HTTPS is selected, the Portal Certificate and Require SNI fields are enabled and must be completed.
|
| Portal Hostname |
Specify the hostname for an additional Portal URL. It will be added to the IIS bindings of main Portal instance. |
| Port |
Specify the port number used by the additional Portal URL or accept the default (80). |
| Portal Certificate |
Certificate thumbprint from IIS is required if HTTPS is selected. Copy and paste the thumbprint from Portal into this field, or click Browse to navigate to the IIS Server Certificates to select the thumbprint. To extract a .CER file from IIS: Open Internet Information Services (IIS) Manager and choose the certificate to be used from Server Certificates.
Double-click to open the certificate properties.
Select Root level and in the Details tab, click the Copy to File… button. Click Next. Select No, do not export the private key, and click Next. Select DER encoded binary X.509 (.CER) and click Next. Specify a file path and name (root) to export to and click Next. Click Finish
|
| Require SNI |
Server Name Indication (SNI) is required if HTTPS is selected. SNI allows a server to present multiple certificates on the same IP address and TCP port number and hence allows multiple secure websites to be served by the same IP address without requiring all those sites to use the same certificate. |
 to delete a selected line.
  .
. 