This screen enables you to select the actions to be taken by Installation Manager (e.g., install, uninstall) and to specify the machine name, type, database, and options for Windows Services that are supported by Anthology Student. The Services are optional modules that enhance the functions of Anthology Student.
|
|
Installation of CampusNexus Windows Service is a required component for every instance of the Anthology Student database. |
Set Up the Services
-
In the Installation menu, click Services. The Services screen for Anthology Student is displayed.

-
Click Add to add a line to the Settings screen.
-
Select an appropriate Action. The following Action values are available:
-
None – Performs no action.
-
Install – Performs a fresh installation or upgrade of a component. You can install or upgrade multiple components at the same time.
-
Uninstall – Removes all subcomponents on that machine and uninstalls the component from Programs and Features.
Optional: Click Select All to set the Action field to Install for all components listed on this screen. Click Unselect All to set the Action field to None.
-
-
Enter the Machine Name for the component to be installed.
-
Select an option from the Type list:
- Automated Processes
- CampusLink Ambassador
- CampusVue Connector
- Messaging
- Regulatory
- CampusNexus
Notes:
-
The same service may be installed to multiple machines by adding a line for each machine for one database and selecting the service type.
-
Different services may be installed to the same machine by entering a line for each service and using the same machine name.
-
Use the Add or Copy button to define additional machines.

Automated Processes (FAA) services can be installed only on one server. Installing these services on multiple servers will result in unpredictable results. Regulatory services and Automated Processes services can be installed on Database Authentication, Active Directory, and Single Sign-on authenticated environments.
-
Select the name of a Database for Anthology Student. The drop-down list contains all Anthology Student databases configured in the Database settings screen.
-
Specify the Destination Directory if you want to override the default directory set on the Global Settings screen.
-
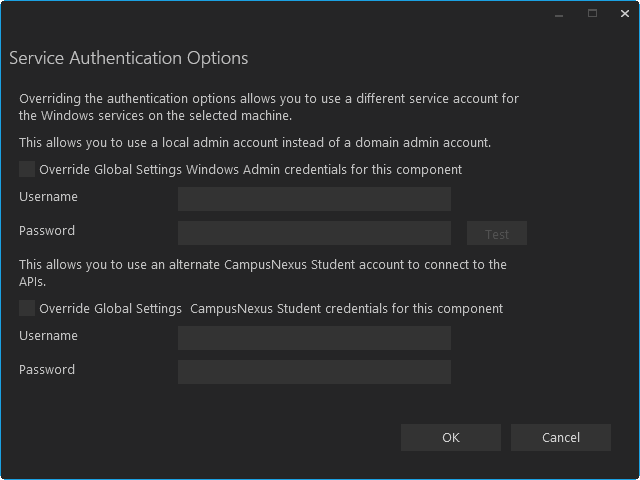
Click
 in the Auth column if you want to override the authentication options from Global Settings to use a different account for the Windows services and alternate Anthology Student credentials on the selected machine. The Service Authentication Options form is displayed.
 -
Click
 to view and edit the Options form.
 -
The Messaging Options window is displayed when the selected Service Type is Messaging.
-
The Service Options window is displayed for all other Services.
Service Options

In the Service Options window, select the database and installed system to be used by the Web Service (API).
— OR —
Click Default to use the API server based on the database selected.
Notes about the Service Options:
-
Automated Processes
Select the API database and installed system for configuring the Automated Processes components.
-
CampusVue Connector
Select the API database and installed system for configuring the CampusVue Connector components.
-
Regulatory
Select the API database and installed system for configuring Regulatory service components. The Regulatory service needs to be installed for all Anthology Student installations. The service can be installed on any tier (Front End, COM Server, or API) that has access to the API servers. Although many instances of the service can be installed for the enterprise, only one instance of the service can point to one database. This comes in handy when a customer chooses to use one computer to host Regulatory services for multiple environments (QA, UAT, etc.).
-
CampusNexus
Select the API database and installed system for configuring components. The service can be installed on any tier (Front End, COM Server, or API) that has access to the API servers. Although many instances of the service can be installed for the enterprise, only one instance of the service can point to one database.
The identity specified to run the service must have db_owner permission to the specified Anthology Student database prior to installation. The service account requires access to the Anthology Student database to handle events and activities. Without this access, the service will fail to connect and exceptions will be logged in the log folder (...\C2000\Services\Nexus Event Notification Service <version>\logs\).
Messaging Options

In the Messaging Options window, enter appropriate data as defined in the table below.
— OR —
Click Default to use the default settings.
Messaging Options Fields Field Description Use Email (SMTP) server from Global Settings Select this check box if you want to use the Email (SMTP) server configured on the Global Settings screen. Clear the check box to use a different email server for the Messaging Service. Email (SMTP) Server By default Installation Manager uses the Email server from the on the Global Settings screen. Messages to pull per query Enter the number of message to pull per query. The default is 50. Note: To avoid performance impacts, do not specify more than 500 messages to pull per query.
Interval between queries (sec) Enter the number of seconds between query intervals to get the next batch of messages to process. The default is 50. Note: To avoid performance impacts, do not specify a query interval below 30 seconds.
Additional databases to processes messages for If you want to provide messaging service to additional databases, select the check box next to the name of the database. -
-
Click OK to save changes on the Options form. The form is closed.
-
Click
 to copy a line. Edit the copied line as needed.
 -
Click
 to delete a selected line.
 -
Click Test to ensure the setup for the corresponding line is correct. If a test on a particular line fails, check all associated fields and click Test again.
-
If all tests pass, click
 .
.