The Global Settings screen contains the Windows Admin user name password used when starting an installation of the legacy interface for Anthology Student. Users can also test this information without moving from the screen.
The Version Information displayed on this screen indicates the versions of Financial Aid Automation and Regulatory that are compatible with the Anthology Student version to be installed. Financial Aid Automation and Regulatory can be installed with Anthology Student (see Services) or added later.
Important: Information on all Installation Manager screens is not saved until you exit the screen by clicking ![]() or by clicking another component on the navigation menu.
or by clicking another component on the navigation menu.
Specify the Global Settings
-
In the Start screen of Installation Manager, click the Anthology Student tile. The Global Settings screen is displayed.

-
Complete the fields on the Global Settings tab as described in the table below.
General Tab Fields Field Description Windows Admin User Specify the user name of the user with administrator permissions on the computer where the COM, Windows, and Web Services will run. This account must have administrative access to all the machines being installed to. It must be a sysadmin on the database as integrated security is the only option that will be used. Depending on your network environment, specify one of the following: - User name
- Domain\User name
- Email address of Admin User
Windows Admin Password Specify the password for the Administrator user name. This password is used in the background for other installation steps. Note: The Application Pool for Security Token Service will use the Windows Admin credentials provided here.
Student Admin User Specify the user name of the Anthology Student user with administrator permissions. This is the Anthology Student administrator account that the Windows and Web Services use for Anthology Student access. Depending on your network environment, specify one of the following: - User name
- Domain\User name
- Email address of Admin User
Student Admin Password Specify the password for the Anthology Student Admin User. Destination Directory The default directory for the Anthology Student legacy interface and Server is C:\Program Files (x86)\CMC\C2000. You can override the default by choosing another path. Web Root The default web root for the APIs to be installed is C:\inetpub\wwwroot. You can override the default by choosing another path. Use HTTPS for all components This option is selected by default and cannot be cleared. All components must use HTTPS. Retain Config Settings Select the Retain Config Settings check box if you want to deploy the latest web.config file and also run a config merge that will merge any settings that were set outside of the install process. If Retain Config Setting is not selected, the install process will not retain and will not merge any configuration settings that were set outside of install process.
Notify Active Users Enable Notification Select this check box to enable notification of active Anthology Student users when an installation is about to begin. Minute Warning Specify the notification time, that is, the number of minutes until the installation starts. Message to display Enter the message to be displayed in the notification window. Version Information Install FAA Components This check box is selected by default. Clear the check box to skip the installation of FAA components if you have already installed a higher FAA version than the one listed in the Version Information field. Install Regulatory Components This check box is selected by default. Clear the check box to skip the installation of Regulatory components if you have already installed a higher Regulatory version than the one listed in the Version Information field. -
Click Test to ensure the user authentication settings are correct. A confirmation message is displayed.
-
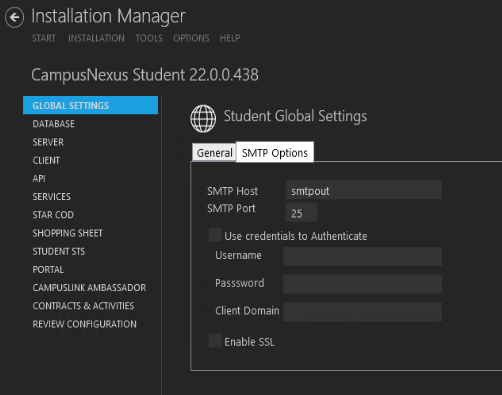
On the SMTP Options tab, provide the following information:
-
In the SMTP Host field, enter the domain address of the SMTP host used for sending out email notifications from Anthology Student, e.g., smtpout.campusmgmt.com.
Enter the Email (SMTP) Server address used for sending out email notifications by doing the following:
-
Determine the desired Email (SMTP) Server IP address and DNS names.
-
On the Exchange Server, an entry for an open relay on TCP Port 25 must be allowed and open to receive SMTP traffic from the MTS Server. This traffic must not be routed through a firewall. OSI Layer 7 firewalls can interfere with the service.
-
Ping the Email (SMTP) Server from the MTS Server and the SQL Server.
-
Telnet to the Email (SMTP) Server on Port 25 and verify successful connection from the MTS Server.
-
Enter the IP address in the SMTP Server field.
-
-
Specify the SMTP Port number or accept the default (25).
-
Select Use credentials to authenticate and enter the Username and Password of the sender's email account.
-
If applicable, select Enable SSL.
-
-
Click
 to continue.